Search by Support Category: General articles
Ultra HD began its life known as ‘4K’. The term 4K was officially adopted by the HDMI® organisation in 2009. In October 2012, the 4K working group of US-based organisation CEA renamed 4K to Ultra HD.
Regardless of its title, Ultra HD it is a video format offering four times the resolution of what is known as 1080p. Ultra HD has been also referred to as ‘4Kx2K’, ‘4K/2K’, and ‘Quad HD’. In simple terms, 1080p video (what is called ‘Full HD’) is actually like viewing a 2 megapixel photo. 4K, however, is the equivalent of viewing an 8 megapixel photo. 1080p = 1920 x 1080 pixels. 4K = 3840 x 2160 pixels (consumer version)
What are the requirements for viewing Ultra HD?
1. Displays:
Ultra HD is initially dominating the high-end purist projector format, where it is most beneficial to improving the viewing experience. Sony have already shipped their first 4K projector. As of November 2012, it is appearing in flat panel displays due to consumer demand and/or manufacturers value-adding.
2. Sources:
The Blu-ray disc format is compatible with Ultra HD content once enough layers to hold the data are incorporated into the disc. A new ‘Ultra HD capable’ BD player will be required, of course.
3. Content:
As of November 2012, the movie industry is gearing up for Ultra HD content. James Cameron’s Avatar 2 will be filmed in Ultra HD and other high profile directors are working with Ultra HD cameras now. Back catalogue film negatives are being transferred to Ultra HD digital masters.
4. Cables:
From a cabling point of view, Ultra HD video will actually be the first true technical/performance challenge to many long length HDMI cables which claim to be High Speed.
HDMI 2.0 was unveiled to the world at IFA Berlin in September. Following this, Aussie company Kordz, stocked in the UK by HD Connectivity, became the first approved HDMI 2.0 Adopter in the world, outside of the HDMI Forum, and is the only HDMI 2.0 Adopter in Australia. Founder David Meyer lifts the lid on the key features, inner workings and potential pitfalls of this new specification.
Each time a new version of HDMI is announced, there follows a buzz of new features and formats, but also a groan from the custom installation community as to what the implications may be. HDMI 2.0 paves the way for some fantastic new video and audio capabilities, but no need to panic – the changes may not run as deep as you might think. Ultimately HDMI 2.0 will settle into a place of normality, as has happened with every iteration before it.
So what does HDMI 2.0 offer, how is it different, and what are the headline features that you need to know about? Let’s take a look.
Development of HDMI 2.0
HDMI 2.0 is the first major HDMI specification release since version 1.4 back in 2009, so it’s fair to say a lot has changed, and it needs to. There are now two HDMI organisations;
- HDMI Licensing, LLC, with its seven founder companies. Developers and managers of the HDMI 1.x generations, and now also appointed licensing, marketing and compliance managers of HDMI 2.0,
- HDMI Forum, Inc., a non-profit corporation founded in 2011, with more than 80 member companies for broader market development of future versions of HDMI,
An important point to note is that HDMI 1.4b remains as an ongoing specification, with HDMI 2.0 running concurrently with its subset of additional optional features and enhancements. Existing HDMI Adopters do not automatically get an upgrade; they must sign an addendum and be accepted before they can become adopters of HDMI 2.0.
Key Features of HDMI 2.0
Here’s a summary of some of the key new features of HDMI 2.0;
Video
- 2160p/60 (4K) 8-bit 4:2:0 in the existing 9Gbps data rate (previously 30fps limited),
- 2160p/60 (4K) 10 or 12-bit 4:2:2 colour at a new higher speed of 18Gbps,
- Anamorphic video modes for 2.37:1 picture,
- New ‘Dual View’ video mode for two simultaneous full screen 1080p images (on 3D backbone),
Audio
- Up to 32 channels of One Bit audio to 192kHz, and up to 1536kHz sampling in 2-channel mode,
- New 10.2, 22.2 and 30.2 channel modes for ‘3D Audio’ speaker placement,
- Up to 4 simultaneous audio streams to accompany Dual View video or multi-language,
Other
- New 2.0 clock mode, EQs and data scrambling for transmission robustness,
- New improved CEC 2.0, HDCP 2.2 support, and expanded applications for DDC.
In this article we’ll focus on 2160p, touching on anamorphic, but coming back to explore audio some other day.
Emerging Trends – 4K TV Firmware upgrade to “HDMI 2.0”
The first key new feature of HDMI 2.0 out of the gate is the upgrade of 2160p (4K) to 60 frames per second within the existing defined HDMI bandwidth, where previously it was limited (under HDMI 1.4) to 30fps. Both Sony and Panasonic have recently announced firmware updates for their existing 4K TVs to enable this feature, indicating that there is no new hardware (aka ‘speed’) required. As an aside, they tend to tout this upgrade as “HDMI 2.0”, but that’s a non-compliant practice as it’s actually just one of a multitude of new features of HDMI 2.0 that they’re talking about. What they really mean is that the firmware just adds newly defined support 2160p/60, 8-bit 4:2:0… assuming the existence of content.
So how is it possible to double the frame rate without doubling the bandwidth? The answer lies in the ‘…8-bit 4:2:0’ reference; save on colour data, give back in frame rate.
Chroma subsampling and pixel data packing
Chroma subsampling is a process of compressing, or rather stripping out colour data to reduce file size &/or video transmission bandwidth load. The premise is that the human eye is far less sensitive to colour than in is to brightness and grayscale, by a factor of 20, in fact. As such, the amount of colour information in video can potentially be reduced without us really noticing… or that’s the plan.
The trick is to leave the resolution and gray scale untouched, which is why it’s only applicable to Component video (YCbCr) signalling, where the separate luminance (Y) channel can be left intact. The most common chroma subsampling methodologies are 4:2:2 with half colour data when compared to 4:4:4 original, and then there’s 4:2:0 (as used with DVD & Blu-ray) with just one quarter of the original colour data.
The sampling commonly occurs over a 2×2 pixel array, where each pixel comprises a Luminance channel (Y) and two Chrominance channels (Cb & Cr). Fig.1 below shows a simplified depiction of the uncompressed array before any subsampling, called 4:4:4. Fig.2 shows how HDMI 1.4 (and prior) handles YCbCr, where everything from 8-bit 4:2:0 to 12-bit 4:2:2 produces precisely the same bandwidth at a constant 96 bits per array (same as 8-bit 4:4:4). Fig.3 depicts 4:2:0 as it really should be, being how HDMI 2.0 handles it; with 8 bits of ‘Y’ per pixel, and just one of each 8-bit colour component Cb & Cr across the whole 2×2 array.
What they’ve done with HDMI 2.0 is recognise that 8-bit 4:2:0 natively nets 48 bits per sample array, and they’ve actually passed on the savings. That is, they halve the bandwidth, which enables them to then double it again with frame rate. Voila, 30fps goes to 60fps in the same bandwidth as before. Note this is ONLY applicable to 8-bit 4:2:0. This is not where HDMI 2.0 stops – there’s even better formats on the horizon.
HDMI 2.0 Need for speed
There are several formats of 2160p (4K) that are included in the HDMI 1.4 specification, all of which run at 8.91Gbps, the specification then capping out at 10.2Gbps. HDMI 2.0 introduces some more at this legacy level, and several superior combinations at double this rate, being 17.82Gbps (rounded to 18Gbps, 6Gbps/ch). This is well beyond the limits of HDMI 1.4, and defines the top end of HDMI 2.0. The range above 10.2Gbps is referred to as “HDMI 2.0 mode”, whereby the TMDS Clock is slowed to 1/40th of the data rate to counter the effects of EMI at such high speeds. Other techniques like data scrambling are also employed to improve stability.
HDMI 2.0 Cables
Right off the bat – THERE IS NO SUCH THING! If anyone offers you so-called “HDMI 2.0 cables”, turn and run. It will be either a marketing tactic, or expression of ignorance. Either way it’s non-compliant. When the HDMI 2.0 specification was first announced, it was accompanied by this statement;
“..Current High Speed cables (category 2 cables) are capable of carrying the increased bandwidth.”
– HDMI Licensing, LLC, Press Release, 4 Sep 2013
http://www.hdmi.org/press/press_release.aspx?prid=133
There is no new speed, no new cable. Does it make sense that a cable rated to 10.2Gbps can then carry up to 18Gbps? Logically no, but they have some tricks up their sleeve. 2.0 introduces a parametric-like new sink EQ system which supposed to make a 10.2Gbps tested cable perform up to 18Gbps. It can’t however fully compensate for the collapsing effect of cable length, and will be expected to cap out at around 3m with a decent cable. Beyond that, it’s all bets off and there is no new cable spec, speed or directive. My prediction – HDMI cables will have to turn active, as some already have.
2.37:1 Cinemascope
Another fantastic feature of HDM I 2.0 is the ability for it to support different pixel aspect ratios, namely 4:3 (nothing to do with 4:3 TV, by the way). Eg; a 1080p image is comprised of 1,920 pixels wide and 1,080 pixels high. Every pixel is square, so content is fed to each pixel in 1:1 ratio. The array of 1:1 pixels then determines overall image aspect ratio, being 1.78:1, or 16:9.
What HDMI 2.0 has introduced is the ability for content to be formatted using 4:3 pixel ratio. Every pixel in a supporting display could potentially be fed 4:3 anamorphic content, even though the pixel is still 1:1 square. In practice, a projector with a matching anamorphic lens will horizontally stretch the image by 1/3 (4:3). The result is 2.37:1 picture aspect ratio (1.78/3)x4 = 2.37.
No more encoded black bars. It means we can look forward to maximising image resolution for cinemascope 2.37:1 in a standardised format.
Summary
HDMI 2.0 brings many benefits and some exciting new features, paving the way for a level of AV immersion the likes of which we’ve never seen. Yes it means new hardware, but that points to opportunity for the custom AV dealer/installer. HDMI speeds are ever increasing, and that means more demand on quality infrastructure to ensure everything works as planned.
Imagine a premium 2160p/60 2.37:1 aspect home cinema projection system with brilliant 12-bit 4:2:2 colour and 10.2 audio system. How about dual-view gaming with 2 players each experiencing their own full screen 1080p image on the same TV, with separate audio tracks being fed to their headphones? Or to really make your head spin, imagine an IMAX Private Theater ™ with 30.2 channel 3D digital sound. Phwoah!
Using multichannel 5.1 / 7.1 amps AVR with matrix systems
Essential Knowledge
To understand how multichannel (5.1 / 7.1 etc) audio/sound is routed via a HDMI or HDBaseT matrix system, it is important to firstly acknowledge that all HDMI source devices (Blu-ray players, set-top-boxes, media servers, PCs etc) can only output a single audio format type at any one time. This is a limitation of HDMI itself.
For example, the HDMI port on a Blu-Ray player cannot simultaneously output HDMI with 2.0ch stereo as well as HDMI with 7.1 DTS Master audio. It is always one or the other.
With only displays connected to the matrix
When a matrix has only displays connected, with no AMPS/AVR in your set up, routing audio is relatively easy. This is because displays generally only have two speakers, and so a single HDMI format of HDMI+2.0ch can be routed to all displays. This gives you video and audio at every display.
Adding an AVR/AMP the matrix
When adding an AMP/AVR to the connected device mix, you are adding a component that can accept a multichannel audio format, such as 5.1 or 7.1.
You now have a situation whereby some connected devices (displays) can only accept HDMI with 2.0ch stereo and some (the AVR/Amp) can accept HDMI with multichannel audio.
What to expect in a mixed display / AVR setup
Video matrixes operate on a “lowest common denominator” rule. This means that the matrix will exchange information with your displays and AVRs to decide on the format of audio to get from the source device; choosing the format that will ensure audio is output in all of your locations.
One of two things can happen: If the AVR is turned on first and the matrix set to send a source capable of multi-channel audio to the AVR, the source will deliver multi-channel audio to the AVR. If a stereo TV is then turned on and the matrix then set to send the same source going to the AVR to the TV, the TV will be unable to play back the multi-channel audio. The result would be no sound from the TV.
In the reverse, if a TV is turned on first and the matrix is set to send one of the connected sources, the source will deliver stereo audio to the TV via the matrix. If the AVR is then switched on and the matrix set to deliver the same source going to the TV, the AVR will only receive stereo audio.
It is important to re-iterate, this is not a product limitation of HDanywhere matrixes. This is a limitation of HDMI technology itself and its specification.
A solution is therefore required whereby the source device always sends multichannel audio to the AMP/AVR and 2.0ch stereo audio to the displays.
Solution options
There are many ways to solve this problem. Some complicated, some easier. Things will depend on the location of your equipment and the number of AVRs. We are always happy to help you build a specific solution that meets your setup. Here we can only cover some of the more common setup examples and a single solution to those.
I have a single AVR located beside / local to my source devices and the matrix e.g. in a cupboard / AV rack.
In this type of setup, where the AVR for the multi-channel room is located with the sources and matrix itself, one solution is to deliver the audio to your AVR via alternative connectors to the HDMI where possible. For example, Sky HD boxes and Blu-Ray players usually have a digital audio output that can be connected to the AVR** via optical cabling. This can deliver multi-channel audio to the AVR over the optical cable, whilst the HDMI output from the source device can deliver 2.0 ch stereo audio to your matrix and therefore your other TV (stereo) locations in your setup. If this setup is located away from the room with multi-channel speakers fitted, say an under-stairs cupboard, there are solutions to keep IR control of your AVR that we can help with.

AVRs located in the room with the displays
In this type of setup, where AVR(s) are located in the rooms local to the displays, make sure the HDMI device is set to output 5.1 / 7.1 channel audio. This audio format will be sent over the Cat cable to each display location. In order to get audio out of your HDTVs (in say three rooms) and the AVR (connected to HDTV in a fourth room), some additional hardware is needed. HDanywhere sell a signal manager. Place 1 x signal manager at each TV that needs 2.0 channel audio aka. each TV that does not have an AVR. Use a HDMI cable to connect the HDMI output port of the matrix’s display receiver to the HDMI input port of the Signal manager. Then use another HDMI cable to connect the HDMI output port of the Signal Manager to the HDMI port on the HDTV. So, the Signal Manager sits in between the display receiver and the HDTV.
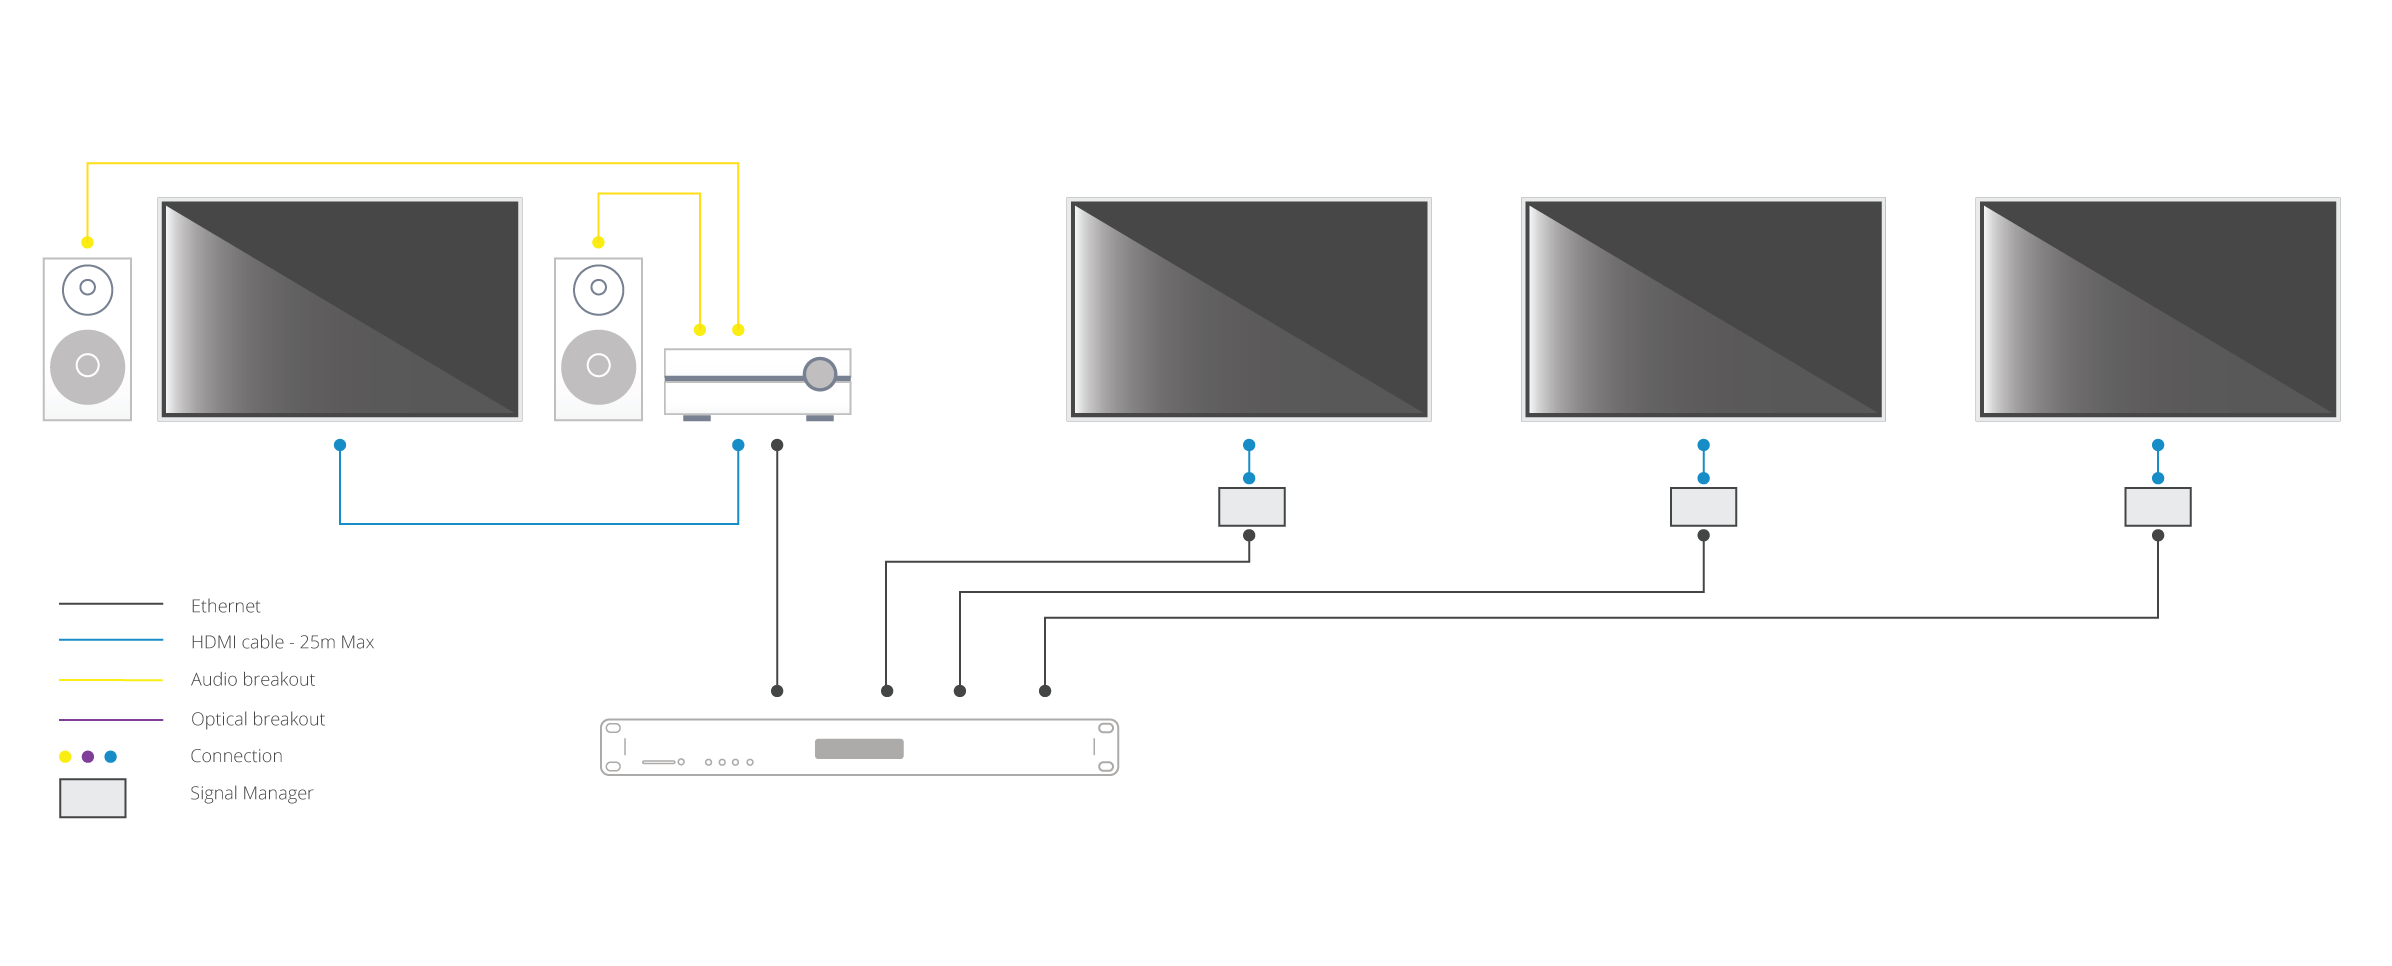
The Signal Manager has a box labelled “Audio”. The little switch on this audio section needs toggled to number 2: LPCM 2.0 before you connect up and turn on all your HDMI source devices and displays. Do not switch toggle the switch from no. 1 to no. 2 whilst displays and HDMI sourced devices are on. If you do so, you will need to power down the re-power all source devices and displays.
Once the signal manager is set up and in place it will take 5.1 and output it as 2.0, ready to be accepted and then output by the HDTV. This should hopefully resolve your issue and deliver 5.1 to your AVR and 2.0 to your HDTV.
Notes:
*Multichannel audio via HDMI includes the following formats: LPCM, Dolby Digital, DTS, DVD-Audio, Super Audio CD, Dolby Digital Plus, Dolby TrueHD,DTS-HD High Resolution Audio, DTS-HD Master Audio, MPCM, DSD, DST
**When using alternative audio connectors other than HDMI, support for DTS-HD Master Audio and Dolby True HD is lost.

-
HDCP indictor light – shows whether a handshake between that display and source has been authenticated
-
Link indicator light – confirms the TV receiver is connected to the hub
-
Mode indicator light – if flashing all is correct
-
Power indicator light – Lit when the TV receiver is on
Finding the IR window on your source device can be difficult if it isn’t mentioned in your user manual or is marked clearly on the front of your device. A very common device is Sky+HD and Virgin’s Tivo boxes. Below, we’ve marked where the IR windows are on these devices for easy installation.
THOMSON model DSI8215

PACE model TDS850NB

Amstrad model DRX895

Sky multiroom box

Sky HD Terabyte box

Can’t find the source device that you we’re looking for? Please email us with a request and we will make it available online the next working day.
Still having problems with your IR setup?
Please check our HDanywhere IR wiring setup diagrams or have a look at our IR troubleshooting video
Important:
In most cases, if you are experiencing green screen on your display then this is often down to the HDMI cable in between. A quick way to test to see if this is the case is to replace your existing HDMI cable with our range of 4K or 8K HDMI cables. If that doesn’t work, move your HDMI source to another display in your property (use a different HDMI cable), connect it up and observe to see if the same behaviour follows the box. This will help you determine if the issue is the cable or the HDMI source.
The article below describes how to troubleshoot a green screen when using a HDANYWHERE product, if you are having green screen issues and you do not own a HDA product then we recommend you buy our 4K or 8K HDMI cables and give that a go first – they come with free shipping!
Symptom:
There is no picture or maybe a green screen following standby or when switching between source devices via a matrix. Most often this problem occurs once the TV goes to standby, and when brought out of standby to an ‘on’ state, it will not handshake properly and green screen instead of video appears.
Green screen flashes generally indicate a HDCP (Digital Content Protection) handshaking issue, or a HDMI hot plug detect issue between that particular source device and display.
Sky HD and Sky+HD boxes freezing, locking up, powering themselves off etc are not uncommon. A quick google search will reveal just how many people suffer from this occurrence.
Their connection to other devices is in most cases not the cause of the Sky box fault.
In order to resolve this issue, HD Connectivity’s experience is that a full Sky system reset is the best medicine. Instructions on how to do this can be found here: Sky box full system reset
Routing 3D Blu-ray (BR) via a multiroom+ system can be a challenge and in some cases, due to an incompatible mix of displays, will not be possible. Whether or not 3D Blu-ray formats can be routed via a multiroom+ system greatly depends on the mix of HDTVs, their capabilities and the 3D BR source itself.

Troubleshooting Approach
When attempting to troubleshoot any issue, we need to isolate where the root cause of the fault could lie by a logical process of elimination.
At the start of a troubleshooting process, never rule out anything as not a potential cause of the problem. Every aspect of the installation should be considered as a potential suspect. Each component of the installation should be ruled out one-by-one and only then eliminated from the troubleshooting process as the potential problem.
NB: Both dongles have ‘RX’ moulded into the casing.
When using the IR over HDMI function, ensure that the switch is pushed across to ‘IR’ and not ‘CEC’.
Connect the dongles into the source device’s HDMI output port and the display device’s HDMI input port, initially without the HDMI cable connected.
Connect the IR cables. Connect the IR TX cable to the dongle that’s connected to the source device and connect the IR RX cable to the dongle connected at the display.
In order to use your source device remote(s) at the TV location, ensure that the IR RX cable receiver eye is fully inserted into the 3.5mm jack port on the dongle and the IR RX cable magic eye is positioned in sight of where you would usually like to point the remote control(s).
Connect the IR TX emitter cable to the 3.5mm jack port on the source device dongle and position the IR emitter in sight of the IR receiving window on that connected source device.
TIP: tape the TX cable flat to a piece of card sat under the source device pointing at the IR window
When using the IR over HDMI kit is set-ups involving splitters/switches/matrices, remember that the IR dongle has to be connected at either ends of a single HDMI cable run. So the dongle will be connected to the HDMI output port of the splitter/switch/matrix and not the HDMI output of the source device. To control the desired source device(s) – ensure that the IR TX emitter cable is positioned in sight of the IR receiving window on that connected source device.
The exact position of the IR window can vary between makes and models of source. Generally it is on the left hand side about 2 inches from the middle of the box. Often it can be a bit of trial and error to locate the optimum IR emitter placement position. Once found I would advice taping/fixing the emitter in place.
A final tip is to ensure that the batteries in your remote control are at full strength. (It’s amazing how a fresh set of batteries can resolve weak IR issues).
If you have all this in place and are still experiencing issues, please contact Customer Services
If you have been advised to ‘hard reset’ your HDanywhere device back to it’s factory condition, please perform the following.
A hard reset will clear any corrupted DDC, EDID or HDCP data on the device’s NVRAM memory and re-initiate the handshaking process with all the connected devices.
Firstly we need to ensure that any manufacturer HDMI CEC link protocols are switched to “off”.
Trade names for CEC are Anynet+ (Samsung); Aquos Link (Sharp); BRAVIA Link and BRAVIA Sync (Sony); HDMI-CEC (Hitachi); E-link (AOC); Kuro Link (Pioneer); CE-Link and Regza Link (Toshiba); RIHD (Remote Interactive over HDMI) (Onkyo); RuncoLink (Runco International); SimpLink (LG); HDAVI Control, EZ-Sync, VIERA Link (Panasonic); EasyLink (Philips); and NetCommand for HDMI (Mitsubishi)
To perform the hard reset:
Power down every device in the set-up – that’s all sources, all displays and the device itself. Leave off at the mains for 10 to 15 minutes.
Now switch all connected display devices on and select the HDMI channel on those displays.
Power the device back on at the mains.
Now one by one, power on the source devices, starting with input 1, input 2 and so on. If you are using a cable/satellite receiver such as Virgin or Sky+HD, please ensure that this is connected to input 1, not input 2. Please note that Sky HD boxes take around two minutes to fully reboot.
After a few seconds everything should have synced and shaken hands correctly and normal operation should resume.
If the problem still persists, Contact Customer Services. for further troubleshooting advice.
Due to the way that HDMI handshaking negotiations take place between source and displays or AVR devices, the display (unless it can accept multi-channel audio and has a setting for such) will communicate with the source to only output 2.0 channel stereo. This is due to the fact that in most cases an HDTV only has 2 speakers.
When using a HDMI splitter or distribution amp (DA) effectively you have 2 display devices competing for the source to send them the audio signal format type that they prefer. The technical rules of HDMI dictate that the lowest common denominator always wins that battle. The logic being that this rule should result in the maximum number of display devices functioning in some way. (i.e. a 7.1 capable device should still be able to output 2.0 channel stereo also, meaning both displays have picture + sound)
Unfortunately, what you and a lot of people really want from HDMI is for a mix of audio formats to be delivered from one source, which is just not possible currently.
Some splitters including ours can be pre-loaded with firmware where the highest denominator formats win the battle, but of course that would leave your 2.0 capable HDTV without sound.
In order to route 3D content easily via a matrix switch or splitter, ALL connected displays need to be 3D compatible. Even, if just one of the displays is not 3D compatible, the 3D source player will NOT output the 3D content. The HDMI handshaking process will trigger the source player to drop it’s resolution output so that all displays can show content.
The problem is HDMI is designed such that the source ‘polls’ the EDID data (EDID is a display’s identity card stating what it’s capabilities are, a bit like a top trumps card) from all connected Sink devices (your 3D enabled display and non-3D enabled AVR) and outputs the lowest quality video signal all devices support (2D in your case).
To ensure 3D IS routed via the Matrix Switch or Splitter, the non-3D compatible display device must not be ‘active’. Sometimes turning the display into standby will be sufficient and sometimes full power off is required.
Essentially, the 3D source player must not be able to ‘see’ a 2D only display connected to the Matrix Switch or Splitter.
For best results when using 3D Blu-ray – HD Connectivity recommends… not actually connecting your 3D Blu-ray (BR) player to the Matrix. As Blu-ray 3D content is generally only viewed at a single ‘main’ TV location, in this instance it is better to have a direct connection between source and display, bypassing the Matrix completely. This will avoid any potential for ‘black screen’ situations at the other TV locations. It will also ensure that absolutely the best 3D format is selected for use on that display, not a potentially reduced quality 3D format that a lower 3D-capable display, connected to the matrix can influence the 3D BR to output. (Plus wearing those massive 3D glasses all around your house is really not cool and could result in you bumping into doorframes! – Ed)
No video/audio being outputted
First troubleshooting question is: Are you using the converter with the source device’s HDMI video output set to 1080i, not 1080p?
The digital to analogue processor (DAC) cannot accomodate a 1080p input signal. The component converter is 1080i pass-through conversion to component video device – it cannot actively reconfigure a 1080p input signal to 1080i.
This is stated on the website, but some people miss it. “The HDMI to Component Converter is a Digital to Analogue (DAC) conversion device that will take a HDMI source input (up to 1080i) and output the video signal as RGB component (YPbPr).”
Finally, always power on the system in the following order from an ‘off at the wall’ starting point.
- TV
- Converter
- Source