Search by Support Category: Help with IR (infra-red) control
Some devices no longer have built in IR receivers. To enable them to be used with the uControl app you can add a third party device called FLIRC. This connects to a source device via USB and turns IR codes into control commands the source device recognises.
There are two Flirc devices that we are compatible with, the first part of this guide is for the older model which can be found here. The second part of this guide is for the Flirc device that is specifically for the Amazon Fire TV and can be found here.
Regular Flirc
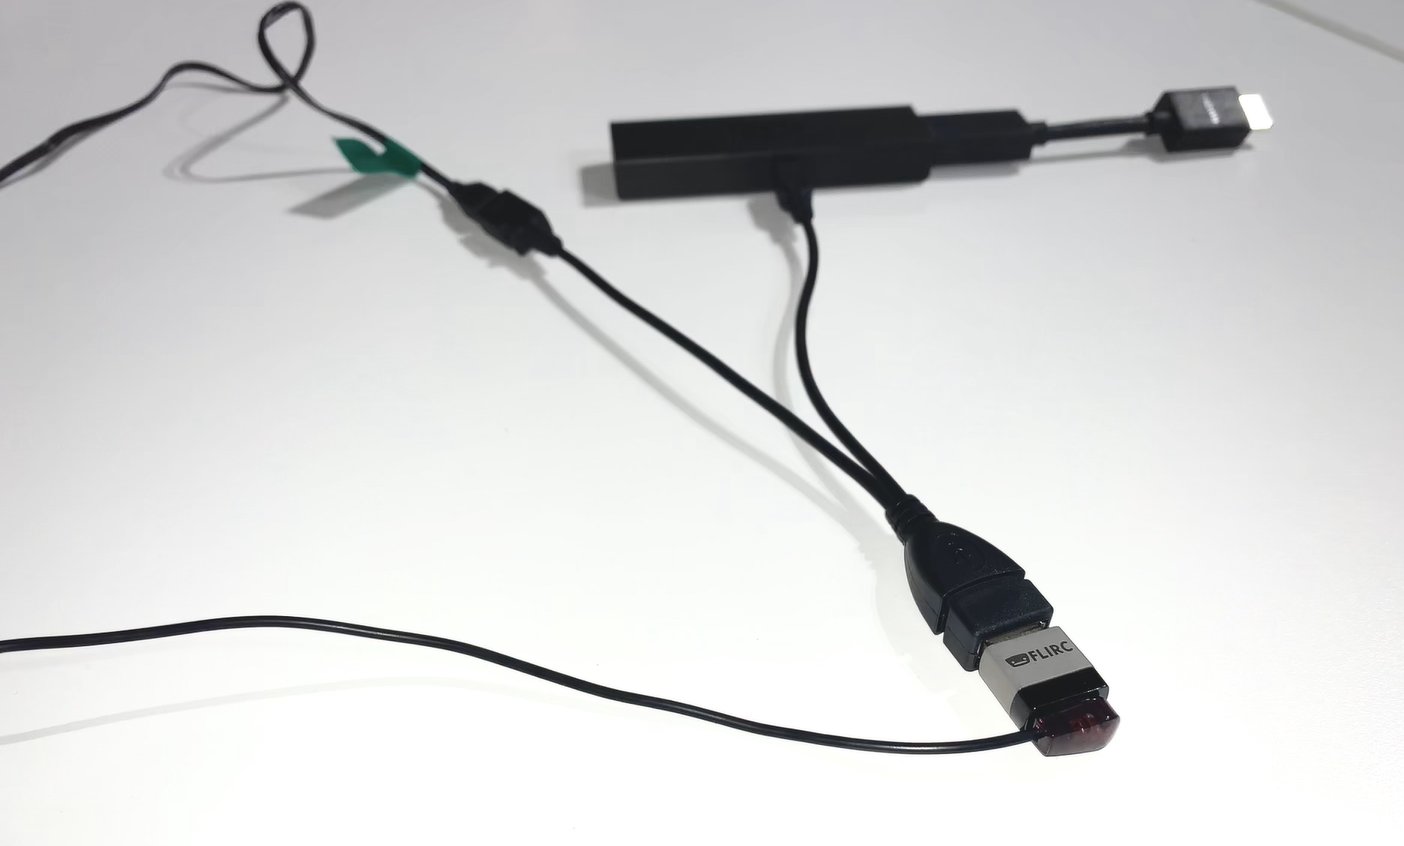
If you are using the older model of Flirc you will need an OTG cable like this -

Install the Flirc software on your computer and install this profile onto your laptop/PC – Fire TV
Load up the Flirc software and in the top left click File, and then Load Configuration and choose the Fire TV profile you have just downloaded.
Remove your Flirc from the laptop/PC and connect it to the female USB port on the OTG cable. Then taking the male micro USB section of the cable plug it into the Firestick. Lastly plug your power into the female micro USB port.
Next place the IR transmitter from you HDANYWHERE device on or near to the Flirc. You may need to move it around to test which positioning works best, but we recommend taping it to the top of the Flirc.
Once this is done you can install the FireTV(FLIRC) IR pack and control your Amazon device with uControl.
Amazon Fire TV Flirc
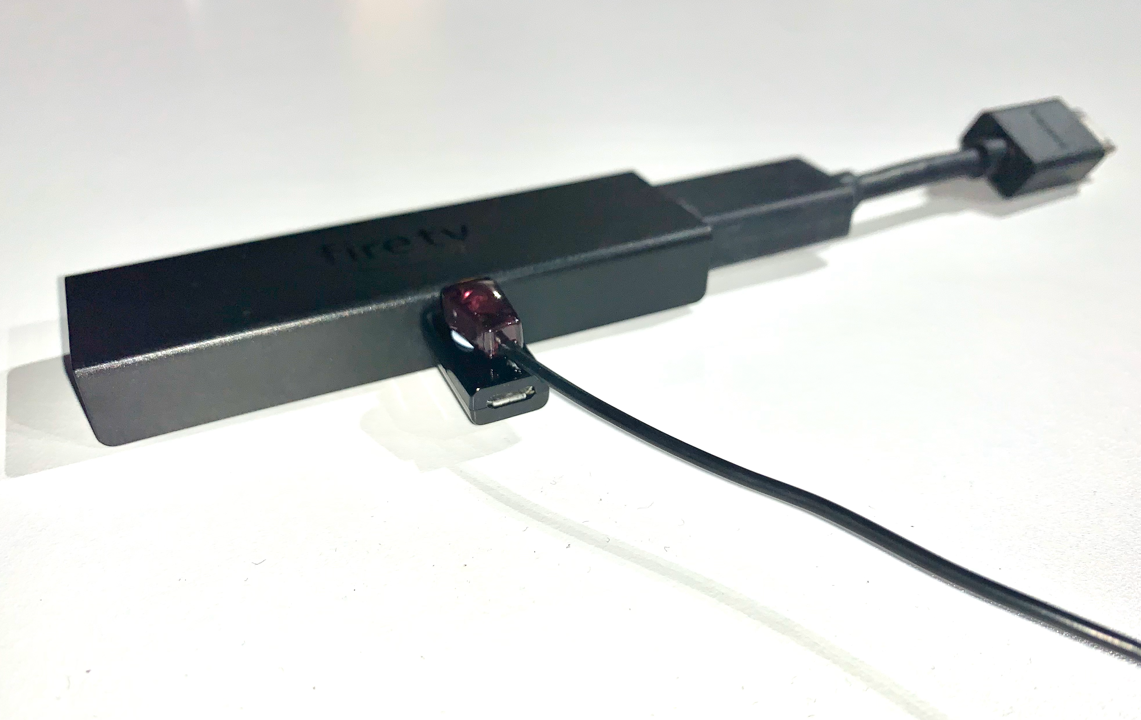
If you are using the Fire TV specific Flirc you will not need the OTG cable, but will need to install the Flirc software on your computer and install this profile onto your laptop/PC – Fire TV
Load up the Flirc software and in the top left click File, and then Load Configuration and choose the Fire TV profile you have just downloaded.
Remove the Flirc from your laptop/PC and connect the power lead to the micro female USB port on the Flirc. Plug the other side of the Flirc (male USB) into the side of the Firestick, and then plug the Firestick into your desired input.
Lastly place the IR transmitter from you HDANYWHERE device on or near to the Flirc. You may need to move it around to test which positioning works best, but we recommend taping it to the side, adjacent to the Flirc.
Once this is done you can install the FireTV(FLIRC) IR pack and control your Amazon device with uControl.
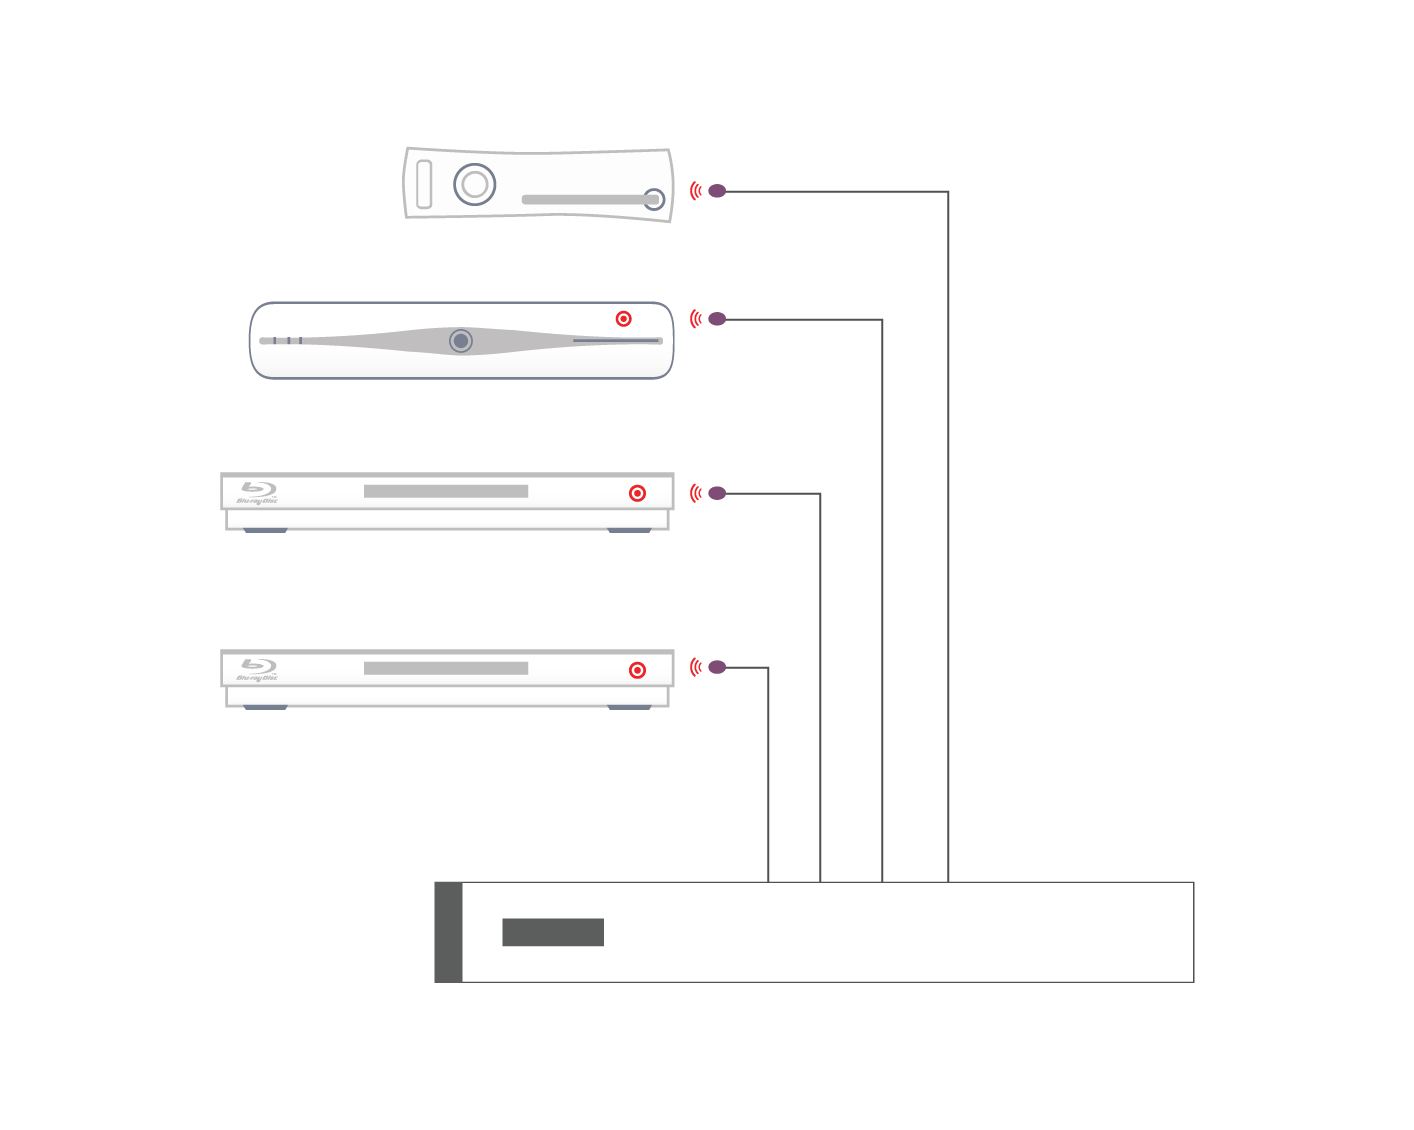
Daisy chaining IR can allow you to connect the IR systems of 2 devices. This allows IR to pass from one device to another
This does not work for HDMI Mirrored ports.
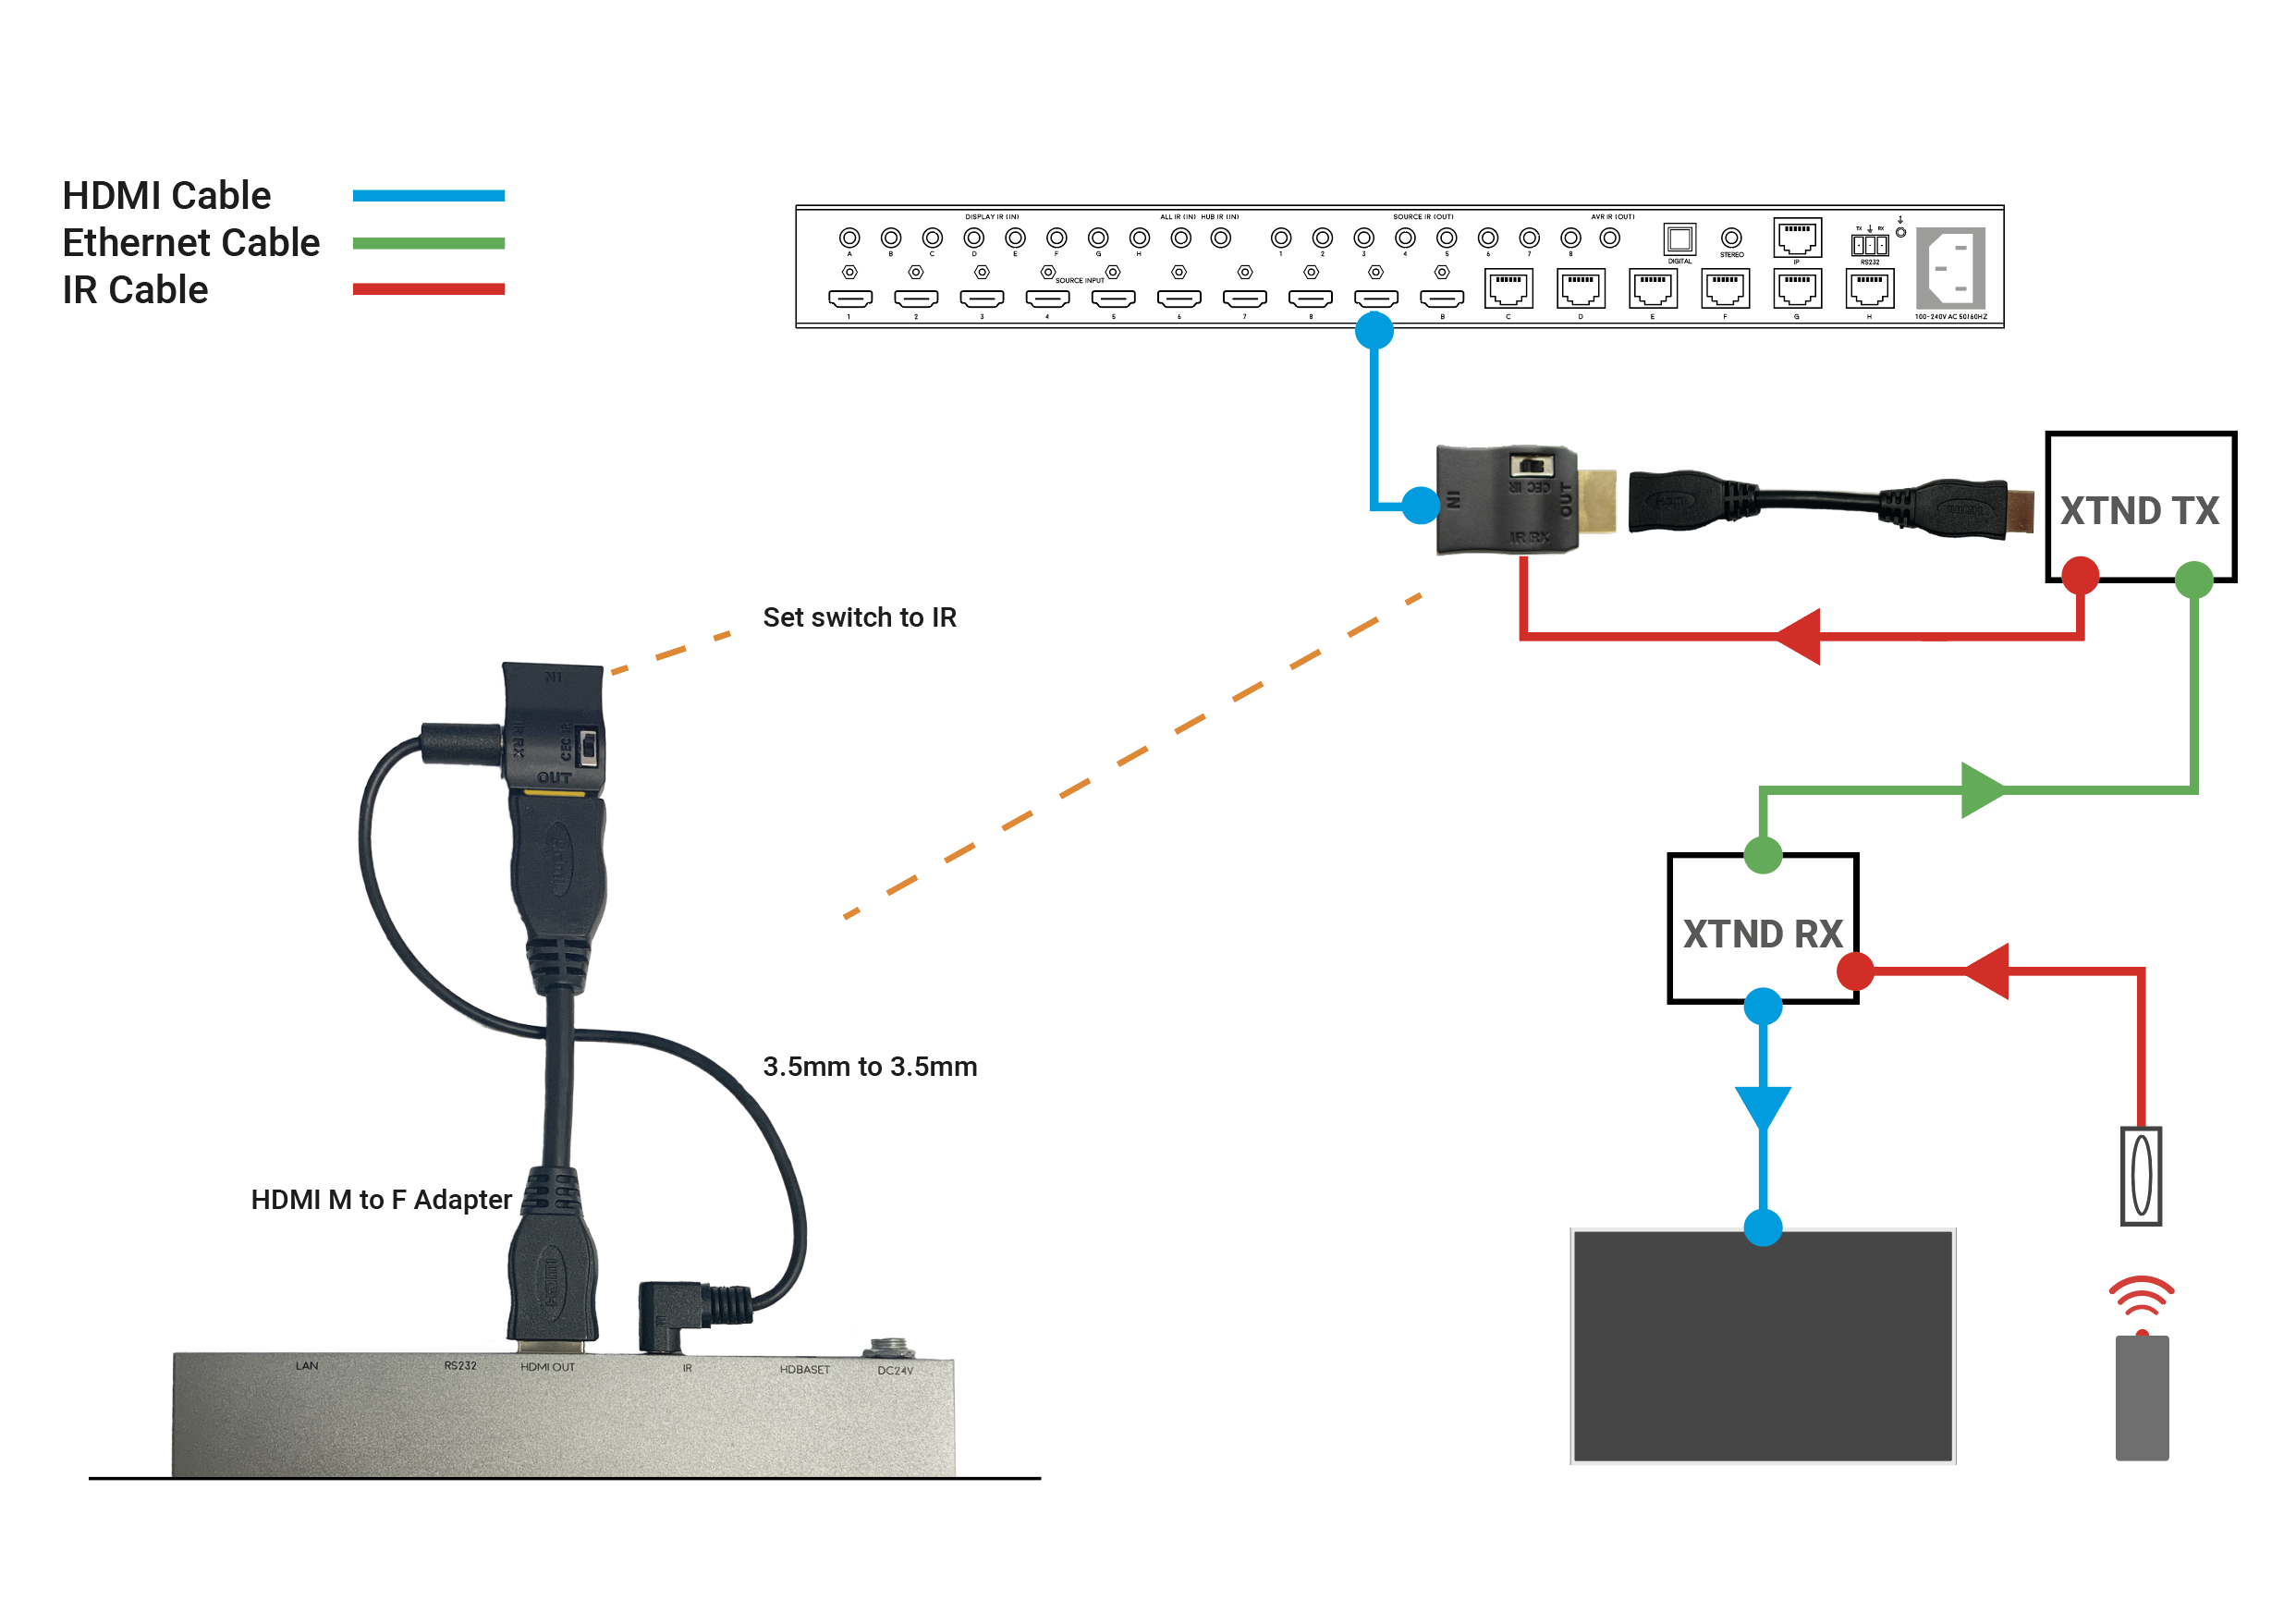
a) The diagram below shows how you can link two HDA devices, such as an MHUBU86240 and an XTND4K40TPC using a MHUB + XTND Integration Kit
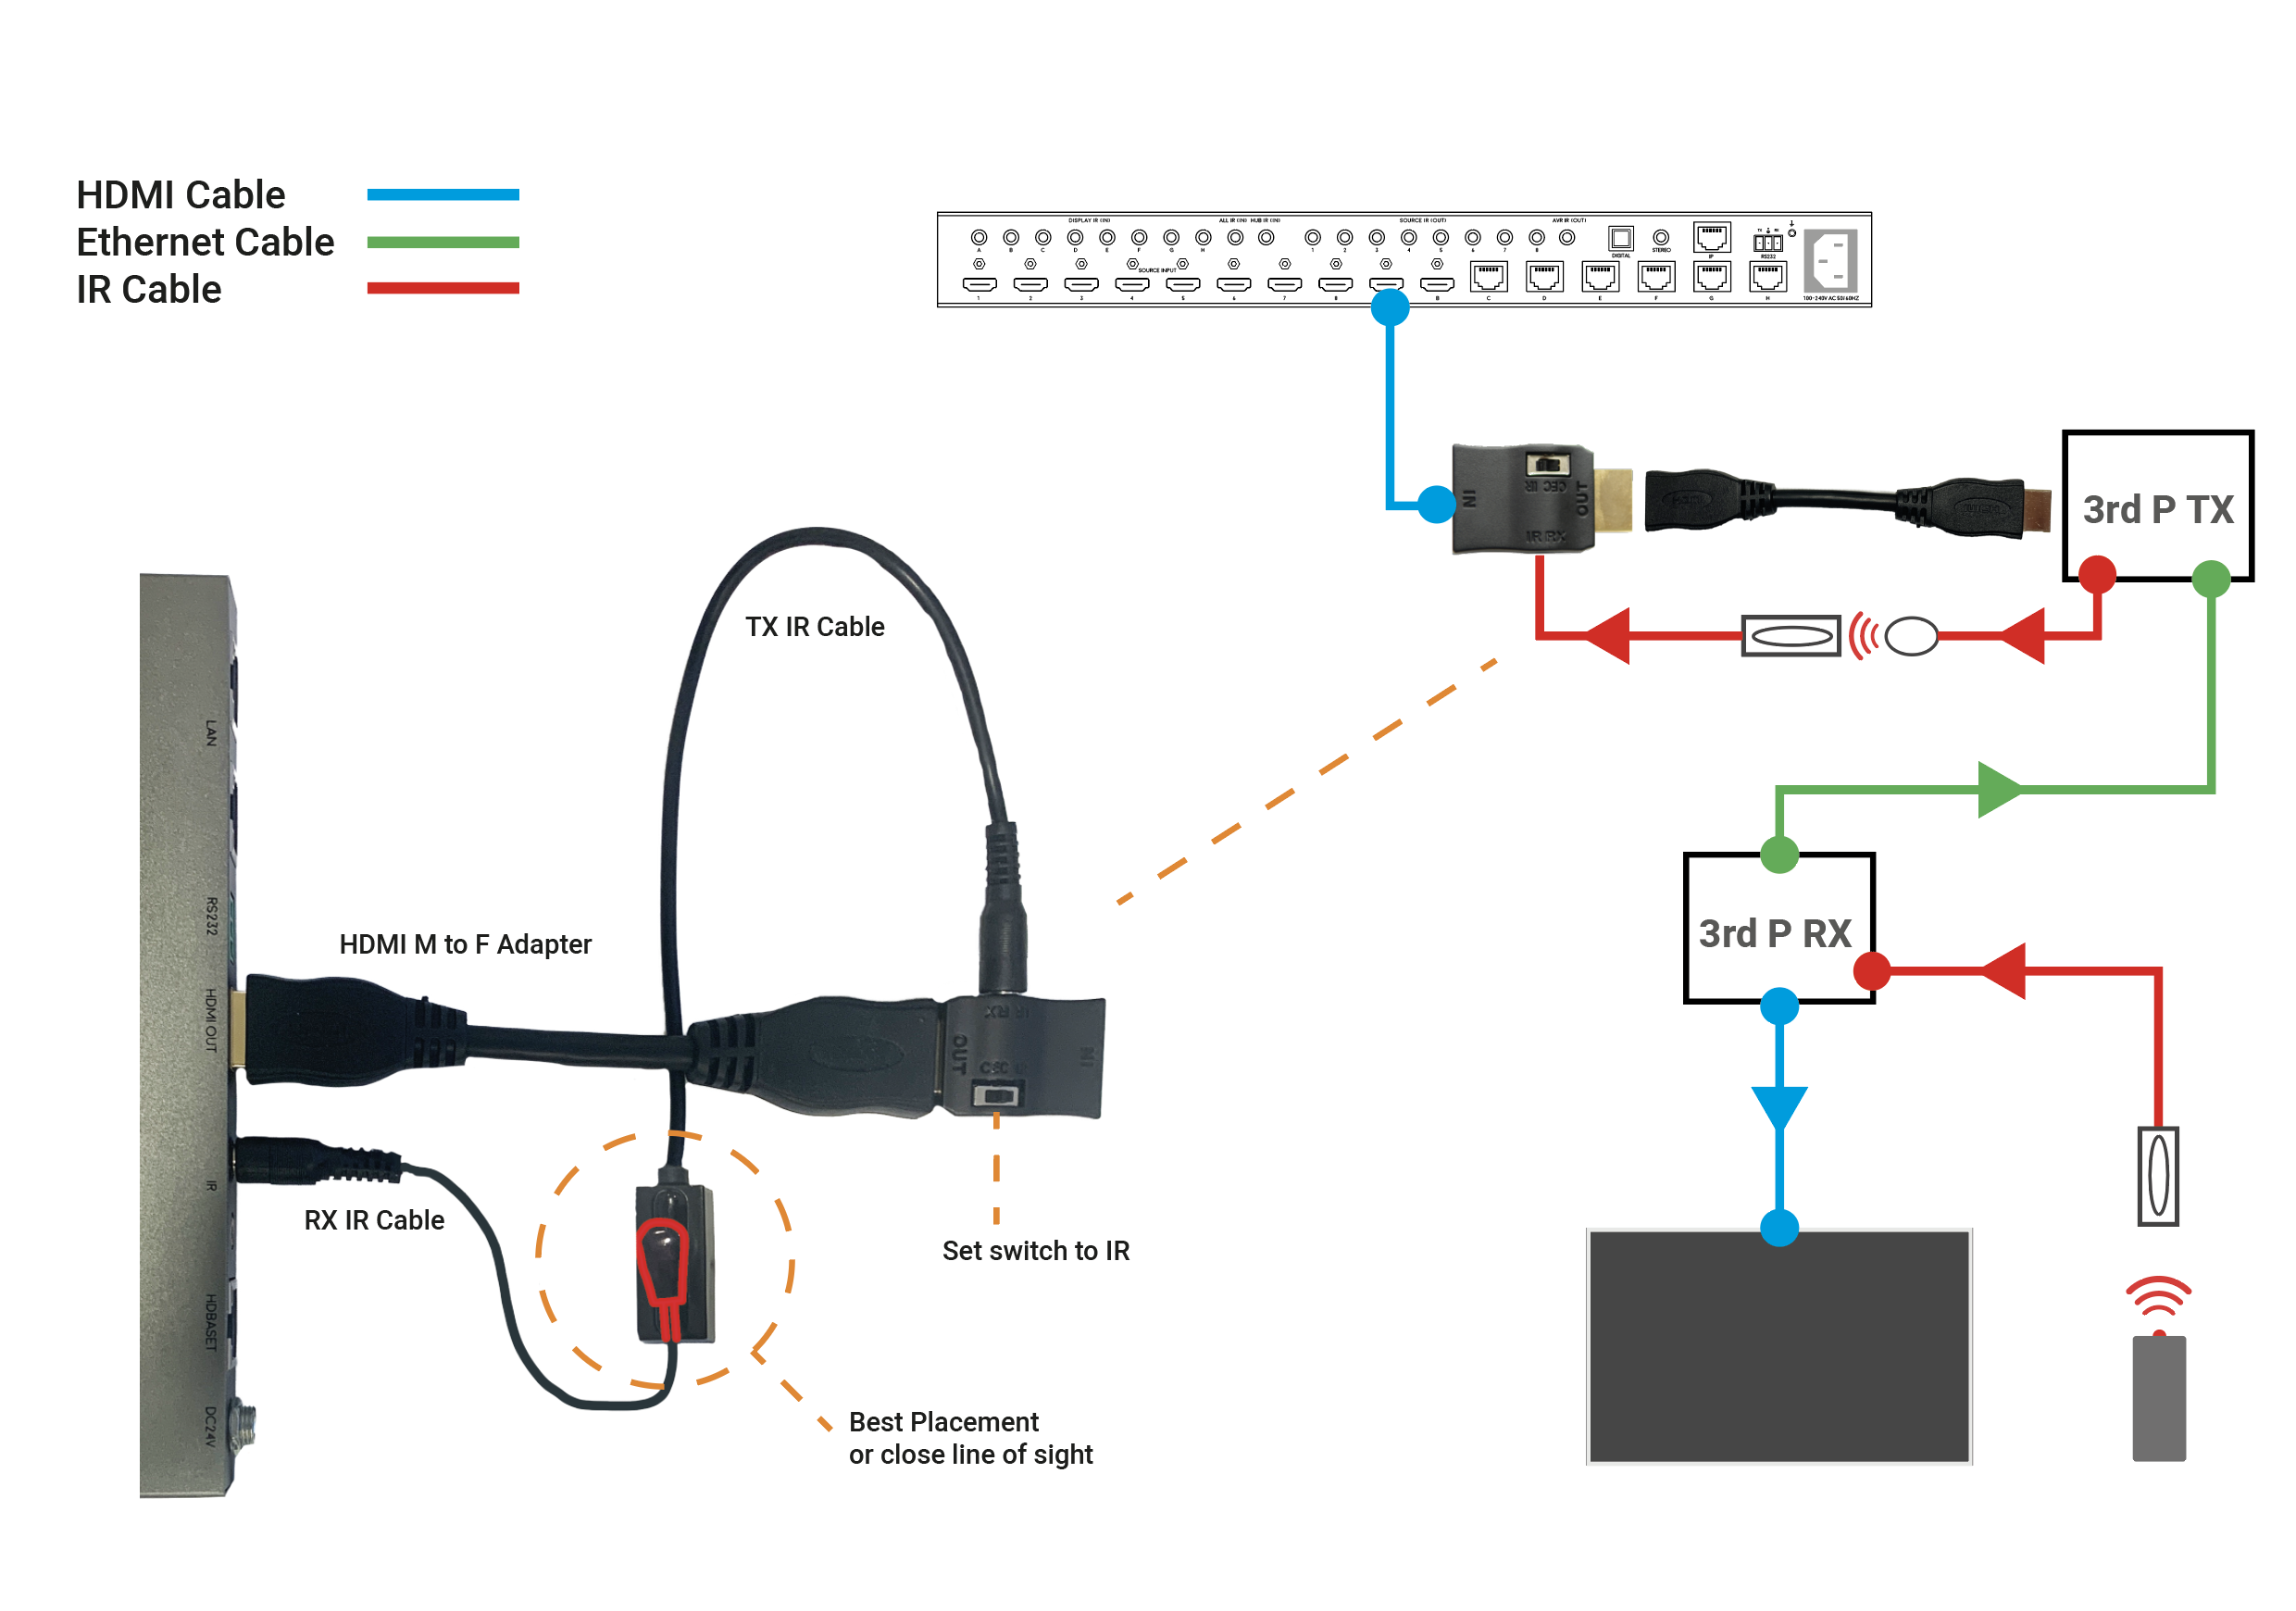
b) This second diagram shows how you would connect a HDA system to a 3RD PARTY extender or device such as a Harmony Remote by Daisy-chaining the IR transmitter from the 3RD party device and the IR receiver included with the MHUB system.
c)

We have recently become aware of a compatibility issue between the EX-50 extender and certain models of Panasonic televisions, which we are currently working hard to resolve.
If you have a Panasonic TV and experience picture drop-out when using IR with the EX-50 HDMI 50m extender set, then please get in touch with us. We have replacement receivers available that don’t suffer from this issue.
If you purchased EX50s directly from HD Connectivity or the HDanywhere website get in touch via email (support@hdanywhere.com) or phone 01684 575 324. If you purchased it through a distributor (including AWE, ACE or Unicam) then please contact them directly.
Email: support@hdanywhere.com
Modular units have the ability to receive Infra-red(IR) commands in two different ways; Code-based IR and Contextual based IR. Code-based IR uses unique codes for each room/output, whilst Contextual IR uses a single set of codes, with the unit determining where the IR command originated.
If you wish to revert the unit to Code based IR control please edit the settings.ini file on the SD card (Please use only PC based systems to edit the SD card contents) and remove the following information.
cir1 = 0x00ff9867
cir2 = 0x00ffd827
cir3 = 0x00ff8877
cir4 = 0x00ffa857
cir1 = 0x00ff807f
cir2 = 0x00ff00ff
cir3 = 0x00ff30cf
cir4 = 0x00ff906f
Finding the IR window on your source device can be difficult if it isn’t mentioned in your user manual or is marked clearly on the front of your device. A very common device is Sky+HD and Virgin’s Tivo boxes. Below, we’ve marked where the IR windows are on these devices for easy installation.
THOMSON model DSI8215

PACE model TDS850NB

Amstrad model DRX895

Sky multiroom box

Sky HD Terabyte box

Can’t find the source device that you we’re looking for? Please email us with a request and we will make it available online the next working day.
Still having problems with your IR setup?
Please check our HDanywhere IR wiring setup diagrams or have a look at our IR troubleshooting video
What is two-way IR?
With one way IR, the IR travels “backwards” from the TV location to the location of your source device or central matrix. The addition of a “forward” IR path means that IR can be sent 2 ways along the transmission cable, known as “two way IR”.
The “forward” IR path takes IR from the central location to the location of the receiver part of the product you are using. Normally this will be the location of a display or projector.
Definition
When you push a button on one of your remote controls at home, a short burst of infrared light is emitted from it (normally from the top at the front of the remote). This short burst of light contains information about the button you have pushed. When this light reaches your source device (sky box, Apple TV etc) it is interpreted and the function of the button you have pushed (stop, play, pause etc) will be performed.


IR over HDMI Injector Kit setup guide
1. Install the HDMI IR dongle between the HDMI input on the TV and your HDMI cable. Ensure that the switch is set to “IR”. Plug the IR Receiver (see ‘Pack Contents – 2.’) into the stereo jack input on the dongle (labelled RX).
2. Position the IR Receiver ( see ‘Pack Contents – 2.’) with clear line-of-sight to the remote.
3. Install the HDMI IR dongle betwen the HDMI input on the source and the HDMI cable, similarly to point 1. Again, ensuring that the switch is set to “IR”.
4. Plug the IR Transmitter (see ‘Pack Contents – 1.’) into the stereo jack input on the dongle (labelled RX on the dongle).
5. Position the IR transmitter ( see ‘Pack Contents – 1.’) with clear line-of-sight to the remote receiver on the source.e.
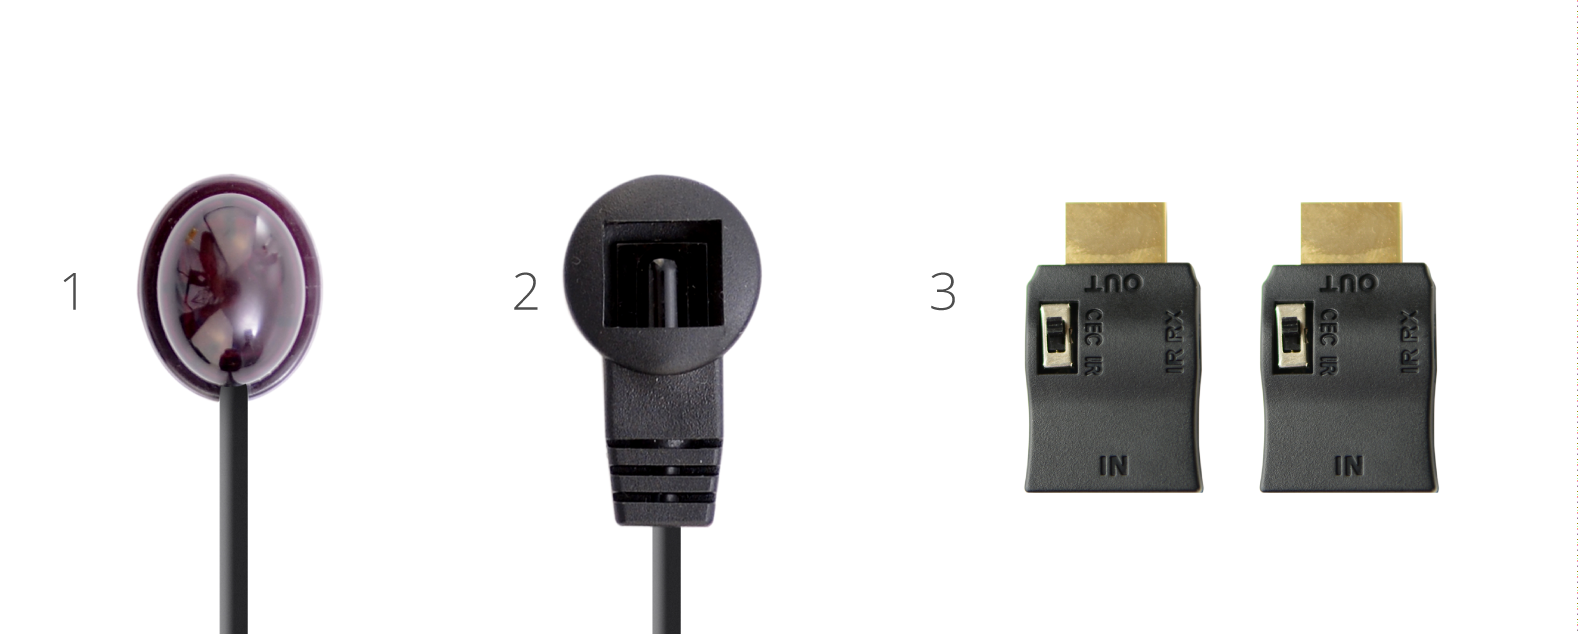
Pack Contents
1. IR Transmitter
2. IR Receiver
3. IR Dongle (both labled RX)

Troubleshooting Approach
When attempting to troubleshoot any issue, we need to isolate where the root cause of the fault could lie by a logical process of elimination.
At the start of a troubleshooting process, never rule out anything as not a potential cause of the problem. Every aspect of the installation should be considered as a potential suspect. Each component of the installation should be ruled out one-by-one and only then eliminated from the troubleshooting process as the potential problem.