Search by Support Category: Control System Integration Drivers
Control4 does not natively support Audio Return Channel (ARC). With more and more content coming from the likes of Netflix, AppleTV, Disney+ Youtube and BBC iPlayer, this presents a problem for installers who want to take this audio and feed it to external speakers as part of their Control4 project.
This video shows you how MHUB and our Control4 driver makes the impossible possible and describes the steps you need to follow in Composer to achieve ARC in Control4.
More information:
Please ensure that both your MHUB and the Control4 driver supports ARC.
Download control driver:
http://support.hdanywhere.com/hda-control-drivers/
Five reasons why Control4 dealers prefer working with MHUB:
https://hdanywhere.com/why-c4-dealers-prefer-mhub-pro-2
4×4 and 8×8 HDBaseT / HDMI Matrix: MHUB PRO 2.0
The latest control driver from Loxone can be downloaded here
The Loxone API 2.0 driver is compatible with the following HDANYWHERE products:
MHUB431U
MHUB862U
MHUB4KPRO44
MHUBPRO4440
MHUB4KPRO88
MHUBMAX44
MHUBAUDIO64
and the following Loxone products:
Miniserver
Miniserver Go
IMPORTANT
Before setting up the Loxone driver, the MHUB must have been through its first boot process. This can be done by navigating to the MHUB’s IP address in a web browser or in uControl and following the onscreen instructions. No other setup of the matrix is required.
Add the HDANYWHERE MHUB device template as a “Virtual Output”
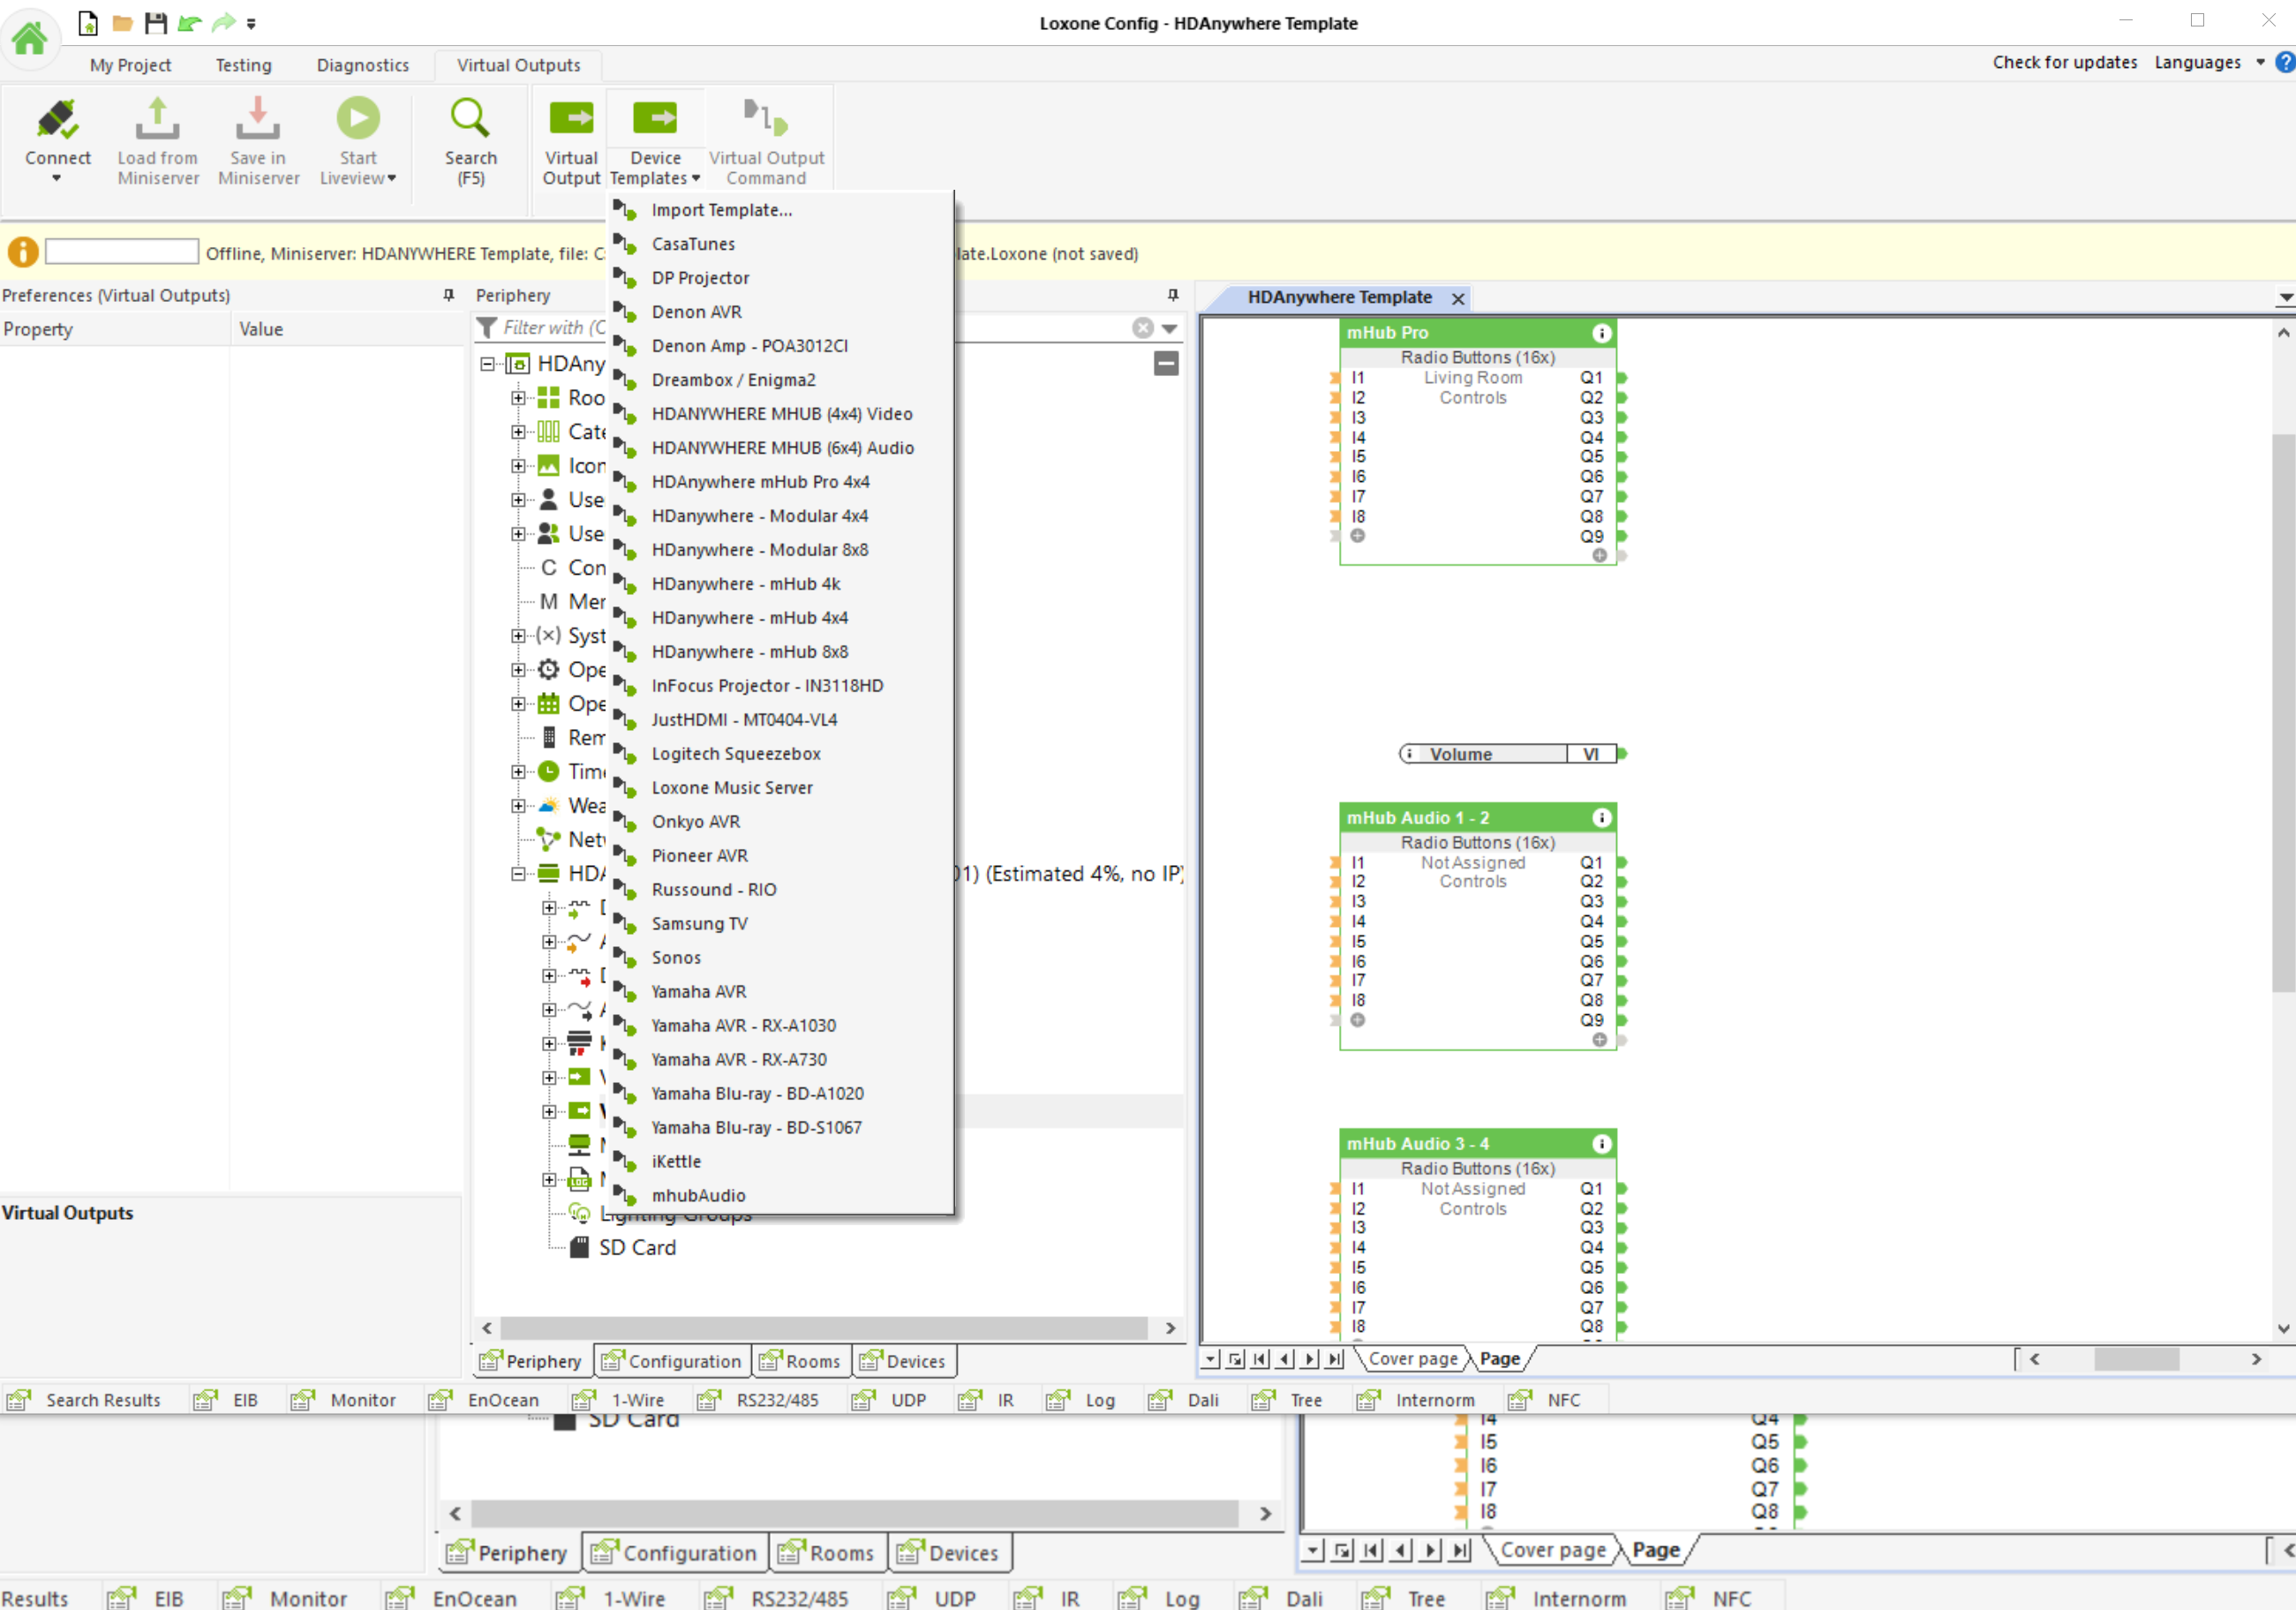
Next, assign your Inputs and outputs

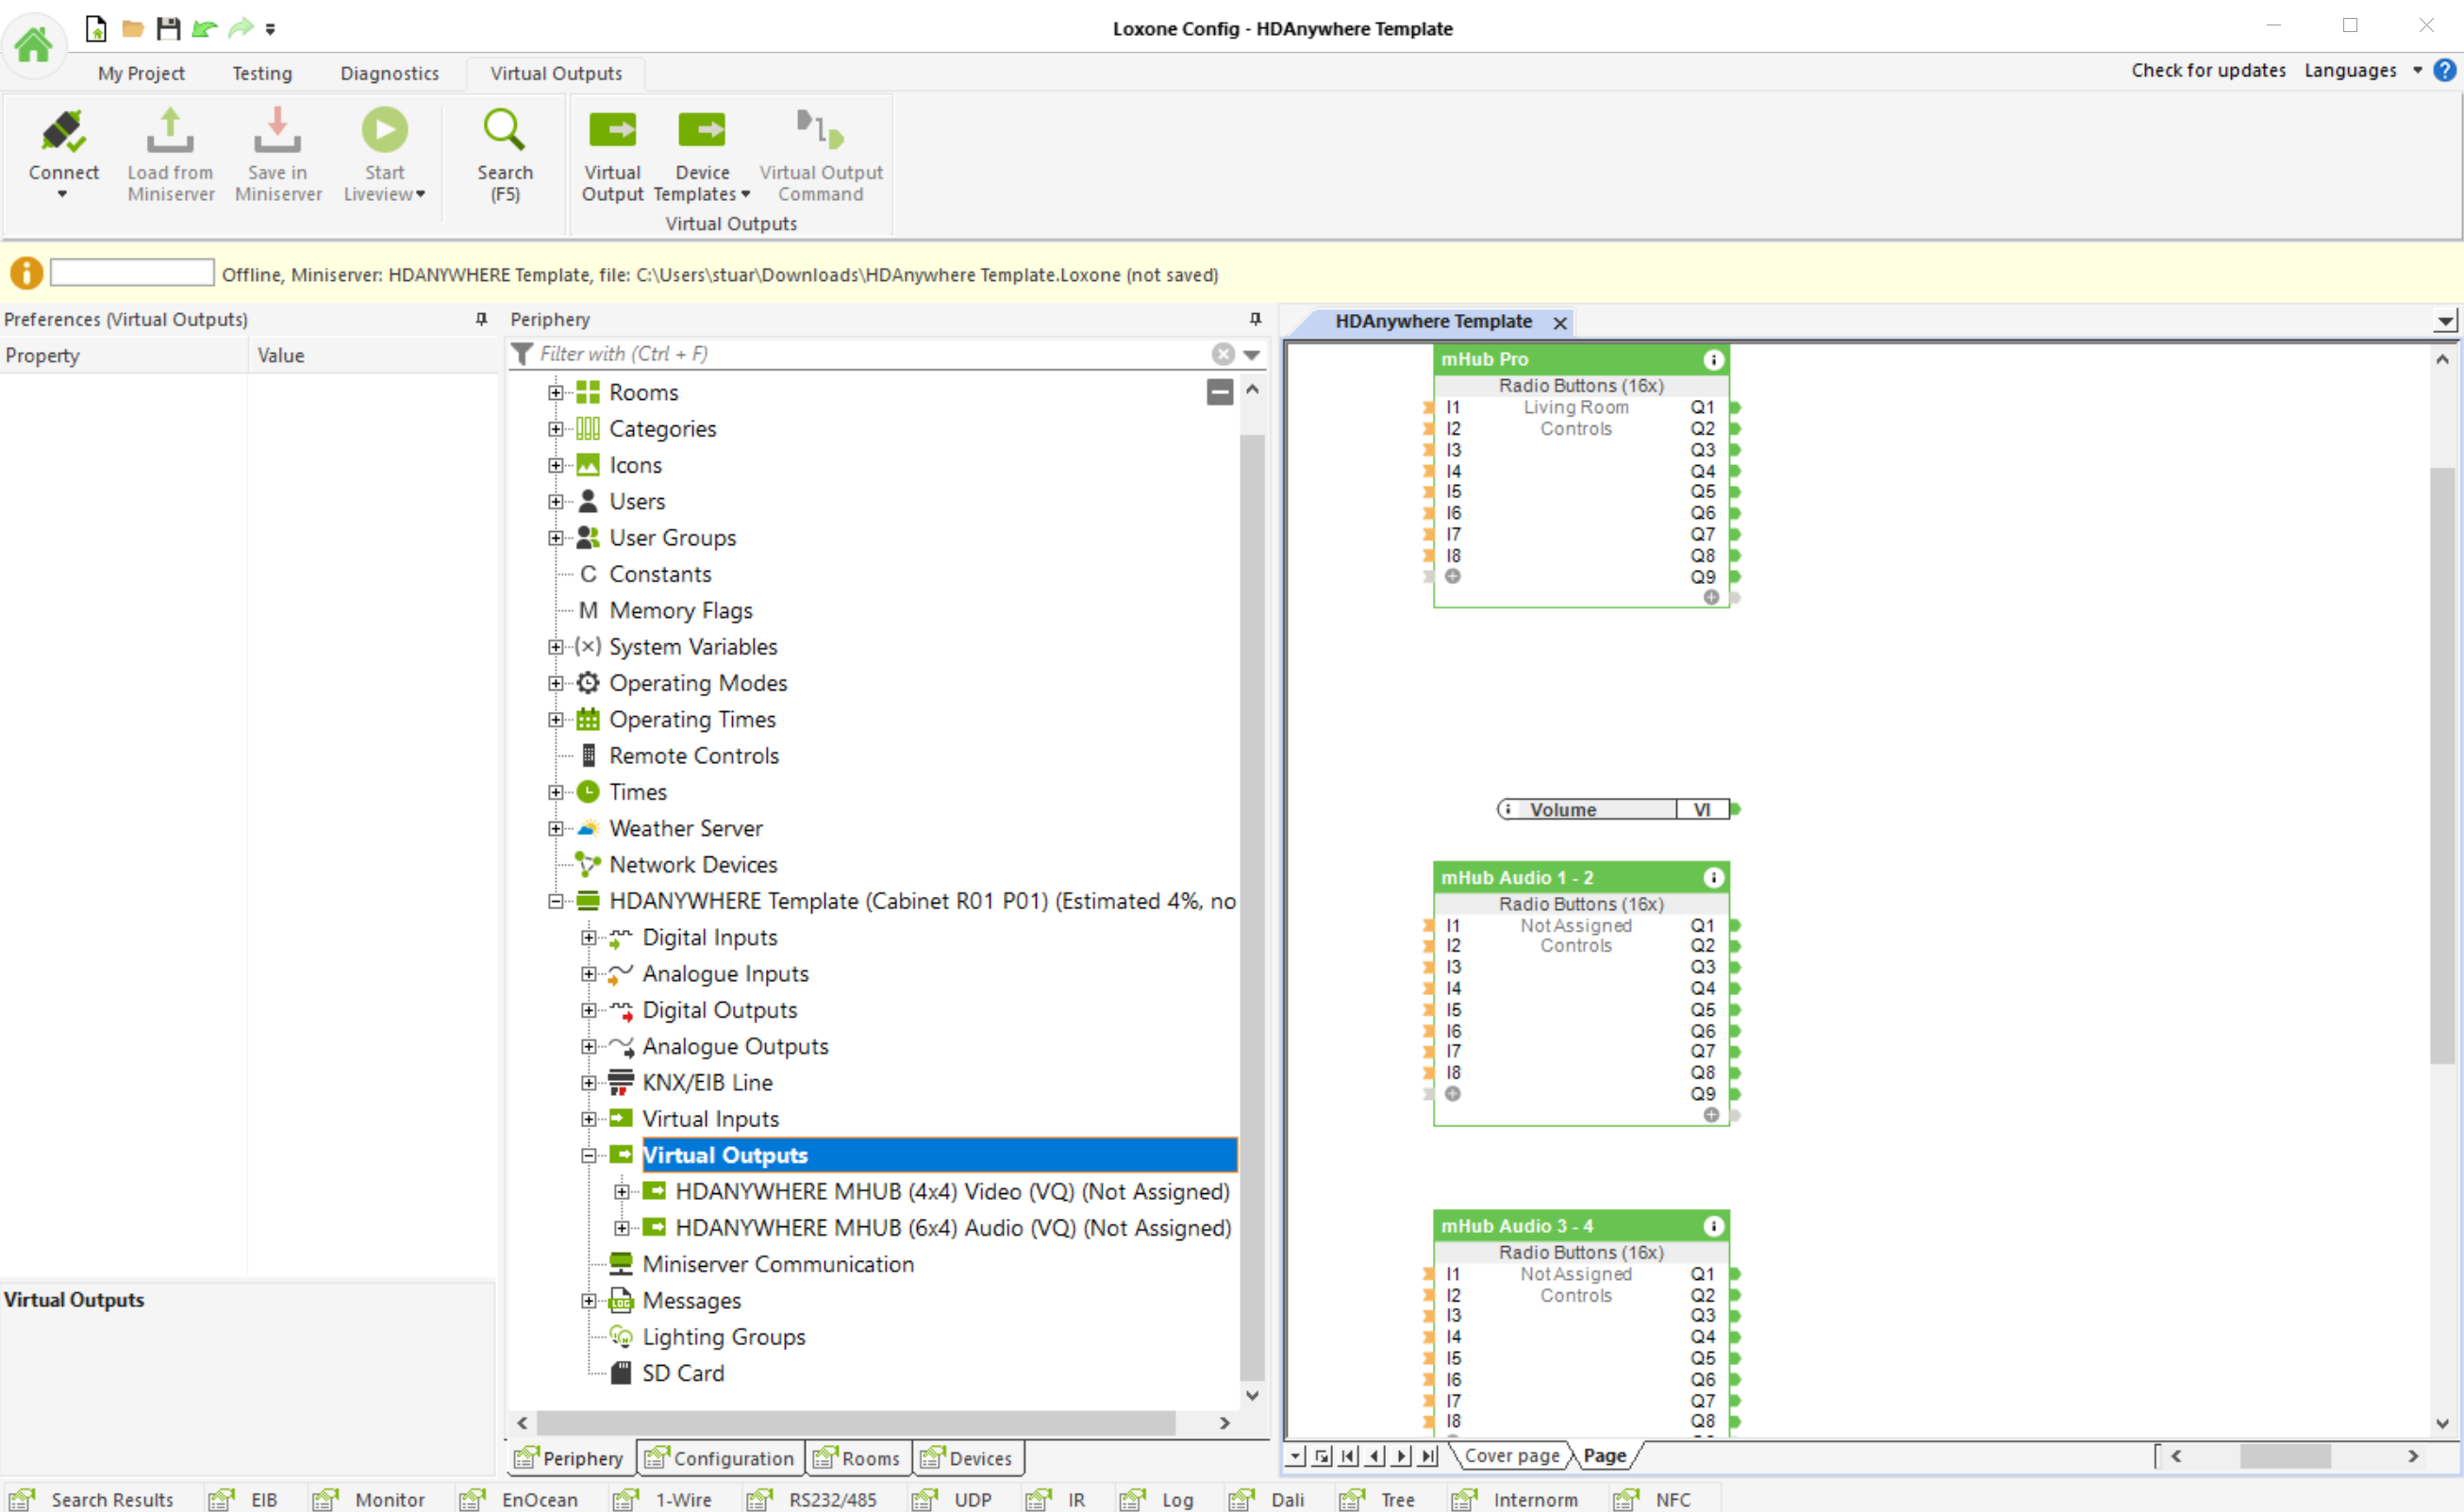
The video below shows the entire process
The latest control driver from Chowmain software can be downloaded here included in the download is also an in-depth guide to installing the driver
The HDAnywhere MHUB RTI driver allows for control of the HDAnywhere range of Video and Audio distribution products. The driver allows for direct switching of inputs to outputs, the ability to switch preconfigured zones, control of audio levels (volume, mute, etc) and the ability to send IR codes as well as being able to reboot or restart the system. It is compatible with the following systems:
MHUB431U
MHUB862U
MHUB4KPRO44
MHUBPRO4440
MHUB4KPRO88
MHUBMAX44
MHUBAUDIO64
and the following RTI products:
RP-4RF
XP-3
XP-6
XP-6s
XP-8s
XP-8v
IMPORTANT
Before setting up the RTI driver, the MHUB must have been through its first boot process. This can be done by navigating to the MHUB’s IP address in a web browser or in uControl and following the onscreen instructions. No other setup of the matrix is required, but this step must be completed before the RTI processor can utilise the matrix I/O ports. It is not required otherwise.
The latest control driver from Chowmain software can be downloaded here
It allows the Control processor to utilise the IR inputs and outputs of the HDANYWHERE matrix as if it was there own. Allowing installers to spec smaller Control 4 processors than they would typically need and is compatible with the following HDANYWHERE products:
MHUB431U
MHUB862U
MHUB4KPRO44
MHUBPRO4440
MHUB4KPRO88
MHUBMAX44
MHUBAUDIO64
and the following Control 4 products:
CA-1
EA-1
EA-3
EA-5
HC250
HC800
HC1000
IMPORTANT
Before setting up the Control 4 driver, the MHUB must have been through its first boot process. This can be done by navigating to the MHUB’s IP address in a web browser or in uControl and following the onscreen instructions. No other setup of the matrix is required, but this step must be completed before the C4 processor can utilise the matrix I/O ports. It is not required otherwise.
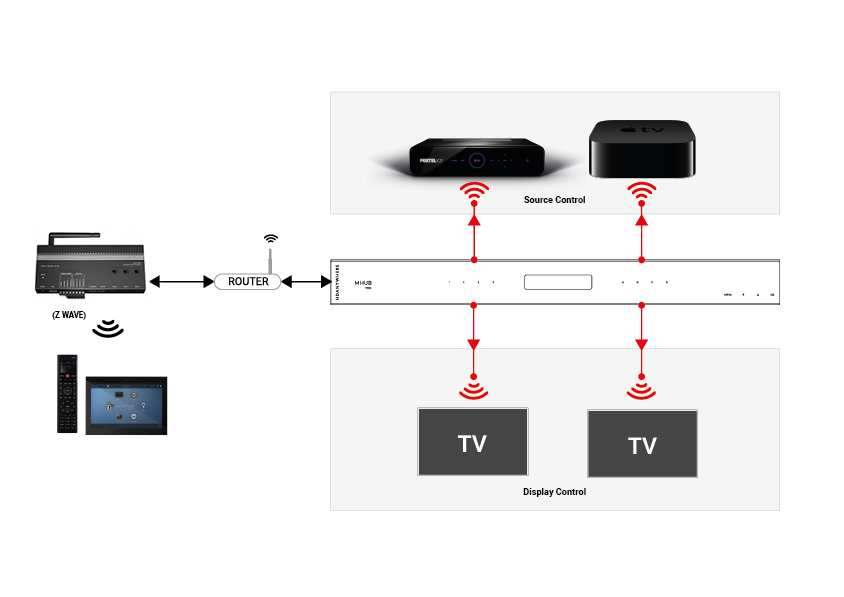
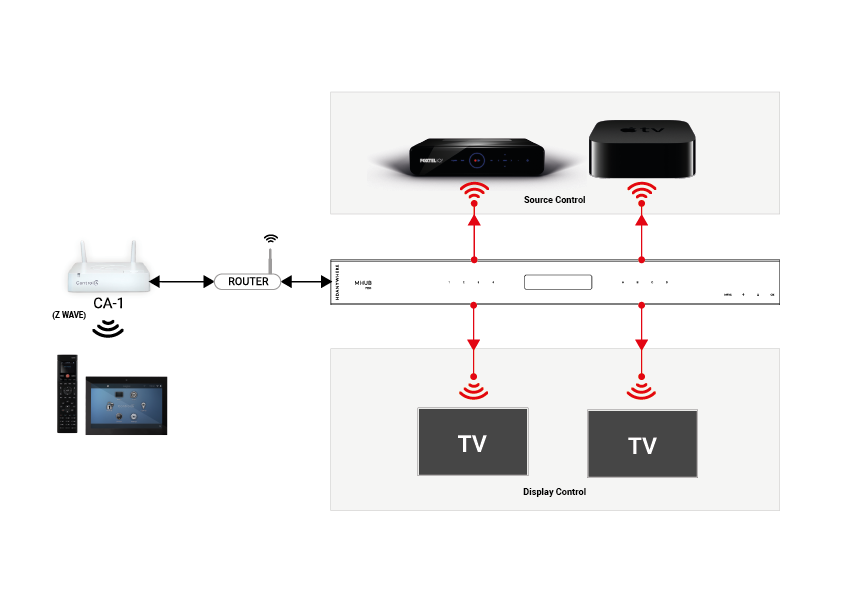
Add the HDANYWHERE driver as you would any other driver, the driver will auto-discover a video matrix or multiple Audio Matrices
The next step is to setup your control and AV connections. Traditionally in a normal Control 4 setup, you would bind the source devices ‘control inputs’ with an IR output on the C4 controller. Instead, with the MHUB Video driver’s you can route the control through the MHUB’s IR ports utilising the IP>IR Engine. Similarly, Display IR is routed through the Display IR ports on the matrix. This video shows how to make these bindings

1. HDA Cloud
The HDA Cloud acts as our global data storage and service delivery platform offering an interface for MHUB owners, HDA Pro’s and 3rd party devices to talk to one another.
There are two types of cloud account that can be associated with an MHUB system.

2. HDA Cloud Account
The HDANYWHERE (HDA) Cloud account is the account that belongs to the Homeowner and/or End-User. The owner of the MHUB has to have a verified HDA Cloud account before any communication between MHUB systems and the HDA Cloud can take place.
Registering the MHUB system provides numerous benefits including:
- Extending the warranty period on the system by 1 year (must be registered within 30 days of purchase, Warranty is non-transferable)
- Enables advanced functions for things like voice control, uControl, integration with other IoT devices and Sequences
- Provide advanced troubleshooting information to your HDA Pro installer and HDA
- Provide your HDA Pro installer permission to remotely manage your system, they can then modify your system for you without physically being there
3. HDA Pro Account
The HDA Pro account can not be added to a unit unless a HDA Cloud account (outlined above) is present first. This account authorises the installer to monitor the MHUB on their customer’s (the homeowner) behalf. This account sits alongside the Cloud account and gives a 3rd party access to the MHUB’s data and the ability to control it. HDA Pro’s can register Here
The following Settings can be managed remotely:
- Source Routing (and switching)
- Edid management
- uControl sequence configuration
- uControl IR pack configuration
- Power management
- IP configuration
- Temperature
- Firmware (MHUB-OS, and MHUB)
You can also monitor the following:
IMPORTANT: a HDA Pro Account has to be created first Here and authorised by HDA staff before the installer can use their account details to enable monitoring on the MHUB.
4. MHUB-OS
MHUB’s operating system which acts as the bridge between using MHUB and managing it. From MHUB-OS it is possible to connect to HDA Cloud, integrate devices like Amazon Alexa, manage network settings and update software to add new features.
5. uControl
uControl is our remote control app for MHUB 4K PRO systems. It pulls all the information it needs to work directly from MHUB-OS and requires no setup or configuration. Just download it and let it find your MHUB and you’re ready to go.
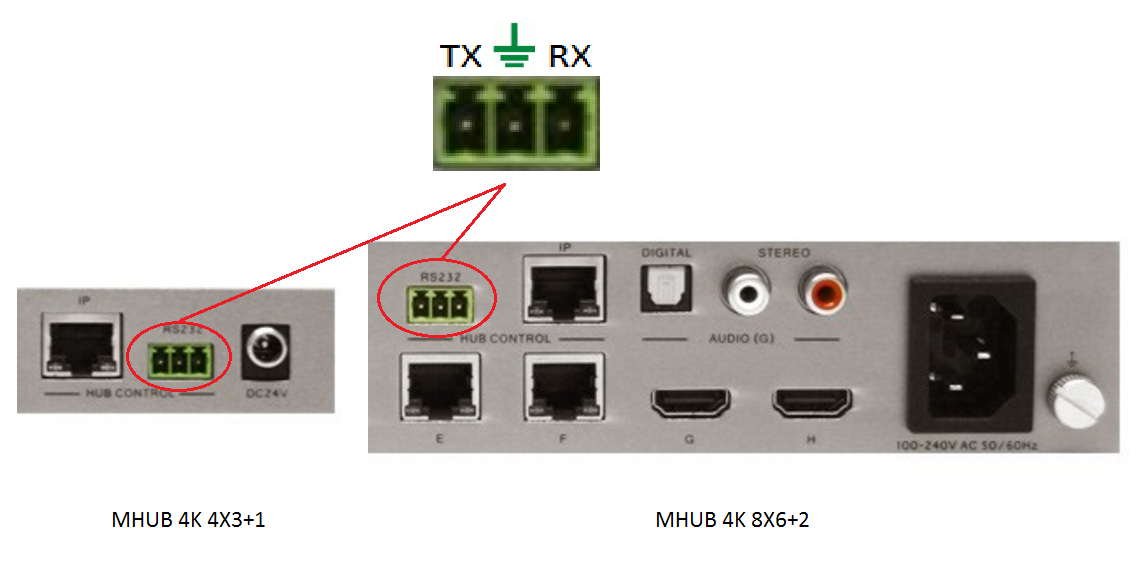
If you wish to control your MHUB 4K 4×3+1/8×6+2 from an external control system via a RS232 connection you will need to wire the included phoenix connector to the following specification.
Windows configuration tool for MHUB 2K and MHUB 4K systems. Search for MHUB, configure EDID and network settings.
Download the MHUB 2K and MHUB 4K configuration tool.
The software configuration tool has been written for an older version of Windows. If you run the exe file on your laptop and you receive a C++ error message then please read this support article.
Description
When I try to install the software, I receive this warning:
“The application has failed to start because its side-by-side configuration is incorrect. Please see the application event log for more detail.”
This issue is typically caused by a conflict between the program and one or more of the files in the C++ runtime libraries. These libraries are part of the Windows operating system and are used, and potentially updated, by installing or updating several Microsoft or other third party products.
If you are experiencing this error when launching or installing the program, and if the program repair option does not resolve the issue, the most effective method to correct this error is to uninstall and reinstall any Microsoft Visual C++ installations currently available on your computer before proceeding with the installation.
To uninstall all current Microsoft Visual C++ installations
Open the Control Panel and locate the list of programs.
Windows 8/10
From within the Start screen, type “Control Panel” and click on the Control Panel search result when it appears.
Select Programs and Features.
Windows 7/Vista
Click Start> Control Panel
If viewing categories, click Programs> Uninstall a Program
If viewing icons, click Programs and Features
Windows XP
Select Start> Control Panel> Add or Remove Programs
Scroll down to locate the Microsoft Visual C++ entries.
Select each one, starting from the top entry, and choose Uninstall.
Do this for each entry, until there are no more Microsoft Visual C++ entries listed.
To reinstall new Microsoft Visual C++ packages follow the instructions on this page –
Once every package has been downloaded and installed, restart Windows.
Finally, launch the program. If the error message persists after following all of these instructions, then please contact HDanywhere technical support on 01684 576348
To disable the beep on the mHub 2k range of matrices please following the instructions below using either I.P or RS232 connection methods.
To adjust the settings on the mHub range of products, you will need to download the controller software Download
A) Connecting to the mHub Via I.P
The mHub 2K’s IP address is pre-configured as 192.168.0.100, your computer will need to have it’s IPV4 range configured to be within the same range initially while you setup the matrix. (You don’t need to follow this step if you have a mHub 4K system)
To configure your IPV4 settings you will need to navigate to the following menu
->Network and sharing center
—>Ethernet
—–>Properties
——->Internet Protocol Version 4 (TCP/IPv4)
———>Properties
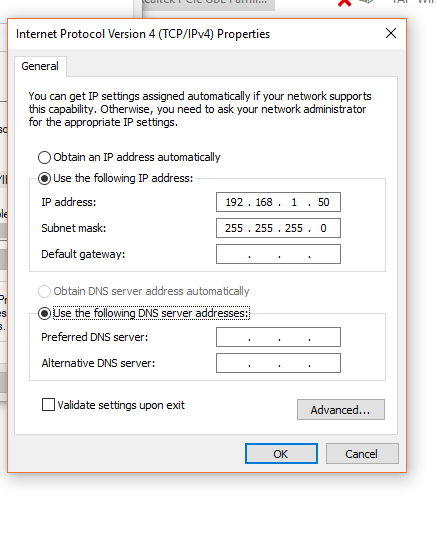
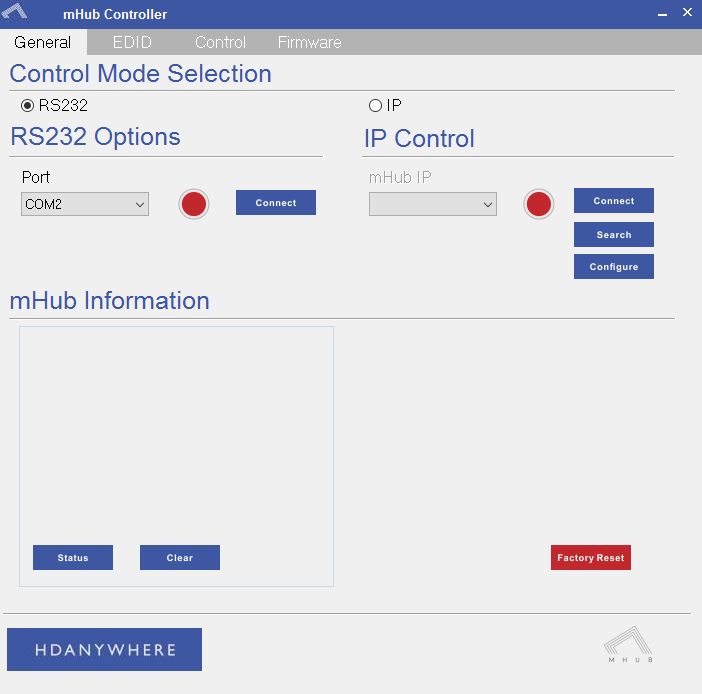
Once you have changed the IP settings on your PC, open the Mhub controller software.
In the Control Mode Select Box choose ‘IP’, then click the ‘Search’ button. When the IP address shows in the mHub IP box, click connect.

B) Connecting to the mHub Via RS232
To connect via RS232 use the supplied serial cable can connect between the mHub and your PC, then on the Controller software select ‘RS232′, then in the RS232 Options section select the Com port being used from the drop down menu then click connect
C) Disabling the Beep
To disable the beep select the ‘Control’ tab and untick the box labeled ‘Enable Feedback Beep’.
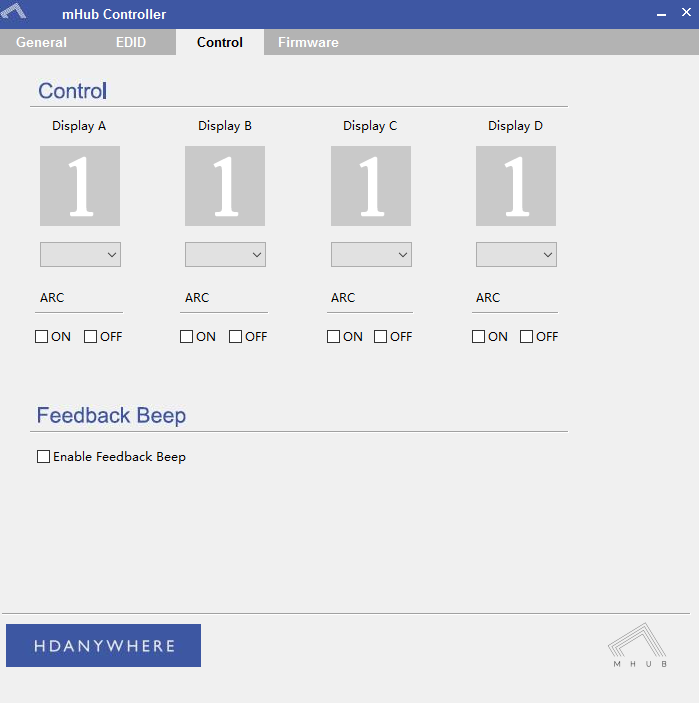
Once changed, you can verify the beep has been disabled by performing a source switch operation.
IR codes for MHUB systems (not Modular or Multiroom+) including power control available here:
Control Drivers for 8×8 Multiroom+ System – HKHA818SW
We have ready-made control system drivers available for the 8×8 Multiroom+ System (Singlewire HDBaseT) for the major control systems used in the UK.
Each download package also includes support for the 4×4 Mutliroom+ Singlewire (HKHA414SW, V1, V2 and V3), 4×4 Multiroom+ POE (HKHDA44P) and the 4×4 HDMI Matrix (HKM44-UK, both V1 and V2).
Control Drivers for 4×4 HDMI Matrix + IR Passback – HKM44-UK
We have ready-made control system drivers available for the 4×4 HDMI Matrix + IR Passback – HKM44-UK (both V1 and V2) for the major control systems used in the UK.
Each download package for Control4, AMX, Crestron and RTI also includes support for the 4×4 Mutliroom+ Singlewire (HKHA414SW, v1, V2 and V3), 4×4 Multiroom+ POE (HKHDA44P) and the Multiroom+ 8×8 System (HKHA818SW).
Control Drivers for 4×4 Multiroom+ System – HKHA414SW
We have ready-made control system drivers available for the 4×4 Multiroom+ System (Singlewire HDBaseT, V1, V2 and V3) for the major control systems used in the UK. V1 and V2 drivers are based on RS232 serial connections and V3 drivers are IP or RS232 connections.
Each download package for Control4, AMX, Crestron, Netstream and RTI also includes support for the 4×4 HDMI Matrix (HKM44-UK, both V1 and V2), 4×4 Multiroom+ POE (HKHDA44P) and the Multiroom+ 8×8 System (HKHA818SW).