Search by Support Category: Extenders
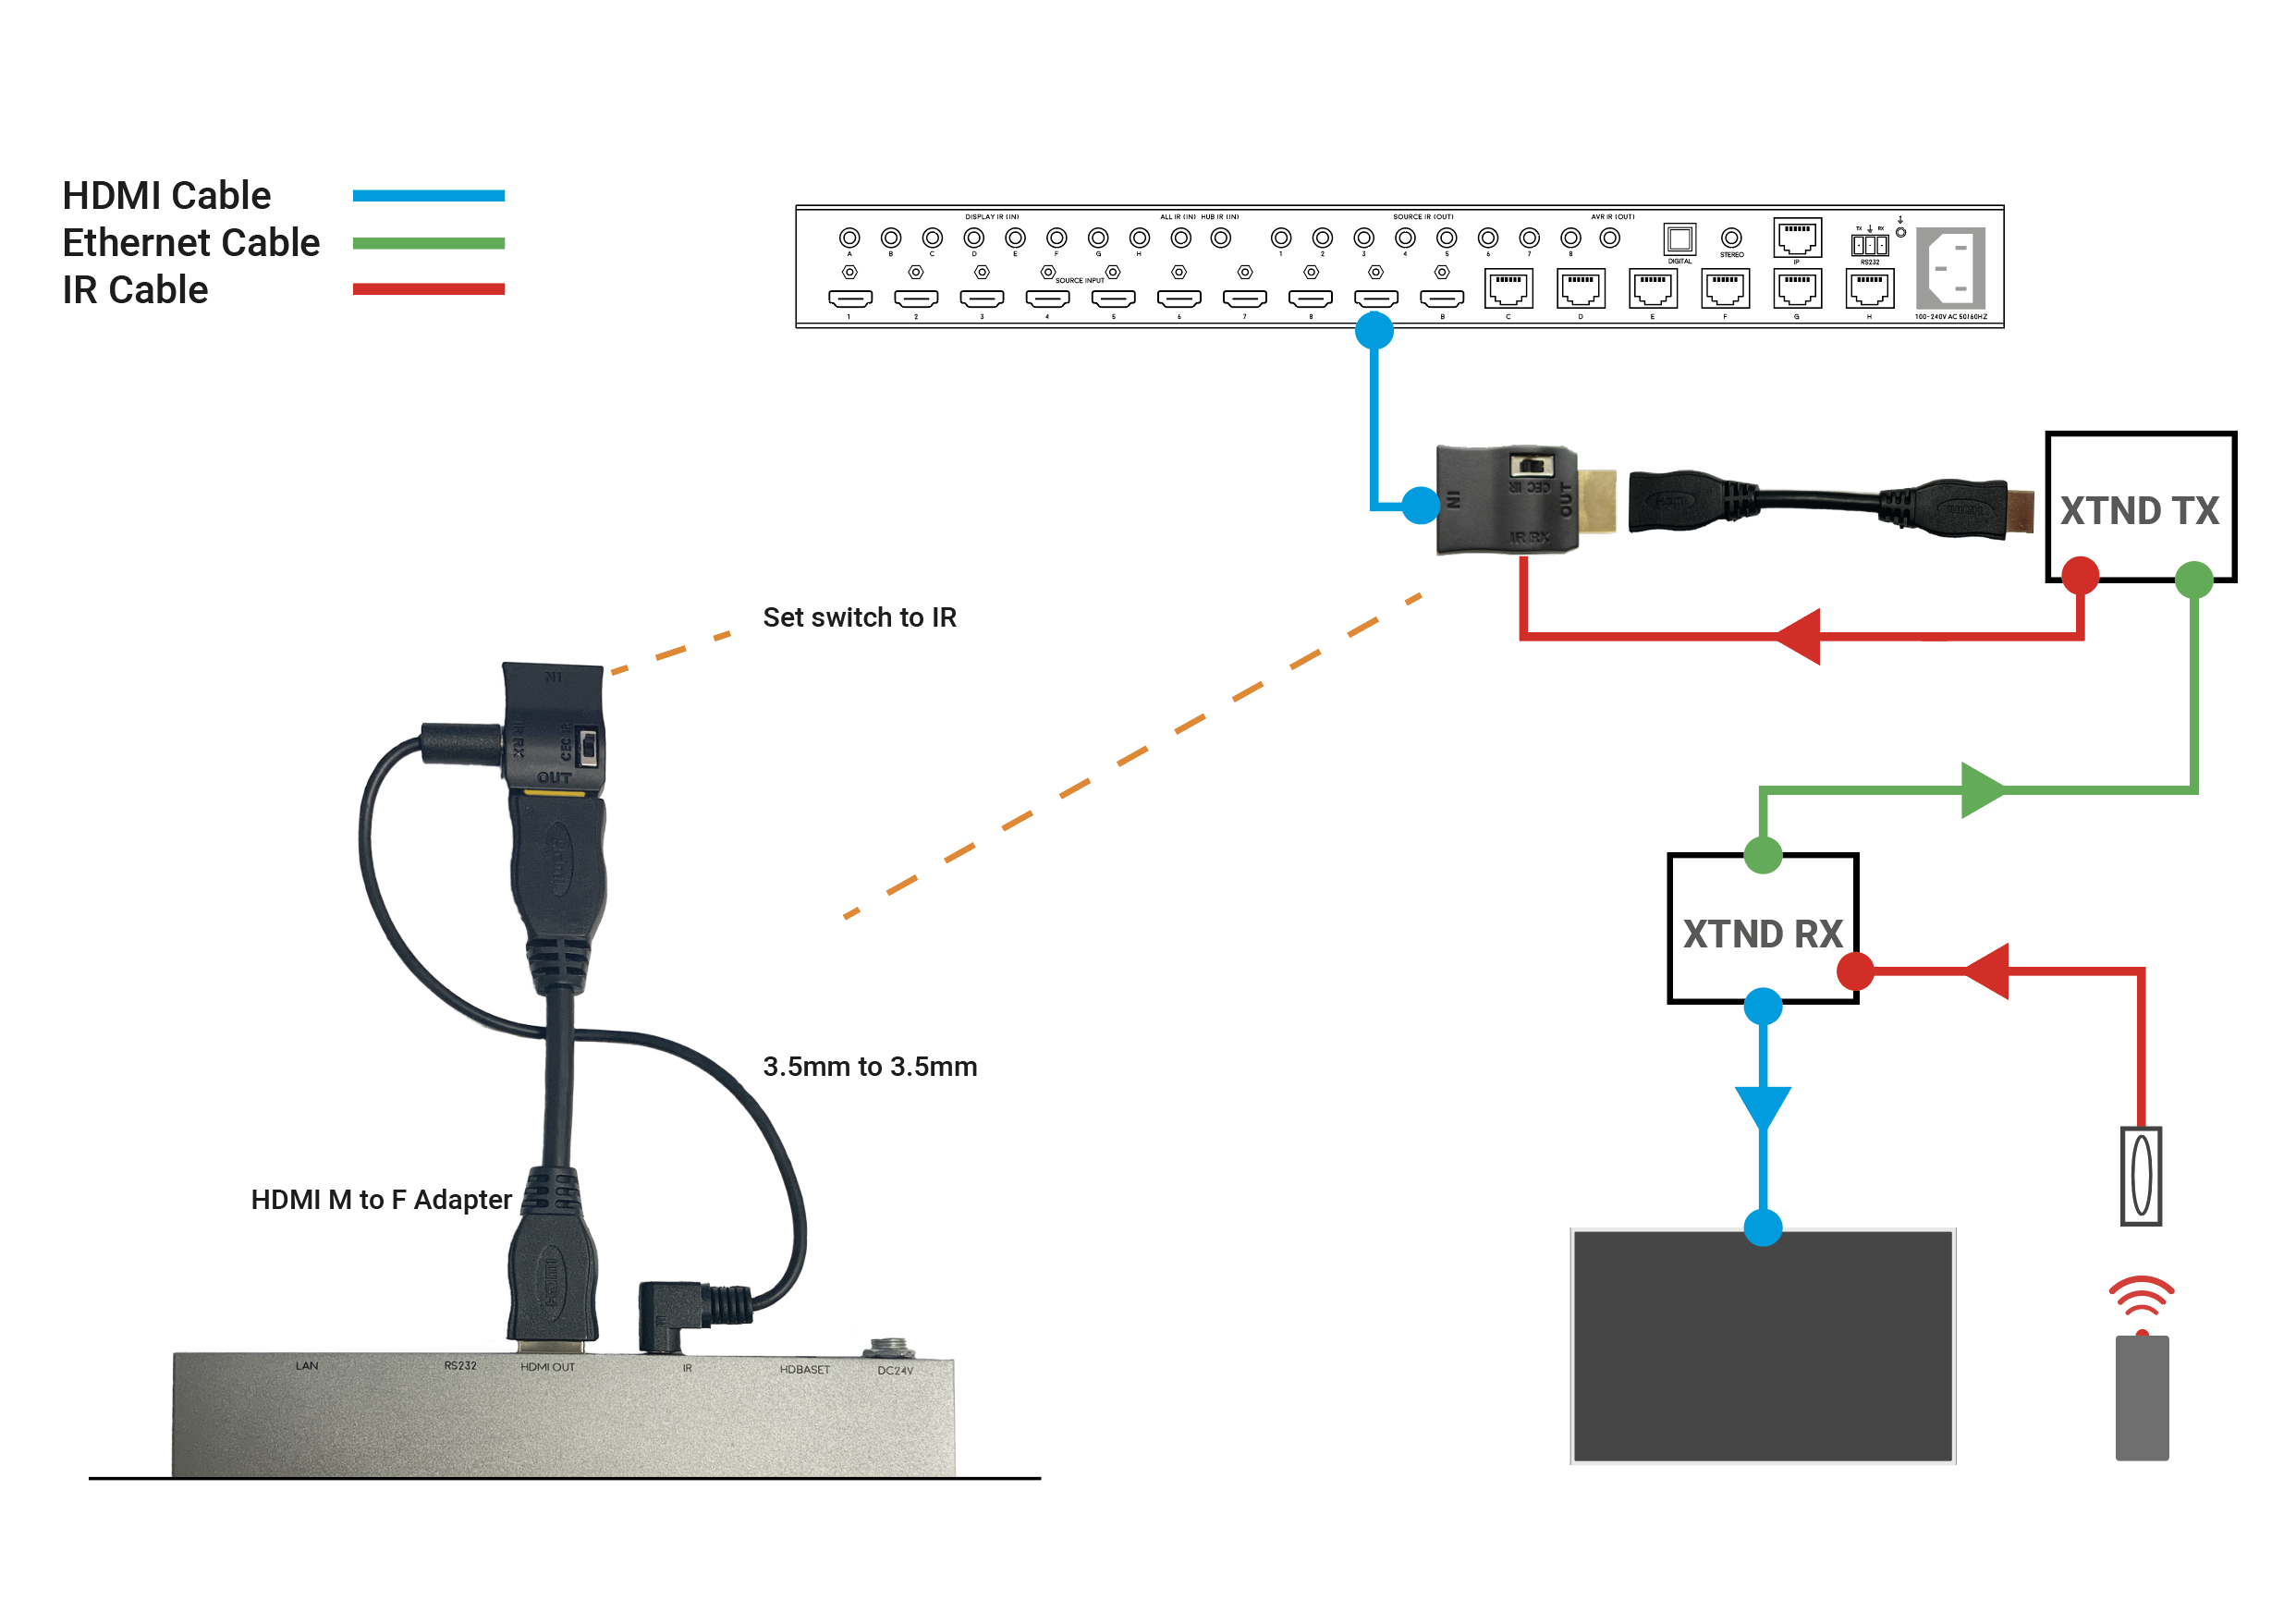
Daisy chaining IR can allow you to connect the IR systems of 2 devices. This allows IR to pass from one device to another
This does not work for HDMI Mirrored ports.
a) The diagram below shows how you can link two HDA devices, such as an MHUBU86240 and an XTND4K40TPC using a MHUB + XTND Integration Kit
b) This second diagram shows how you would connect a HDA system to a 3RD PARTY extender or device such as a Harmony Remote by Daisy-chaining the IR transmitter from the 3RD party device and the IR receiver included with the MHUB system.
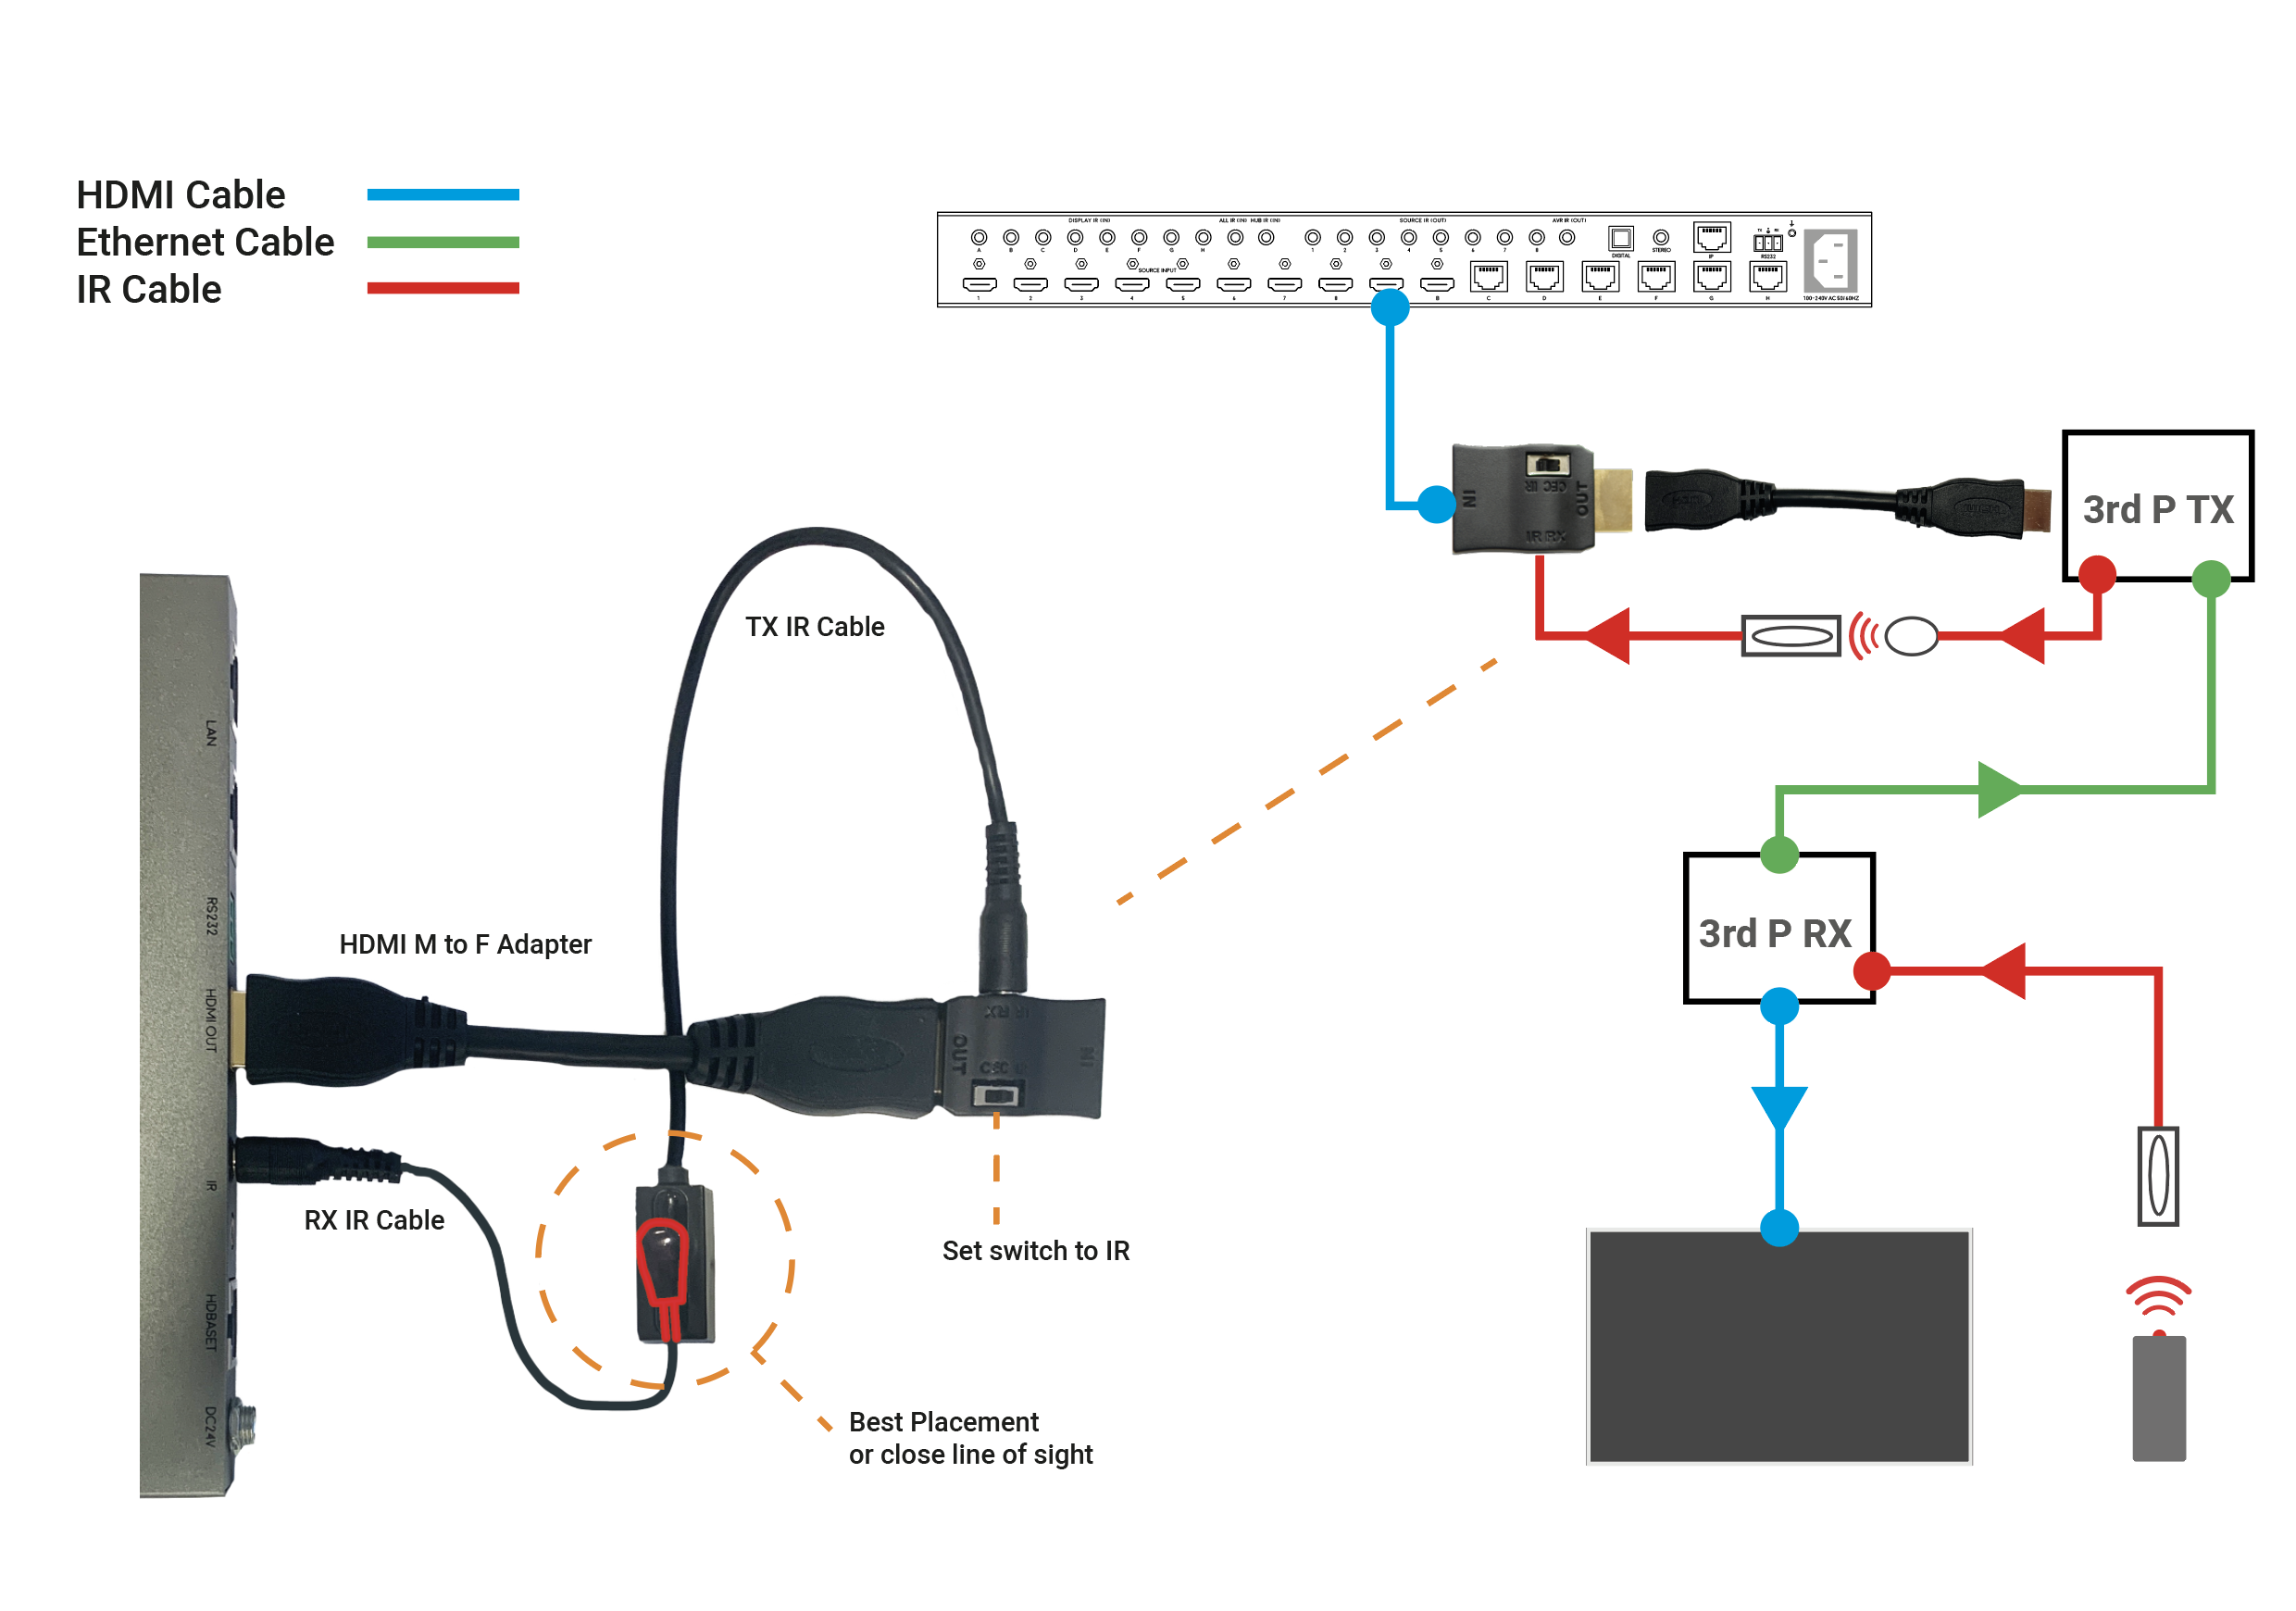
c)

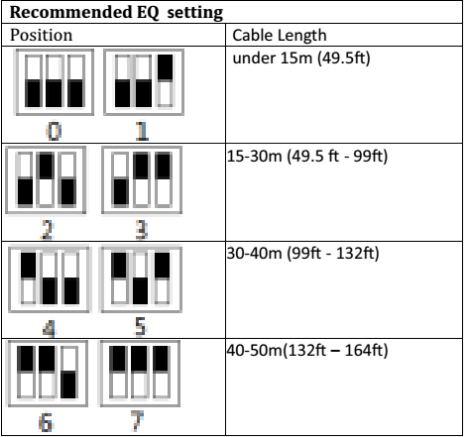
If you find that you have no picture or poor picture quality, you may need to adjust the EQ settings on your XTND 2K30 based on the approximate distance of your cable run. If you have any patch points add an additional 10% onto your effective distance. The below diagram shows the correct switch settings for various lengths of cable run. We suggest working from the maximum distance and working down if you are unsure of the length of your cable run.
We have recently become aware of a compatibility issue between the EX-50 extender and certain models of Panasonic televisions, which we are currently working hard to resolve.
If you have a Panasonic TV and experience picture drop-out when using IR with the EX-50 HDMI 50m extender set, then please get in touch with us. We have replacement receivers available that don’t suffer from this issue.
If you purchased EX50s directly from HD Connectivity or the HDanywhere website get in touch via email (support@hdanywhere.com) or phone 01684 575 324. If you purchased it through a distributor (including AWE, ACE or Unicam) then please contact them directly.
Email: support@hdanywhere.com
If you’re looking to distribute a 3D source device using the EX50 50m extender set, then carry out the following steps.
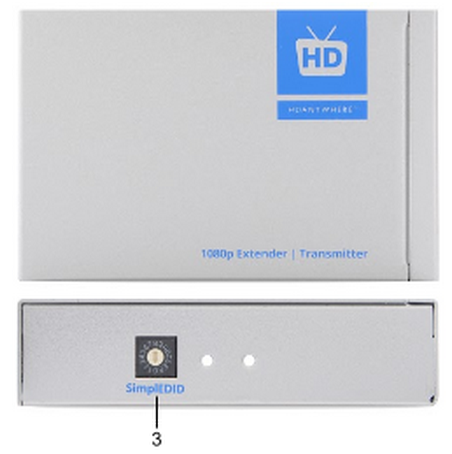
1. Before you connect your 3D source device to the transmitter, locate the SimplEDID dial on the side of transmitter, which is labelled with the figure 3 below:
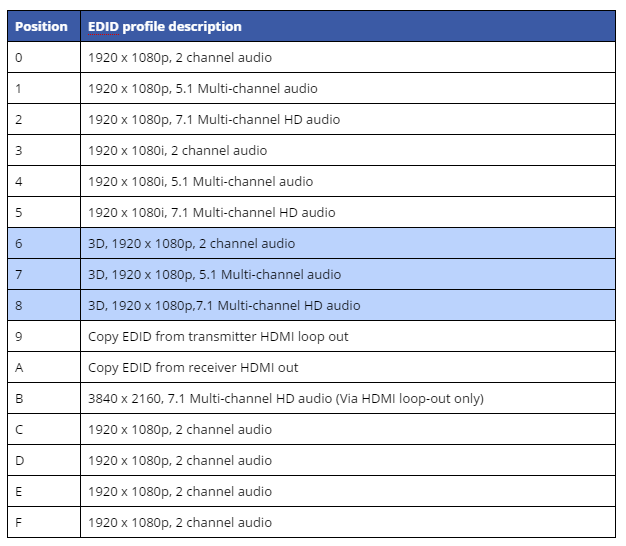
2. On the SimplEDID profile table in the EX50 manual, there are three choices of 3D EDID profiles (highlighted below). Pick the profile that suits the audio format that you wish to distribute.
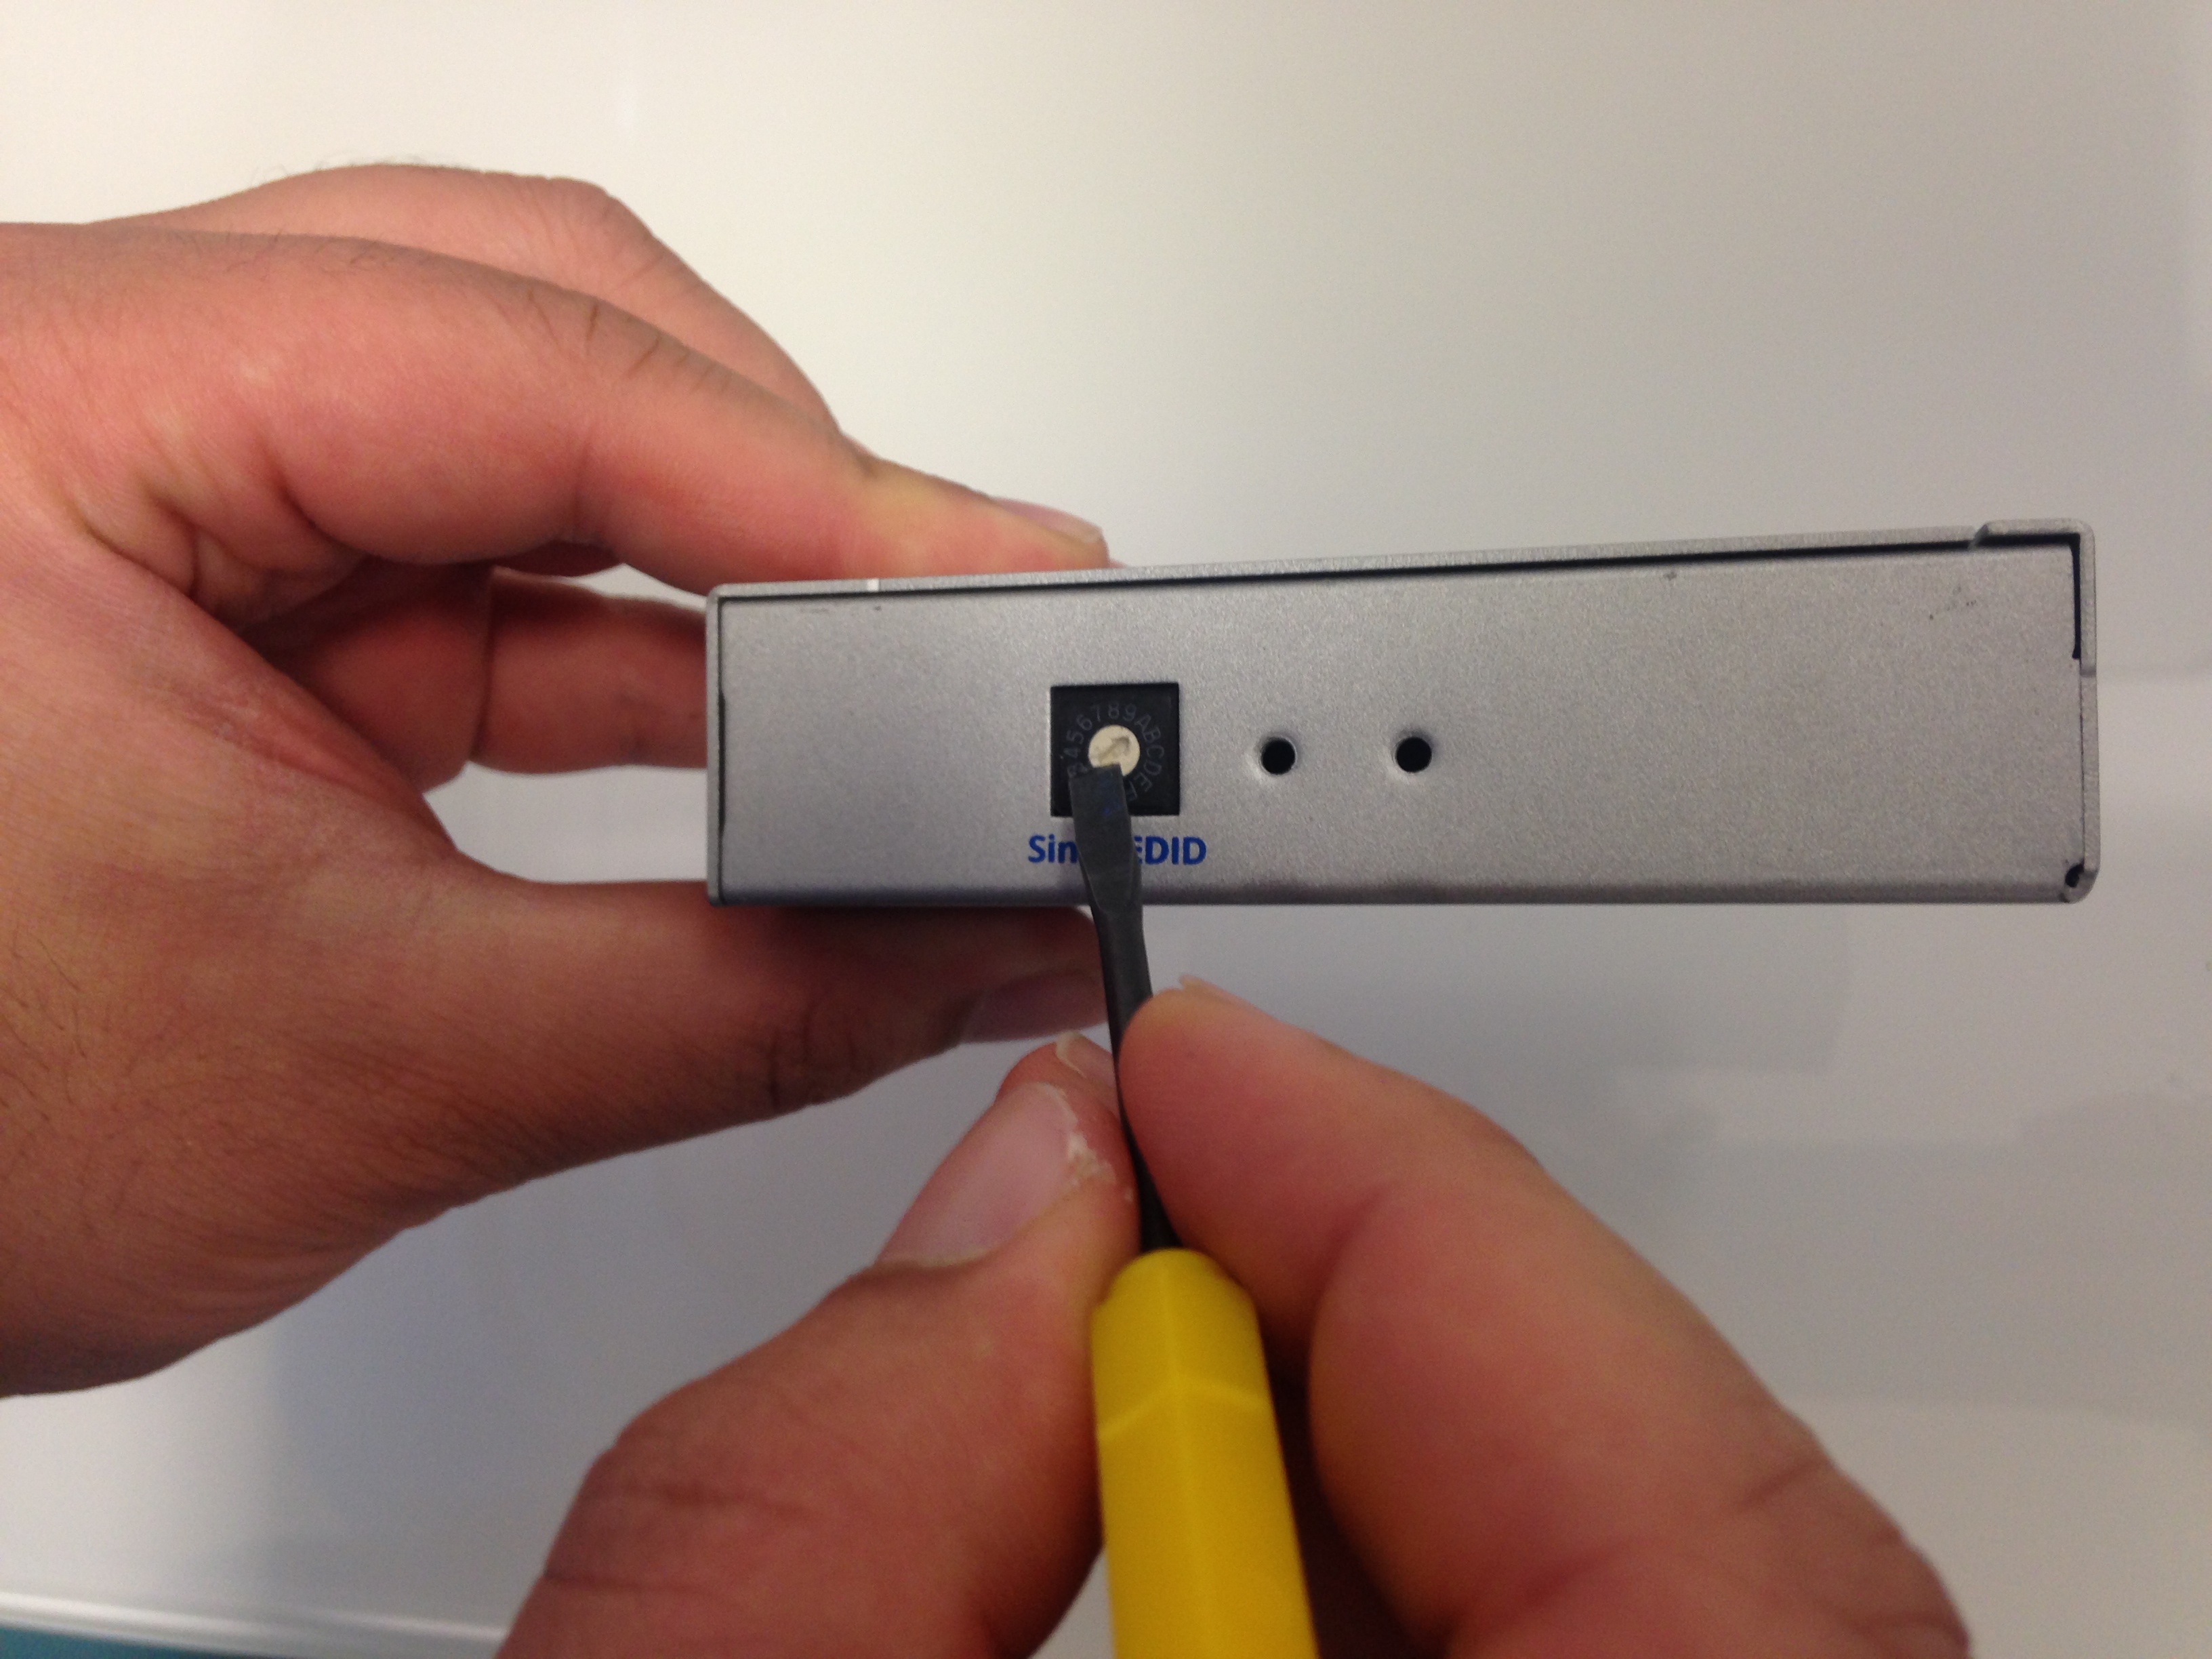
3. Now use a small screw driver to turn the dial manually to the desired 3D EDID profile, which are lettered / numbered on the dial, as show below.
4. Finally, connect your 3D source device to the transmitter via HDMI cable. Connect the transmitter to the receiver using a single run of Cat cable and connect the receiver to the display using a HDMI cable.
If distributing to a local display via the HDMI loop out on the receiver, then also connect the receiver to the local display using a HDMI cable.
Power the source device on and the TV(s) should be showing the 3D video and outputting the chosen audio correctly.
IMPORTANT: With EX50s, changes EDID profiles are only recognised once the transmitter is powered off then on again.
If you need to change the EDID profile of the EX50 extender set once the extender is up and running then you must disconnect / power off the transmitter. Next, manually change the EDID profile once again. Connect up the EX50s as step 4 recommends. You cannot change an EDID profile whilst the transmitter is connected / on.
50m HDMI + IR Singlewire Extender Support Notes – RESW50
Should you be experiencing difficulty with our RESW50, please read through the support notes below to troubleshoot your installation. If your issue persists and you need any further information or support, you can contact customer services here. A downloadable and printable version of these notes is available here.
HDanywhere video distribution systems require a single network cable to be run from each HDTV location, back to a central point. Some single wire systems use HDBaseT technology to transmit over 1 x Cat5e/6/7 cable up to a 100 / 328 ft metre distance.
This article is designed to give you a good overview of the standard of wiring needed for a HDBaseT system. For a detailed, official set of guidelines issued by HDBaseT click here.
NB: Both dongles have ‘RX’ moulded into the casing.
When using the IR over HDMI function, ensure that the switch is pushed across to ‘IR’ and not ‘CEC’.
Connect the dongles into the source device’s HDMI output port and the display device’s HDMI input port, initially without the HDMI cable connected.
Connect the IR cables. Connect the IR TX cable to the dongle that’s connected to the source device and connect the IR RX cable to the dongle connected at the display.
In order to use your source device remote(s) at the TV location, ensure that the IR RX cable receiver eye is fully inserted into the 3.5mm jack port on the dongle and the IR RX cable magic eye is positioned in sight of where you would usually like to point the remote control(s).
Connect the IR TX emitter cable to the 3.5mm jack port on the source device dongle and position the IR emitter in sight of the IR receiving window on that connected source device.
TIP: tape the TX cable flat to a piece of card sat under the source device pointing at the IR window
When using the IR over HDMI kit is set-ups involving splitters/switches/matrices, remember that the IR dongle has to be connected at either ends of a single HDMI cable run. So the dongle will be connected to the HDMI output port of the splitter/switch/matrix and not the HDMI output of the source device. To control the desired source device(s) – ensure that the IR TX emitter cable is positioned in sight of the IR receiving window on that connected source device.
The exact position of the IR window can vary between makes and models of source. Generally it is on the left hand side about 2 inches from the middle of the box. Often it can be a bit of trial and error to locate the optimum IR emitter placement position. Once found I would advice taping/fixing the emitter in place.
A final tip is to ensure that the batteries in your remote control are at full strength. (It’s amazing how a fresh set of batteries can resolve weak IR issues).
If you have all this in place and are still experiencing issues, please contact Customer Services
If you have been advised to ‘hard reset’ your HDanywhere device back to it’s factory condition, please perform the following.
A hard reset will clear any corrupted DDC, EDID or HDCP data on the device’s NVRAM memory and re-initiate the handshaking process with all the connected devices.
Firstly we need to ensure that any manufacturer HDMI CEC link protocols are switched to “off”.
Trade names for CEC are Anynet+ (Samsung); Aquos Link (Sharp); BRAVIA Link and BRAVIA Sync (Sony); HDMI-CEC (Hitachi); E-link (AOC); Kuro Link (Pioneer); CE-Link and Regza Link (Toshiba); RIHD (Remote Interactive over HDMI) (Onkyo); RuncoLink (Runco International); SimpLink (LG); HDAVI Control, EZ-Sync, VIERA Link (Panasonic); EasyLink (Philips); and NetCommand for HDMI (Mitsubishi)
To perform the hard reset:
Power down every device in the set-up – that’s all sources, all displays and the device itself. Leave off at the mains for 10 to 15 minutes.
Now switch all connected display devices on and select the HDMI channel on those displays.
Power the device back on at the mains.
Now one by one, power on the source devices, starting with input 1, input 2 and so on. If you are using a cable/satellite receiver such as Virgin or Sky+HD, please ensure that this is connected to input 1, not input 2. Please note that Sky HD boxes take around two minutes to fully reboot.
After a few seconds everything should have synced and shaken hands correctly and normal operation should resume.
If the problem still persists, Contact Customer Services. for further troubleshooting advice.
Our HDTV multiroom products use the physical properties of the twisted pair copper cables to transmit an uncompressed HDMI signal. It does not alter or compress the HDMI transmission into IP for example.
It cannot be linked in to an existing IP network. Our latest HDBaseT models however can transmit both HDMI and Internet traffic over a single Cat5/6 cable.