Basic IR Setup (dos and don’ts)

When using the remote with the penny type battery, the battery needs to be inserted in a specific way. When you remove the battery cover, there is a small metal tab on the right hand side of the battery compartment. the penny battery needs to be placed underneath this small tab, please see attached image for correct insertion method.
Important:
In most cases, if you are experiencing green screen on your display then this is often down to the HDMI cable in between. A quick way to test to see if this is the case is to replace your existing HDMI cable with our range of 4K or 8K HDMI cables. If that doesn’t work, move your HDMI source to another display in your property (use a different HDMI cable), connect it up and observe to see if the same behaviour follows the box. This will help you determine if the issue is the cable or the HDMI source.
The article below describes how to troubleshoot a green screen when using a HDANYWHERE product, if you are having green screen issues and you do not own a HDA product then we recommend you buy our 4K or 8K HDMI cables and give that a go first – they come with free shipping!
There is no picture or maybe a green screen following standby or when switching between source devices via a matrix. Most often this problem occurs once the TV goes to standby, and when brought out of standby to an ‘on’ state, it will not handshake properly and green screen instead of video appears.
Green screen flashes generally indicate a HDCP (Digital Content Protection) handshaking issue, or a HDMI hot plug detect issue between that particular source device and display.
Sky HD and Sky+HD boxes freezing, locking up, powering themselves off etc are not uncommon. A quick google search will reveal just how many people suffer from this occurrence.
Their connection to other devices is in most cases not the cause of the Sky box fault.
In order to resolve this issue, HD Connectivity’s experience is that a full Sky system reset is the best medicine. Instructions on how to do this can be found here: Sky box full system reset
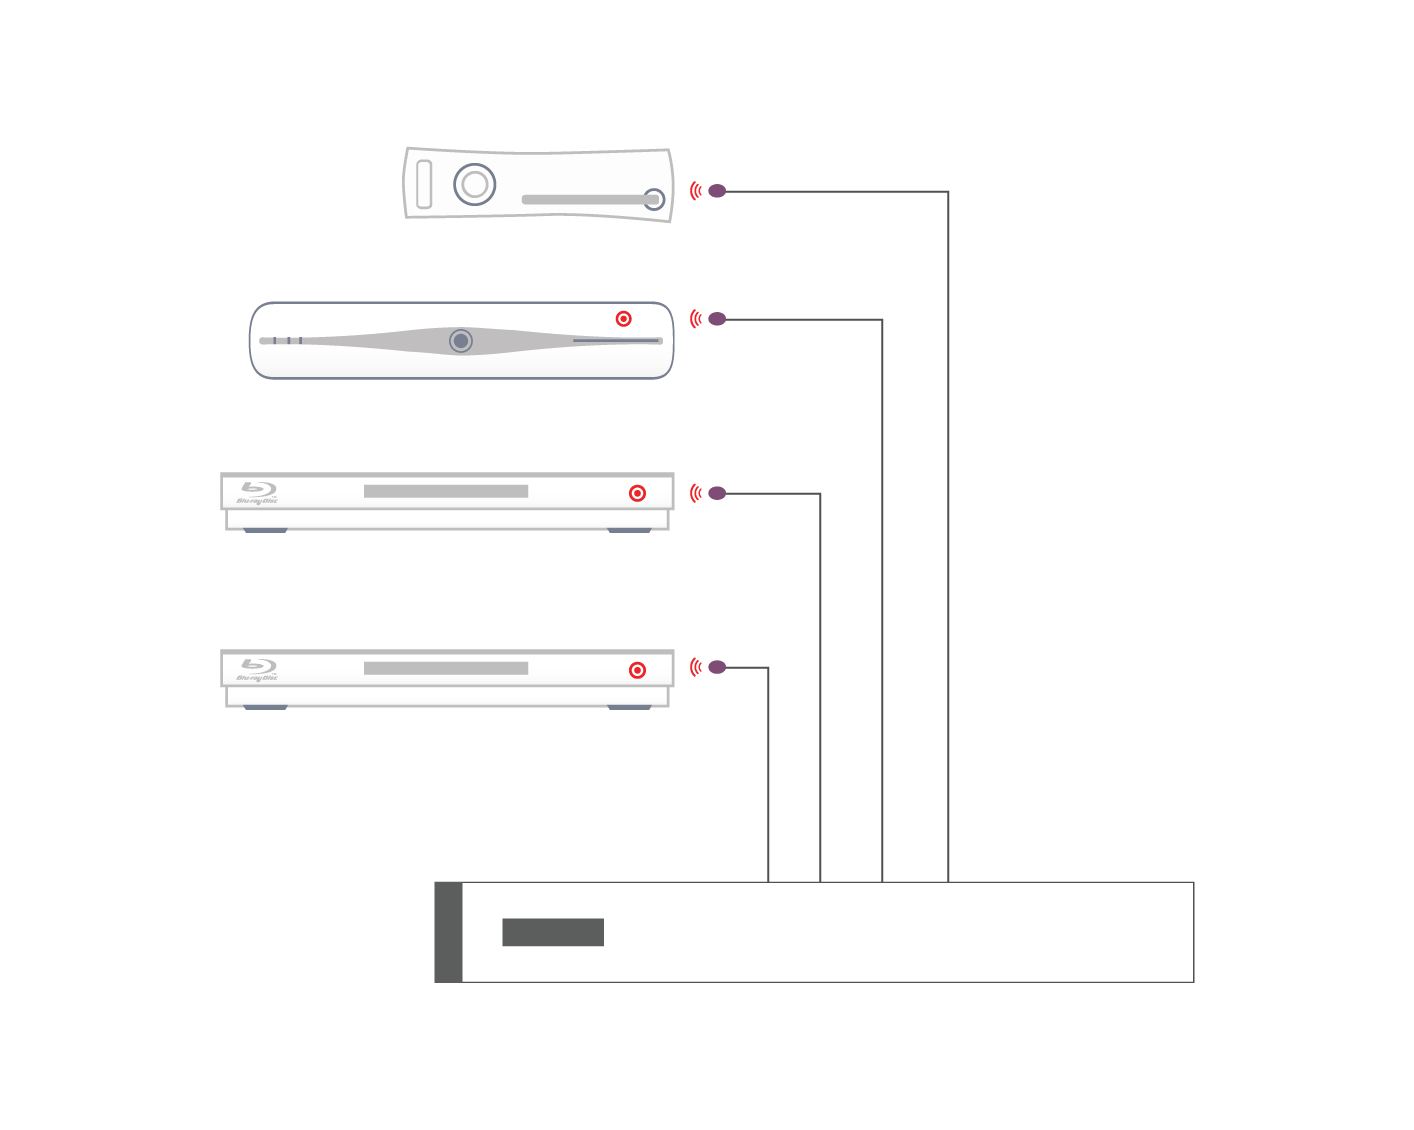
When you push a button on one of your remote controls at home, a short burst of infrared light is emitted from it (normally from the top at the front of the remote). This short burst of light contains information about the button you have pushed. When this light reaches your source device (sky box, Apple TV etc) it is interpreted and the function of the button you have pushed (stop, play, pause etc) will be performed.

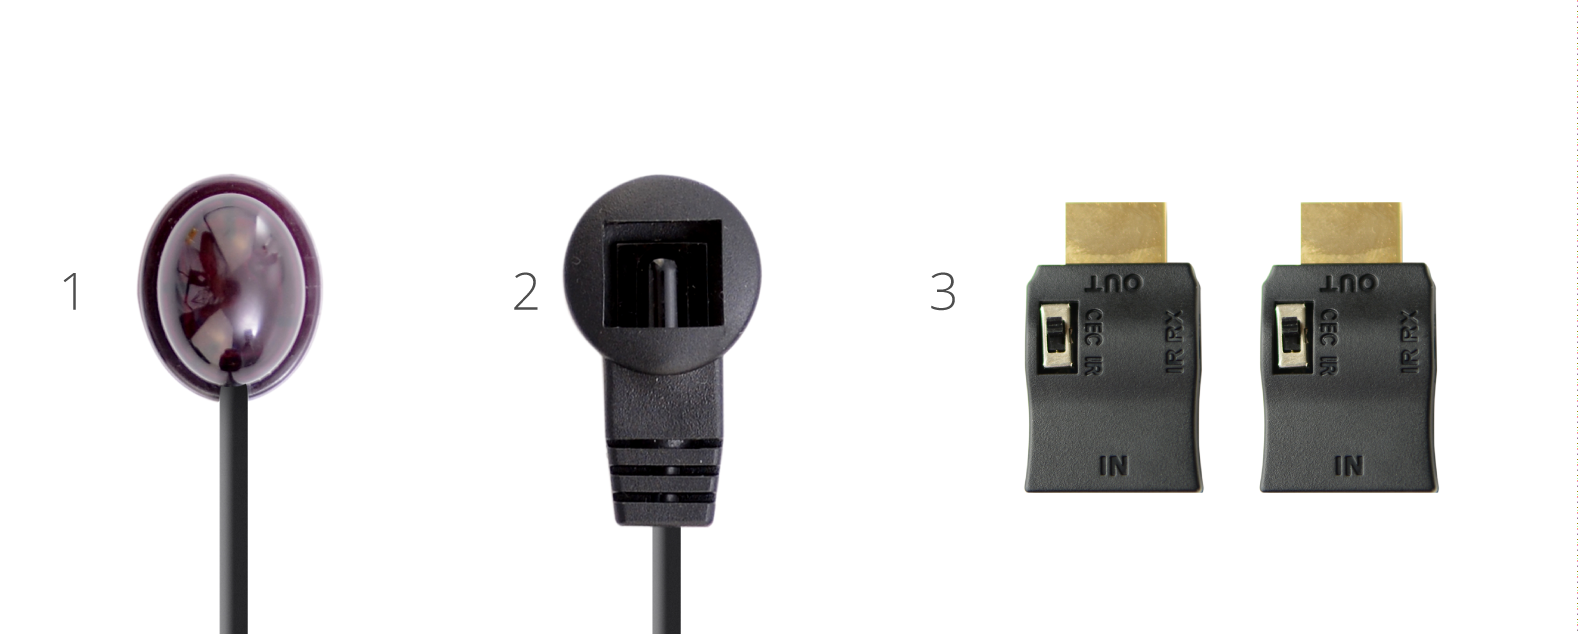
1. Install the HDMI IR dongle between the HDMI input on the TV and your HDMI cable. Ensure that the switch is set to “IR”. Plug the IR Receiver (see ‘Pack Contents – 2.’) into the stereo jack input on the dongle (labelled RX).
2. Position the IR Receiver ( see ‘Pack Contents – 2.’) with clear line-of-sight to the remote.
3. Install the HDMI IR dongle betwen the HDMI input on the source and the HDMI cable, similarly to point 1. Again, ensuring that the switch is set to “IR”.
4. Plug the IR Transmitter (see ‘Pack Contents – 1.’) into the stereo jack input on the dongle (labelled RX on the dongle).
5. Position the IR transmitter ( see ‘Pack Contents – 1.’) with clear line-of-sight to the remote receiver on the source.e.
1. IR Transmitter
2. IR Receiver
3. IR Dongle (both labled RX)
When attempting to troubleshoot any issue, we need to isolate where the root cause of the fault could lie by a logical process of elimination.
At the start of a troubleshooting process, never rule out anything as not a potential cause of the problem. Every aspect of the installation should be considered as a potential suspect. Each component of the installation should be ruled out one-by-one and only then eliminated from the troubleshooting process as the potential problem.
In order to route 3D content easily via a matrix switch or splitter, ALL connected displays need to be 3D compatible. Even, if just one of the displays is not 3D compatible, the 3D source player will NOT output the 3D content. The HDMI handshaking process will trigger the source player to drop it’s resolution output so that all displays can show content.
The problem is HDMI is designed such that the source ‘polls’ the EDID data (EDID is a display’s identity card stating what it’s capabilities are, a bit like a top trumps card) from all connected Sink devices (your 3D enabled display and non-3D enabled AVR) and outputs the lowest quality video signal all devices support (2D in your case).
To ensure 3D IS routed via the Matrix Switch or Splitter, the non-3D compatible display device must not be ‘active’. Sometimes turning the display into standby will be sufficient and sometimes full power off is required.
Essentially, the 3D source player must not be able to ‘see’ a 2D only display connected to the Matrix Switch or Splitter.
For best results when using 3D Blu-ray – HD Connectivity recommends… not actually connecting your 3D Blu-ray (BR) player to the Matrix. As Blu-ray 3D content is generally only viewed at a single ‘main’ TV location, in this instance it is better to have a direct connection between source and display, bypassing the Matrix completely. This will avoid any potential for ‘black screen’ situations at the other TV locations. It will also ensure that absolutely the best 3D format is selected for use on that display, not a potentially reduced quality 3D format that a lower 3D-capable display, connected to the matrix can influence the 3D BR to output. (Plus wearing those massive 3D glasses all around your house is really not cool and could result in you bumping into doorframes! – Ed)
No video/audio being outputted
First troubleshooting question is: Are you using the converter with the source device’s HDMI video output set to 1080i, not 1080p?
The digital to analogue processor (DAC) cannot accomodate a 1080p input signal. The component converter is 1080i pass-through conversion to component video device – it cannot actively reconfigure a 1080p input signal to 1080i.
This is stated on the website, but some people miss it. “The HDMI to Component Converter is a Digital to Analogue (DAC) conversion device that will take a HDMI source input (up to 1080i) and output the video signal as RGB component (YPbPr).”
Finally, always power on the system in the following order from an ‘off at the wall’ starting point.
In order to effectively troubleshoot this problem, we need to deduce whether or not the matrix, the HDMI cables, extender set, or other connectivity accessories such as wallplates, repeaters or cable joiners are at fault.
Troubleshooting Step 1
Swap the outputs over on the matrix to see whether the problem follows the cable run, or stays associated with the HDMI port. This will help us decide whether it is the cable run or the matrix at fault.
Outcome 1: Problem follows the cable.
You have isolated the issue to be associated with that particular cable run and TV. If possible, try an alternative HDMI cable (such as the one connected to another TV on the matrix) to deduce whether a known to be working cable solves the issue. If it does, there is a good chance that the original HDMI cable is at fault and requires replacing.
Outcome 2: Problem stays with the port on the matrix.
You have isolated the issue to be associated with that particular HDMI port on the matrix. This issue could be hardware or software related.
Firstly, to rule out whether it is a software issue, follow the hard reset procedure (described in manual) to reset the matrix software. If this does not revive the troublesome HDMI port, it is likely that there is a hardware fault with the matrix.
In this case, Contact Customer Services. for a replacement unit.
When attempting to troubleshoot any issue, we need to isolate where the root cause of the fault could lie by a logical process of elimination.
The art of effective troubleshooting is the application of logic and deductive reasoning.
At the start of a troubleshooting process, never rule out anything as not a potential cause of the problem. Every aspect of the installation should be considered as a potential suspect. Each component of the installation should be ruled out one-by-one and only then eliminated from the troubleshooting process as the potential problem.

