Search by Support Category: General articles
If your MHUB is marked with “TPC” then it is capable of passing a HDR picture to your display. There are a number of reasons why HDR may not be fed through your HDA device. This support post aims to troubleshoot the most common reasons and how to resolve them.
Important: there are different versions of HDR, make sure your display supports the format your source is outputting!
There are multiple variants of HDR such as HLG, HDR10+ and Dolby Vision, please ensure your display supports the relevant HDR technology.
When connecting your HDR enabled source and display to a HDA system you may need to adjust some settings to get it to work.
- First, disconnect the source and connect it directly to your display. Do you get HDR?
- Ensure you are using High Speed HDMI Cables, this is important as long HDMI cables (over 5m) unless Active or Fibre will not work.
- Was you HDA device manufactured before 2019? Does it have TPC markings or 18G/18Gbps on it anywhere? If it doesn’t then there is a good chance that your HDA device does not support HDR as it was made before the specification was finalised.
- Does your HDA device support scaling? If so please ensure it is set to bypass.
- Copy or set a custom EDID directly from your display. This post explains how to copy EDID directly from your display.
The table below details the PSU DC rating, the system power draw in watts and BTU(British thermal unit) heat output of each device.
| Product Code | Release | PSU Rating (DC) | Power Draw (watts) | BTU | |||||
|---|---|---|---|---|---|---|---|---|---|
XTND |
|||||||||
| XTND2K30 | 2017 | 5V 1A | 2.5 | 9 | |||||
| XTND4K40ARC | 2018 | 24V 1A | 20 | 68 | |||||
| XTND4K100TPC | 2018 | 24V 1A | 12 | 41 | |||||
MHUB |
|||||||||
| MHUBAUDIO64 | 2018 | 24V 13.4A | 520 | 1774 | |||||
| MHUBMAX44 | 2018 | 24V 2.71A | 19.2 | 66 | |||||
| MHUB431U | 2018 | 24V 2.71A | 36 | 123 | |||||
| MHUB862U | 2018 | 24V 2.71A | 28 | 198 | |||||
| MHUBPRO4440 | 2018 | 24V 2.71A | 40 | 136 | |||||
| MHUBPRO8870 | 2018 | 24V 6.3A | 98 | 334 | |||||
| MHUB4K44PRO | 2016 | 24V 2.71A | 42.72 | 146 | |||||
| MHUB4K88PRO | 2016 | 24V 6.3A | 100 | 341 | |||||
| MHUBPRO24440 | 2019 | 24V 5A | 68 | 232 | |||||
| MHUBPRO288100 | 2019 | 24V 6.3A | 130 | 444 | |||||
SPLITTERS AND SCALERS |
|||||||||
| SPLITTERMAX12 | 2019 | 5V 1A | 2 | 7 | |||||
| SPLITTERMAX14 | 2019 | 5V 1A | 2 | 7 | |||||
| SIGNALMANAGER | 2018 | 5V 1A | 1.65 | 6 | |||||
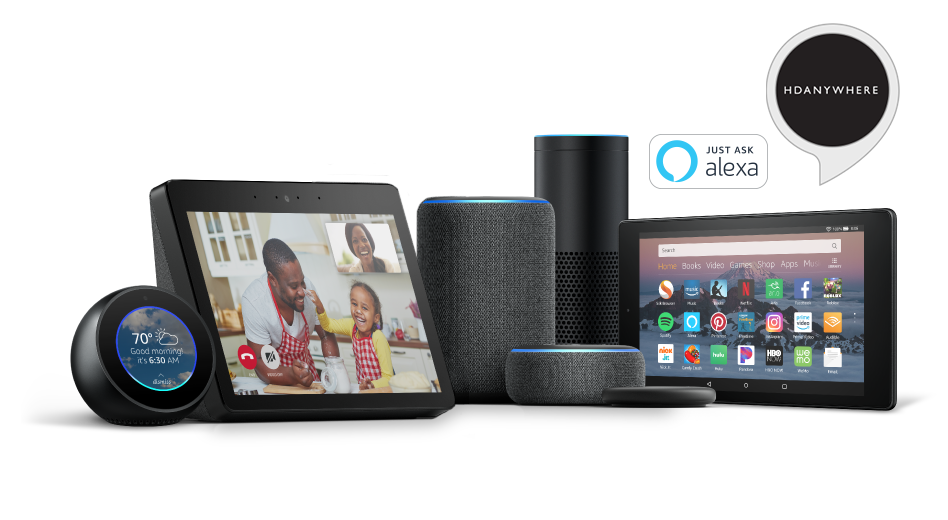
*Before you activate the Alexa Voice Service with your MHUB, make sure Amazon support your territory and version. We cannot guarantee voice services or offer support to those territories not officially supported by Amazon. Check here: https://www.amazon.co.uk/gp/help/customer/display.html?nodeId=202207000
What you need to get your MHUB to respond to voice commands:
- You have completed the first-boot procedure within MHUB-OS
- You have MHUB-OS version 8.10 or higher installed on your MHUB
- You have an active HDA Cloud account
- You have downloaded uControl packs for all displays and source devices you want to control
- You have completed input mapping in MHUB-OS
- You have an active Amazon account
- You have an Amazon Alexa enabled device, such as Amazon Dot/Echo/Show
Setting up AV Skill
Configure voice commands to do exactly what you want
Let’s take the command “Alexa, Turn on football” as an example.
It might appear like a very simple command but there are a number of things that need to happen in order to watch football! First the TV might need to turn on, but in which room? The volume might need to be set to a desired limit. The correct source input might need to be selected on MHUB and finally that source will need to navigate to the channel hosting the football.
You can configure all those actions in what we call a “Sequence”.
Taking the example above:
Alexa (this wakes up your Amazon Dot/Echo/Show)
Turn on… (this invokes the smarthome skill)
football (this is your custom name for the Sequence, it can be anything you want)
Inside MHUB-OS we can configure exactly what “football” does.
- You can select if you want MHUB to turn your TV on and adjust the volume
- You can tell MHUB to switch to the source device with has the football on it
- You can instruct MHUB to change the channel on that source device
Read more about Sequences and Scheduling.
Troubleshooting
- When searching for devices, nothing is found
- Check you cloud account details were entered correctly
- Ensure only 1 system is linked with the cloud account being used
- Ensure you have backed up the system to cloud after configuring the Alexa Skill on MHUB-OS
- When you try to control a zone Alexa says the command isnt supported
- Ensure there are no other devices linked to the Alexa that have the same name as the zone.
Here’s a table of all the commands you can tell your MHUB to do…
Now you’re ready to go. Take a look at a full list of commands that you can say to your Echo.
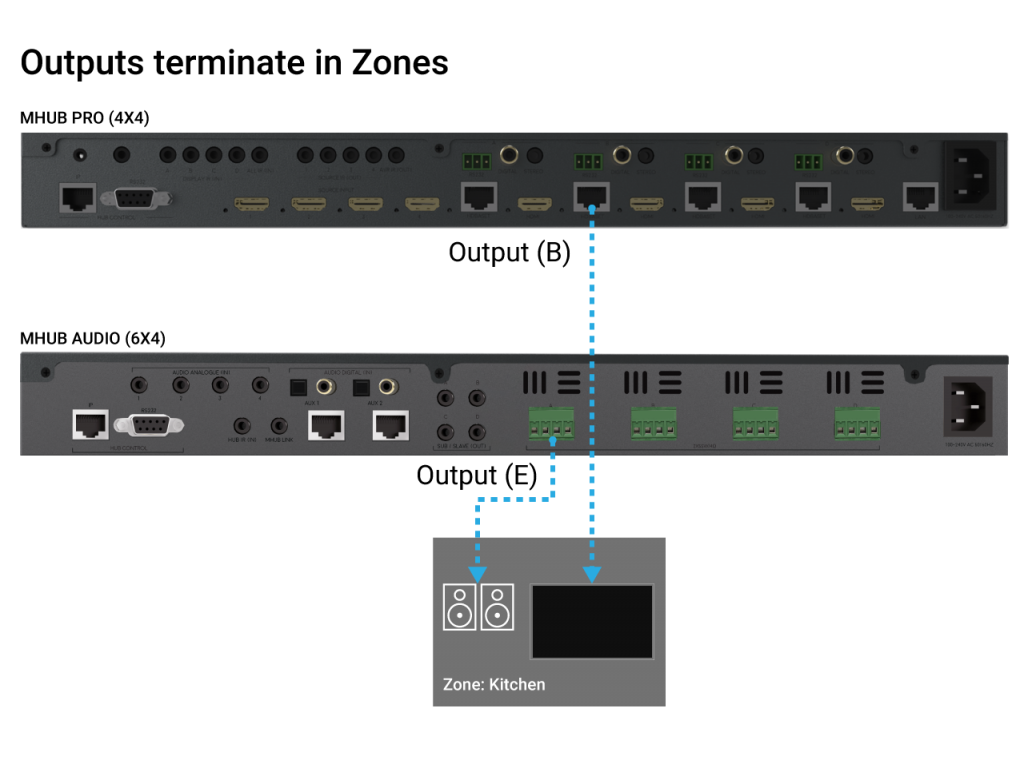
Zones define a physical space in a property where outputs from MHUB terminate.
A Zone can include a maximum of 1 video output and a maximum of 4 audio outputs. For example, you can create a zone called “Kitchen” and assign 1 video and 1 audio output to it to provide you with viewable TV and sound. A Zone must contain at least 1 output from an MHUB for it to be addressable for control. Note: outputs can not be shared or split to more than 1 Zone.
The first boot process for MHUB-OS has remained largely unchanged with the exception of zones.
The slideshow below walks you through the steps within MHUB’s first boot process and how to setup zones to refect the different rooms or areas within you property.
If you wish to configure a stacked system please watch this video – Creating a MHUB stacked system.
You should be able to complete the process in under 10 minutes.
MHUB-OS first boot steps are as follows:
- EULA and Privacy policy
- Name your MHUB
- Name your source devices
- Create zones
- Assign outputs to zones
- Confirm zones
- Connect MHUB to HDA Cloud
- Complete setup
HDANYWHERE(HDA) recommends that every MHUB install goes through its first boot process to ensure that the MHUB is setup correctly.
How long does the process take to complete
If you have an update to install then then first boot usually take about 10 minutes. If there is no update you can normally finish the entire process and have an operational MHUB system well within 5-7 minutes.
Yes. You do not need to access MHUB-OS if you don’t want to. But this is only recommended if you intend to control you MHUB via a control system. You will also miss the opportunity to increase your warranty period and open your MHUB to additional features or services.
I don’t want to use MHUB-OS or go through the first boot process, will MHUB work like a normal?
Yes. You do not need to access MHUB-OS if you don’t want to. But this is only recommended if you intend to control you MHUB via a control system. You will also miss the opportunity to increase your warranty period and open your MHUB to additional features or services.
I made a mistake in the first boot process, can I go back or make a change?
Yes. You can go all the way back to the update step and correct any incorrect information you entered. Alternatively, you can also access MHUB-OS (after you have completed first boot) and change anything then.
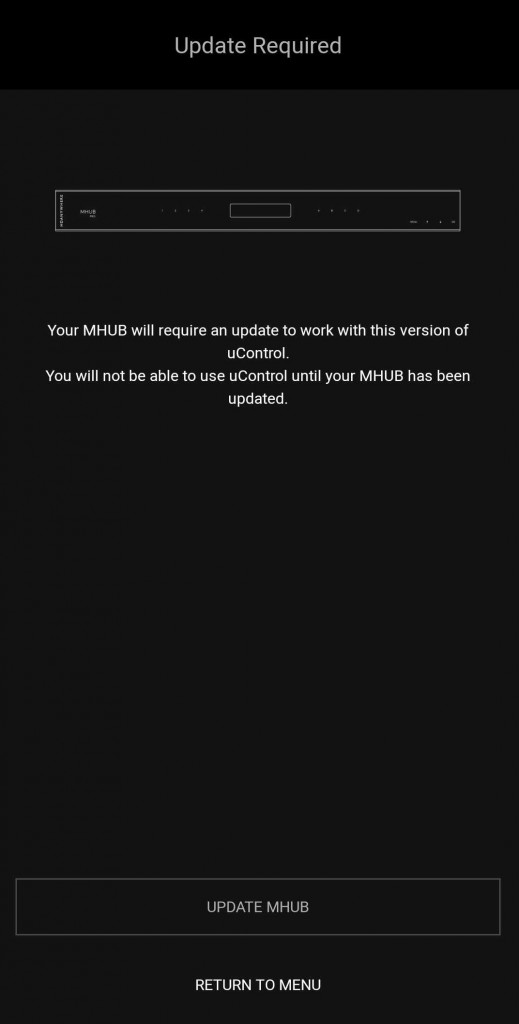
If you have received a notification in uControl or by email that an update is available for your MHUB-OS then follow these steps to update your system. All updates are now handled by uControl. Please ensure you have installed the latest version.
If you have not connected to your MHUB before, please follow this guide first – Connecting to a MHUB
If you have received a notification in uControl or by email that an update is available for your MHUB then chose the correct option below:
Updating an existing system
The majority of MHUB customers will be on MHUB-OS 7 and their systems will contain user data which needs updating to the latest version. If this is you then follow these steps.
- Click ‘Connect to an exisiting MHUB system’, uControl will scan your network for any MHUB systems
- Select your MHUB device
- Connect to your MHUB
- uControl will show popup message that MHUB-OS requires updating, click ‘update’ and follow on screen prompts
Updating an New system
This is likely to happen if you have recently bought MHUB and it was shipped to you on older software. You will run through the following steps:
- Click ‘CONNECT TO MHUB SYSTEM’, uControl will scan your network for any MHUB systems
- Select your MHUB device
- uControl will check the current version of MHUB-OS, if an update is required, you will be prompted to update it.
- Connect to your MHUB
- Perform first boot process.
Updating to MHUB-OS 8.00 from an earlier version
If your version of uControl updates to version 2.0 or above automatically, any previous connection to your MHUB will be reset. This is normal and part of the update process. Follow the process as described in ‘Updating a New System’ and uControl will update your system as part of the connection process.
Follow the instructions within the app to connect back to your system. During this process uControl will check MHUB(s) to see if they also require updating.
Watch a video of it here:
Having trouble updating your MHUB, check here -Update Troubleshooting
Make sure MHUB is connected up correctly before starting the first boot process on MHUB-OS
HDANYWHERE(HDA) recommends that every MHUB install goes through its first boot process to ensure that the MHUB is setup correctly. Please follow the quick start guide (inside MHUB packaging) to make sure your MHUB is connected correctly to your source devices, displays and has an active network connection before proceeding.
I don’t want to use MHUB-OS or go through the first boot process, will MHUB work like a normal matrix?
Yes. You do not need to access MHUB-OS if you don’t want to. MHUB will work distributing video as normal and will be controllable using the included remote controls. Please note that you will not be able to access advanced features such as voice control, the uControl app or build Sequences.
Accessing MHUB-OS (MOS)
There are two ways to access MOS:
- Download our app, uControl, from the iOS or Google Play Store and let it find MHUB (and run you through the first boot) for you
- Go to your MHUB and press and hold the “MENU” button for 5 seconds to reveal its IP address. Make a note of it then put that address in to any web browser on the same network. You will be forwarded to the first boot process.
First boot process
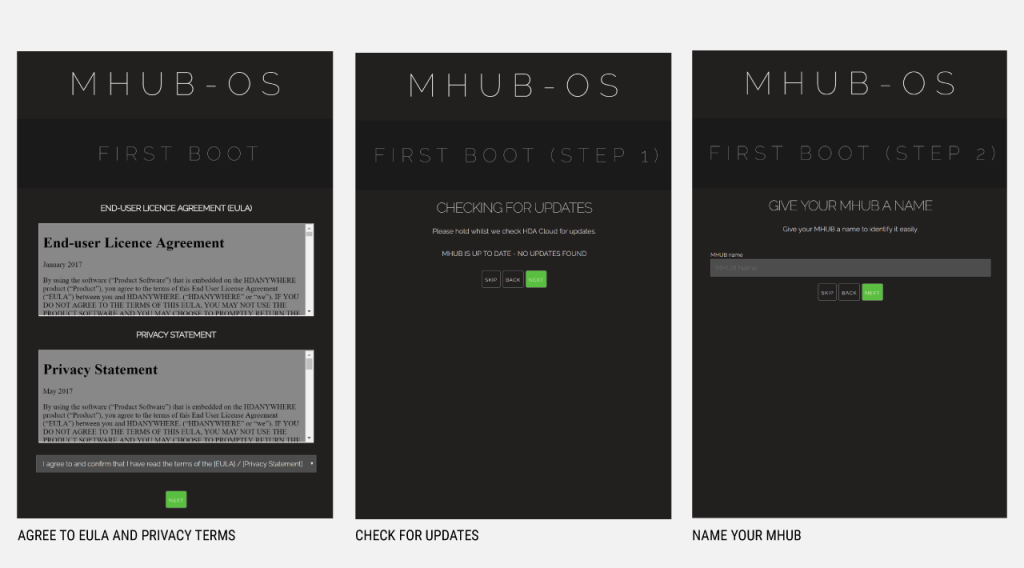
- BEFORE STARTING:Read and agree to the End User Licence Agreement (EULA) and Privacy Statement
- First Boot Step 1 – Check for MOS updates
This is where your MHUB requests available updates from HDA cloud so your unit will update to the latest version. This is done before proceeding.
- First Boot Step 2 – Name your MHUB
Here you can give your MHUB a personal name, this can also be used to differentiate multiple installations by HDA Pro’s - First Boot Step 3 – Name your sources/inputs
On this page you can label your input devices, such as Sky, Apple or Tivo. These labels are used in the uControl app and with voice control. Please go here for best practices when adding names. [Best Practices]
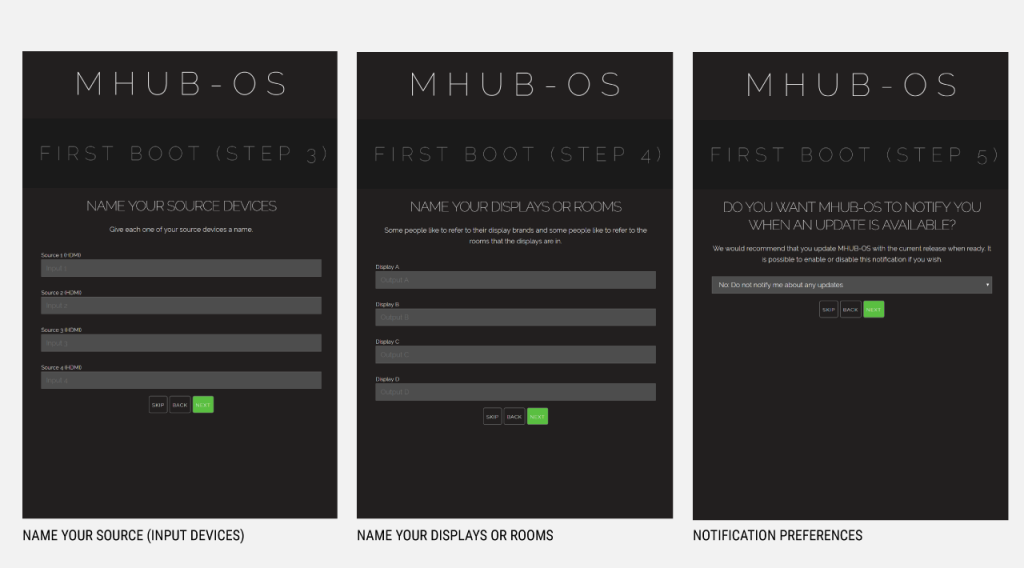
- First Boot Step 4 – Name your Displays/Rooms/outputs
This page is similar to the previous step. You can choose to label them as display manufacturers or room names. Again please follow best practice guidelines available here – [Best Practices] - First Boot Step 5 – Turn update notifications On/Off
MOS updates are released periodically, here you can choose to be notified when an update is available

- First Boot Step 6 – Create or link your MHUB to a HDA cloud account, read and agree to our Terms and Conditions
MHUB4K(3rd gen) and MHUB4KPRO units can be linked to a cloud based account. When registering as a homeowner this enables a couple of things. Firstly when you register, your warranty period is extended by 1 year, in addition to that cloud access is required when using the uControl IRengine feature allowing you to control source and display devices. Cloud access is also required for voice integration. For a HDA PRO the cloud account allows you to manage your MHUB installations remotely, getting system information as well as a host of other features. - First Boot Step 7 – Secure MHUB with a PIN number
If you wish you can lock local access to MOS stopping any unwanted configuration changes from being made. - First Boot Step 8 – Complete First Boot Setup
Once you have completed the first boot process you can either ‘COMPLETE SETUP’ and go to the MOS DASHBOARD pag, . or goto the uControl page to start adding device/source control. For more information on uControl go here uControl
Setting up the MHUB 4K PRO Control / MHUB 4K PRO Smarthome Skill on the Alexa app
We are assuming that you have already downloaded the Amazon Alexa app and have a functioning Amazon account.
Skill types:
There are two types of skill which you can enable on the Alexa app.
- Custom Skill
With a Custom Skill we have full control over the voice interaction (a voice interaction is the communication you have with an ECHO device when speaking a command and also includes the response given by the ECHO) between you and your Echo device, this allows for a greater range of voice commands including playhead, change channel, switch sources, increase/decrease volume.Click here to view a the full range of voice commands. - Smarthome Skill
The Smarthome skill differs from the custom skill in a couple of ways. Firstly, invoking a smarthome skill is fixed and defined by Amazon, this also applies to the voice interaction. We currently support on/off commands, allowing you to perform actions quickly by uttering “Alexa, turn on TV” or a custom label like “Alexa, turn on movies”. - You can of course, use both. They are FREE!
What you need to get your MHUB to respond to voice commands:
- You have completed the first-boot procedure within MHUB-OS
- You have MHUB-OS version 7.0 or higher installed on your MHUB
- You have an active HDA Cloud account
- You have downloaded uControl packs for all displays and source devices you want to control
- You have an active Amazon account
- You have an Amazon Alexa enabled device, such as Amazon Dot/Echo/Show
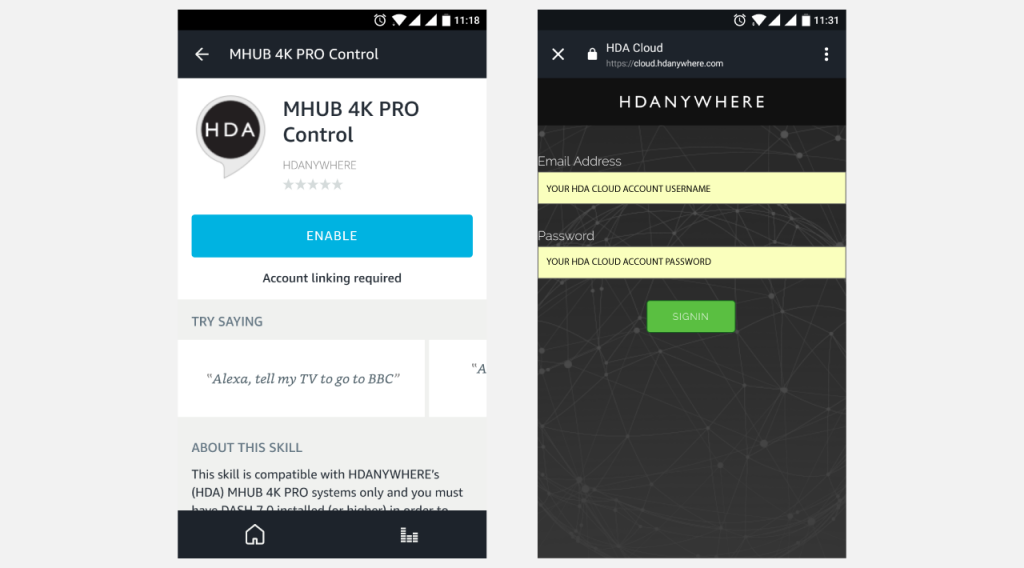
Linking the custom skill “MHUB 4K PRO Control”
- Go to the Skills section on the Alexa app and search for “MHUB 4K PRO Control”
- Click on the skill and select “Enable”
- Click “Link Account” – when you do this, you will be redirected to HDA Cloud’s secure login page. Enter your username and password in to the fields.
Linking the smarthome skill “MHUB 4K PRO Smarthome”
- Go to the Skills section on the Alexa app and search for “MHUB 4K PRO Control”
- Click on the skill and select “Enable”
- Click “Link Account” – when you do this, you will be redirected to HDA Cloud’s secure login page. Enter your username and password into the fields.
- After the account has been linked, visit the “Smart Home” screen then navigate to the ‘Manage devices in Smart Home’ then Devices. Next click ‘Discover’.
- This action will communicate with MHUB and pull any devices making them ready to use.
Configure voice commands to do exactly what you want
Let’s take the command “Alexa, tell my TV to watch football” as an example.
It might appear like a very simple command but there are a number of things that need to happen in order to watch football! First the TV might need to turn on, but in which room? The volume might need to be set to a desired limit. The correct source input might need to be selected on MHUB and finally that source will need to navigate to the channel hosting the football.
You can configure all those actions in what we call a “Sequence”.
Taking the example above:
Alexa (this wakes up your Amazon Dot/Echo/Show)
tell my TV to… (this invokes HDA’s custom skill)
watch (this is a special function which tells MHUB to start a Sequence)
football (this is your custom name for the Sequence, it can be anything you want)
Inside MHUB-OS we can configure exactly what “football” does.
- You can select if you want MHUB to turn your TV on and adjust the volume
- You can tell MHUB to switch to the source device with has the football on it
- You can instruct MHUB to change the channel on that source device
Read more about Sequences and Scheduling.
Here’s a table of all the commands you can tell your MHUB to do…
Now you’re ready to go. Take a look at a full list of commands that you can say to your Echo.
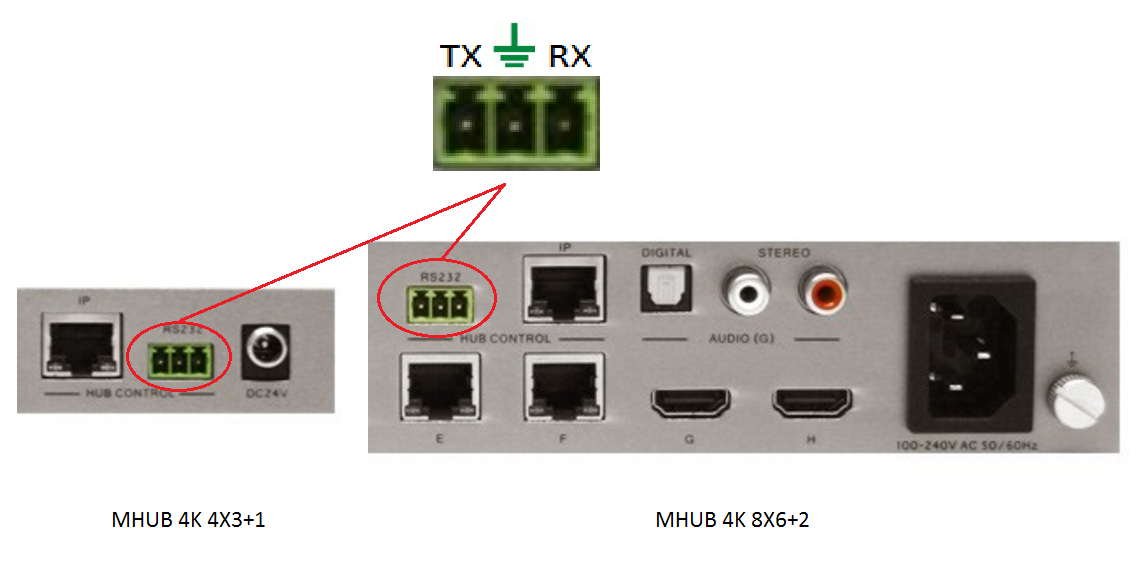
If you wish to control your MHUB 4K 4×3+1/8×6+2 from an external control system via a RS232 connection you will need to wire the included phoenix connector to the following specification.
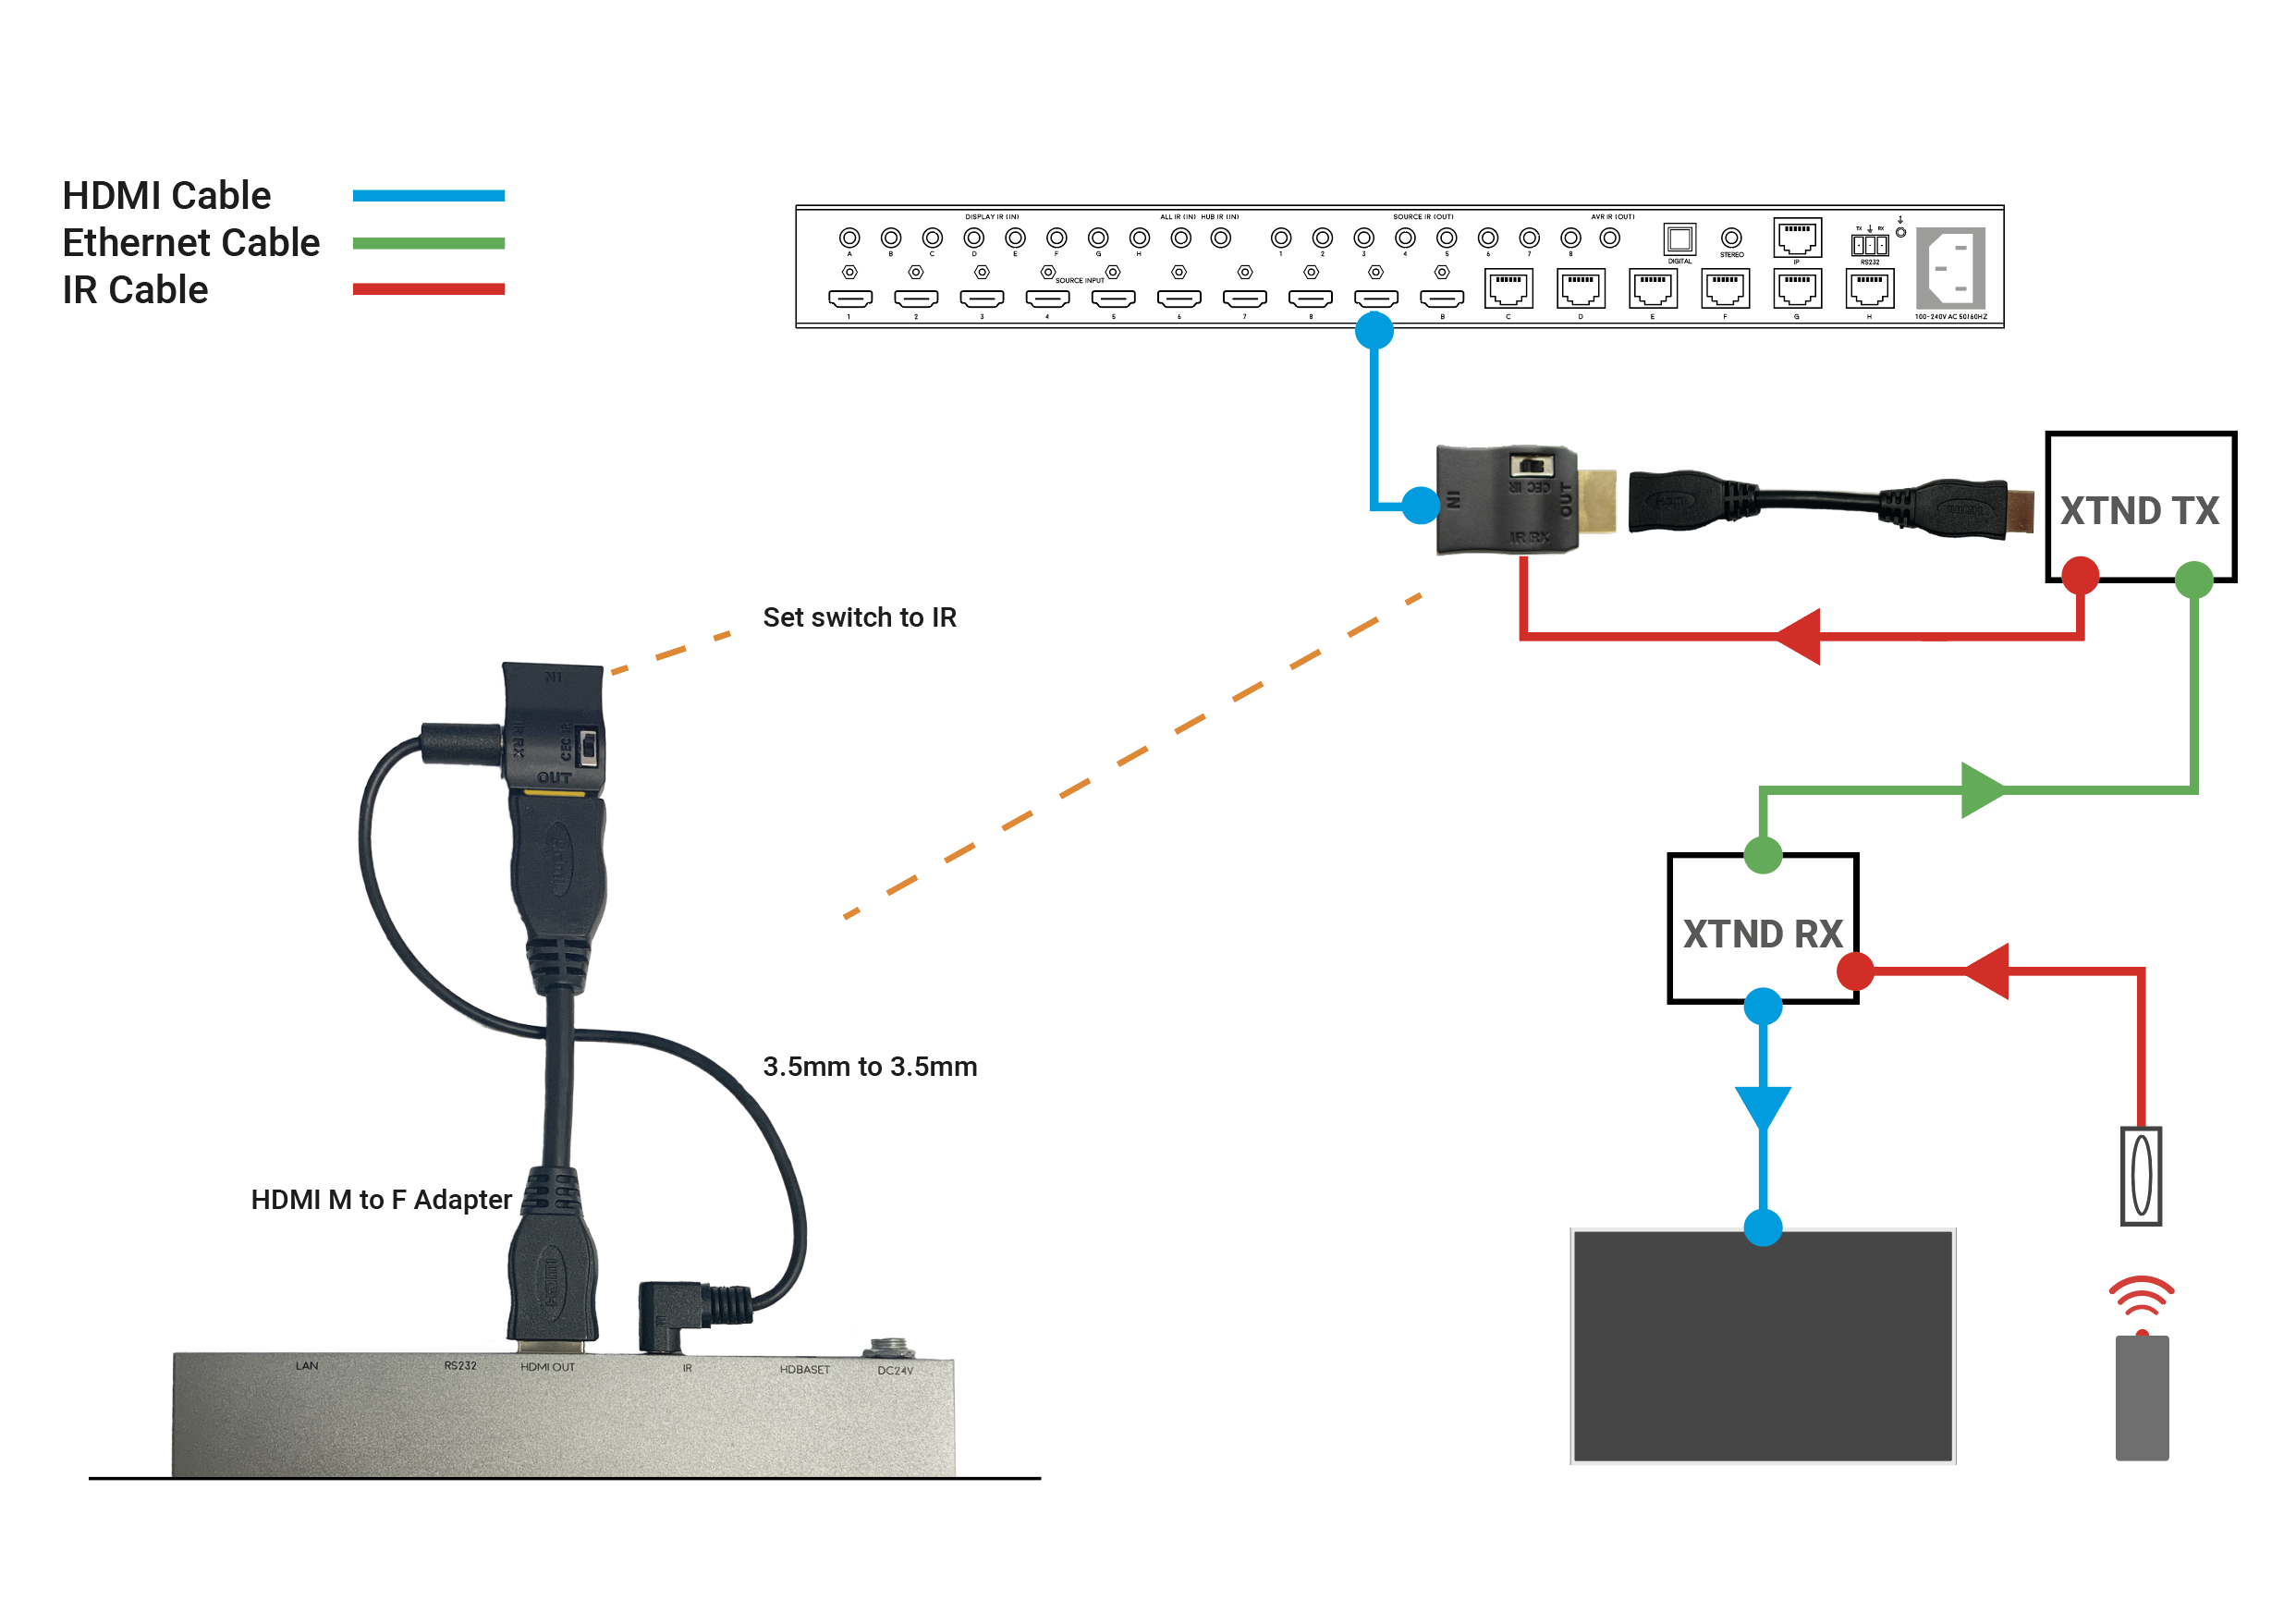
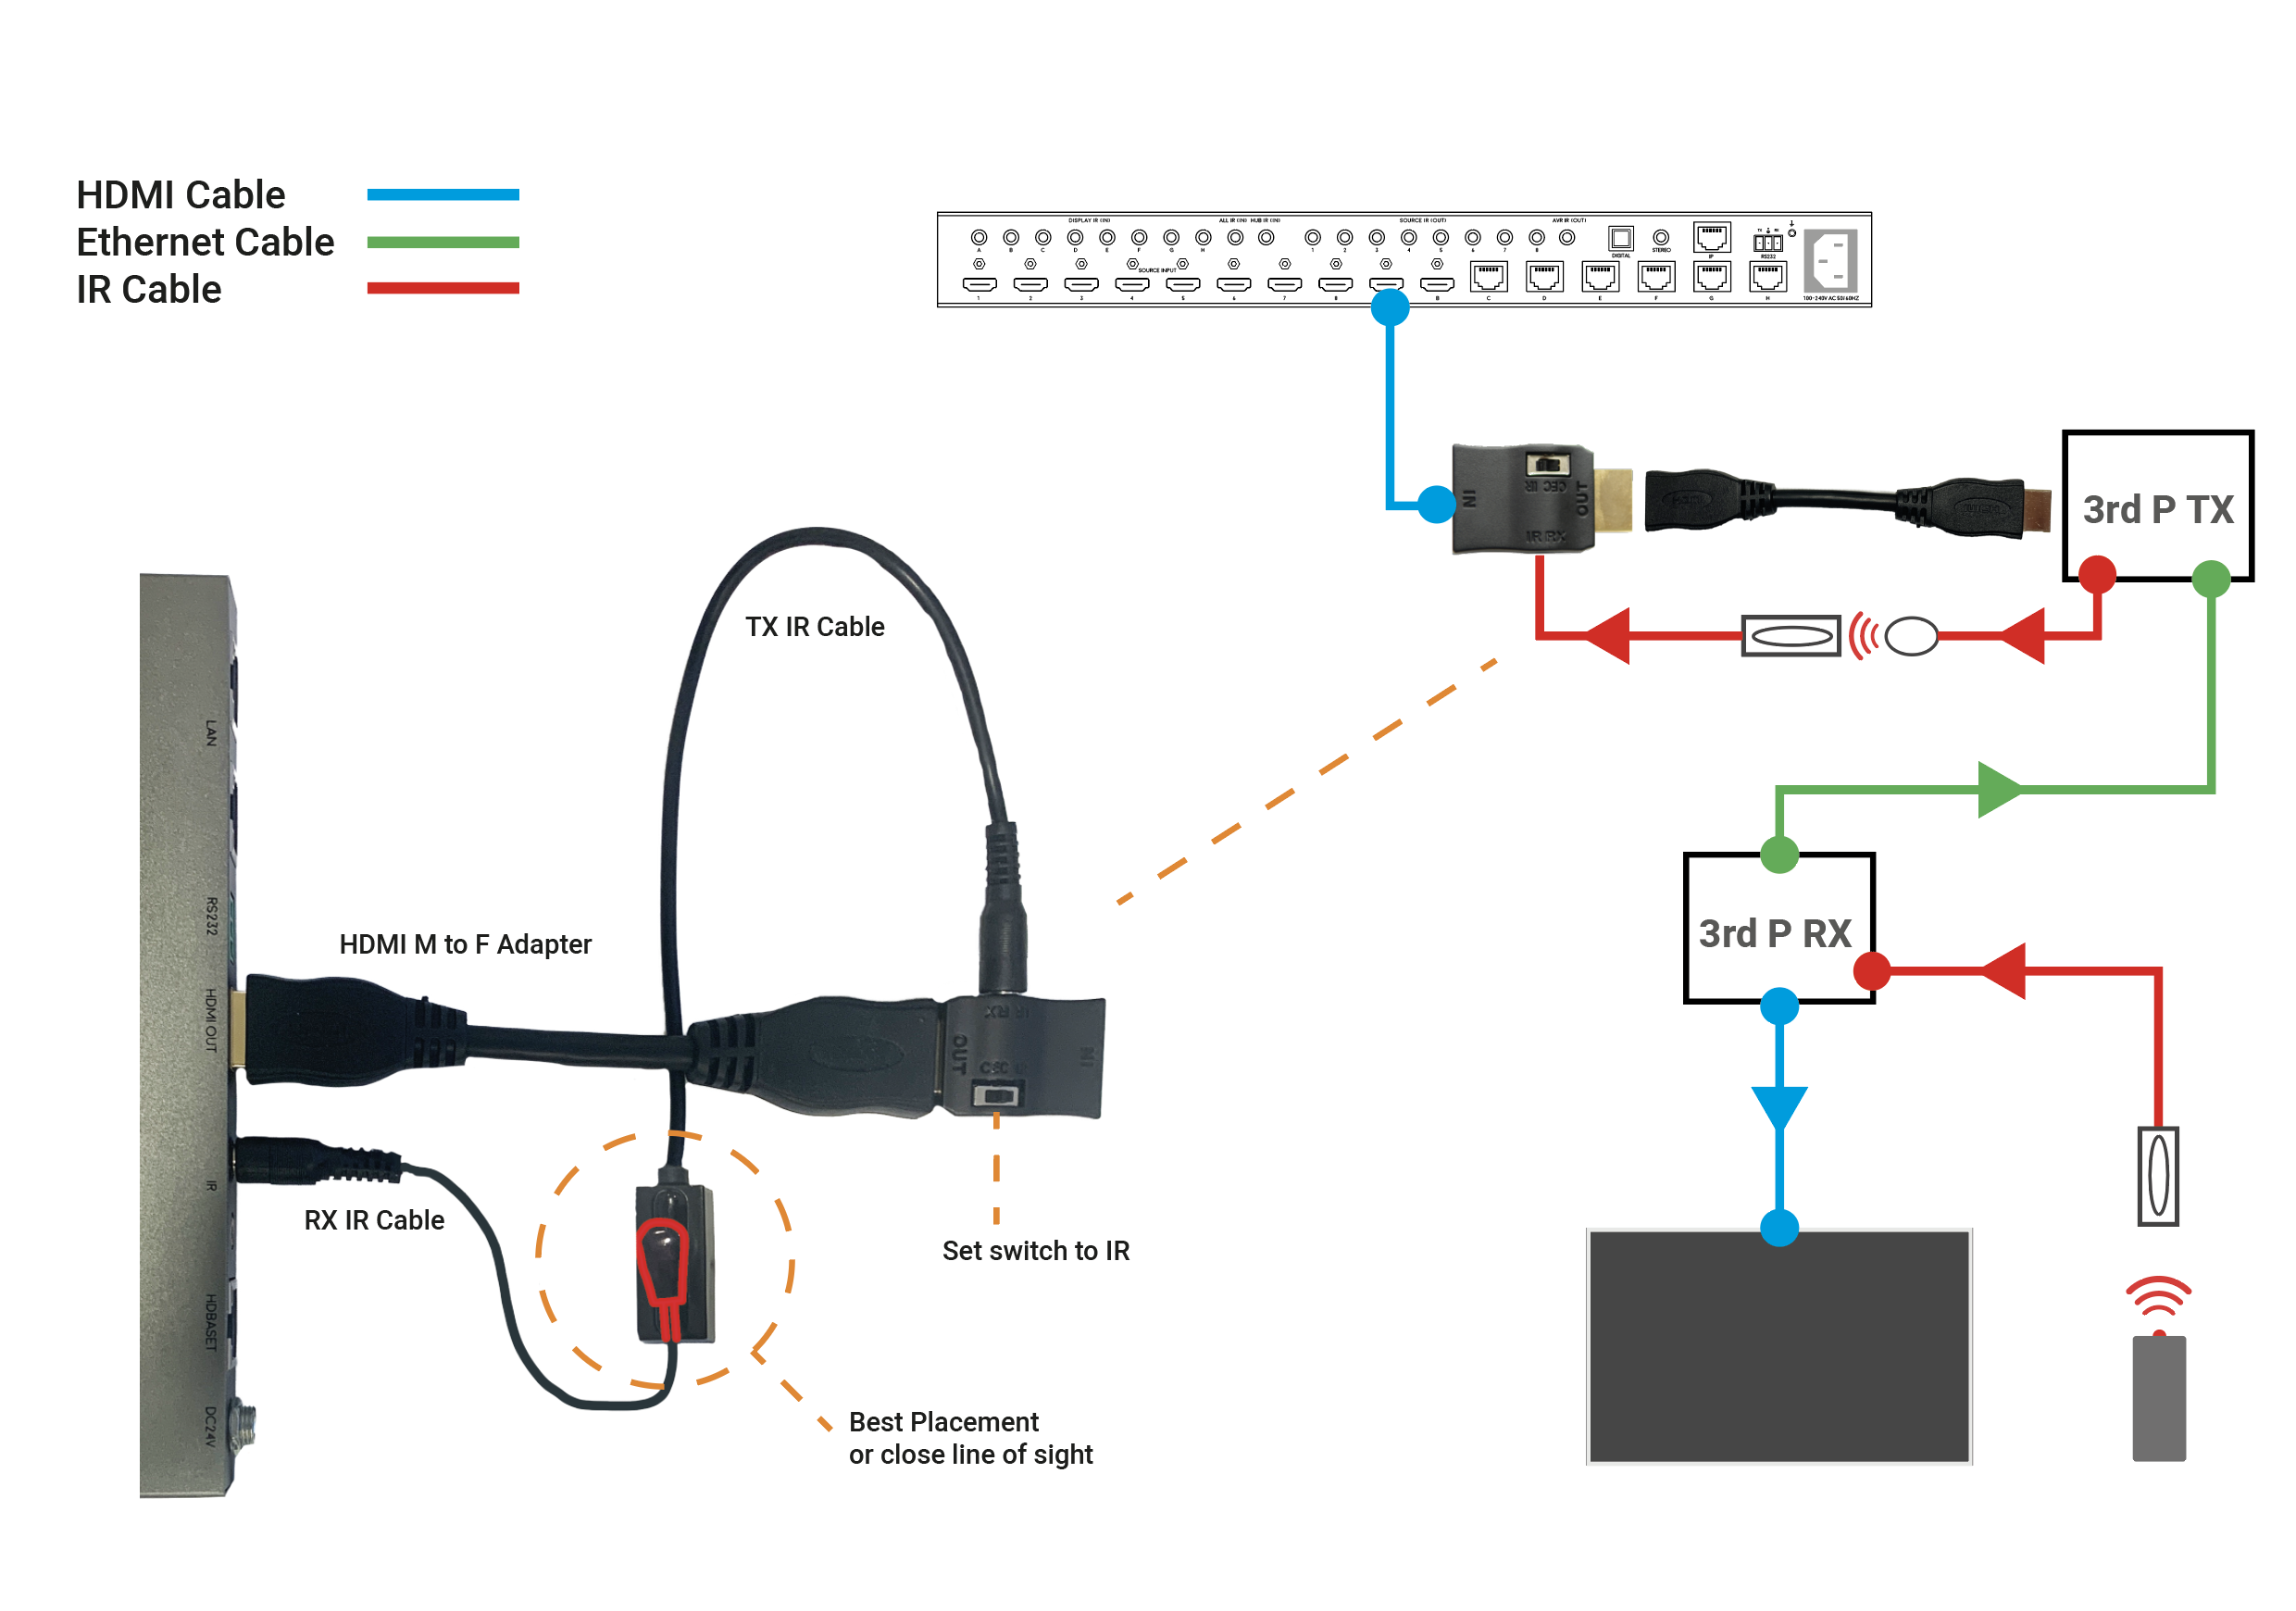
Daisy chaining IR can allow you to connect the IR systems of 2 devices. This allows IR to pass from one device to another
This does not work for HDMI Mirrored ports.
a) The diagram below shows how you can link two HDA devices, such as an MHUBU86240 and an XTND4K40TPC using a MHUB + XTND Integration Kit
b) This second diagram shows how you would connect a HDA system to a 3RD PARTY extender or device such as a Harmony Remote by Daisy-chaining the IR transmitter from the 3RD party device and the IR receiver included with the MHUB system.
c)

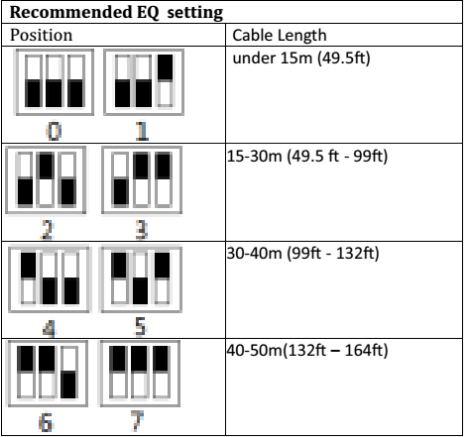
If you find that you have no picture or poor picture quality, you may need to adjust the EQ settings on your XTND 2K30 based on the approximate distance of your cable run. If you have any patch points add an additional 10% onto your effective distance. The below diagram shows the correct switch settings for various lengths of cable run. We suggest working from the maximum distance and working down if you are unsure of the length of your cable run.
On Monday 18th of May we rolled out a firmware release to all live Modular 8×8 units. Whilst the update was being delivered to the units we suffered an ISP issue causing the update file to be corrupted in some instances. Most units will repair themselves automatically. If your unit is displaying a ’1021 cant reach gateway’ error or stuck in a boot loop please follow the instructions below
1. Remove and re-insert the SDCard from the slot on the front by pressing it once to pop it out and press again to pop it back in. This should resolve things in most cases. (This may need to be repeated if the first attempt fails)
2. In more rare cases, it may be that removing all of the cat5 cables from any HDBaseT outputs and then removing and replacing the SDCard is required.
3. In extreme instances, a manual software update is required. To perform this, the SDCard needs to be fully removed from the unit and placed in a Windows based PC. Open The SD Card and remove all files except the ‘SETTINGS.INI’ File. Then file below needs to be downloaded, extracted, then the three files within need to be placed on the root of the 8×8 SDCard. Once there, the card can be inserted back into the 8×8, it should reboot and apply the correct software. Normal operation of the 8×8 will then resume.
If none of the above works, or you require further assistance please contact the technical team via phone or email on 01684576348 & support@hdanywhere.com
Firmware files – Download

Click here for enlarged image: matrix-comparison
With all the technical jargon and various names given to 4K video, it’s difficult to properly compare HD matrices on a like-for-like basis. So here’s our HD matrix buyers guide to help simplify things.
1. Ask yourself, what is the maximum resolution you want your system to support now and in the future?
To help, you can look at the maximum resolution of your displays and / or HDMI sources that you want to connect to the HD matrix. To date, there are very few 4K sources, but lots of 4K capable displays. So you may only have 1080p sources, but 4K displays. So the choice is often if you would like 4K support from your HD Matrix or not, in order to future proof yourself for the eventual arrival of 4K capable source devices.
To understand the resolutions in the table below in greater depth, you can click here for our more detailed 4K support article.
Once you’ve decided on the support you’d like your HD matrix to have, you can match it off to the chipset specification required by studying the table below.
This chipset specification can then be compared across HD matrix products. We’ve also broken the typcial chipset speeds down into levels to help make the next stage easier.
(NB – Platinum will support all Gold resolutions, Gold will support all Silver resolutions and Silver will support all bronze resolutions.)
|
Input Side Level |
Maximum Resolutions Supported |
Typical HDMI Chipset Specifications |
|
Platinum HDMI 2.0 |
4096×2160 @ 60Hz 4:4:4 |
600 Mhz Pixel Clock 18 Gbits Bandwidth |
|
Gold HDMI 1.4 |
3840×2160 @ 60Hz 4:2:0 4096×2160 @ 30Hz 4:4:4 1080p @ 60Hz 3D |
340 Mhz Pixel Clock 10.2 Gbits Bandwidth |
|
Silver |
1080p @24Hz 3D 1080p @ 60Hz 720p @ 60Hz 3D |
165 Mhz Pixel Clock 4.95 Gbits Bandwidth |
|
Bronze |
1080p @ 24Hz 720p @ 60Hz 1080i @ 60Hz |
75 Mhz Pixel Clock 2.25 Gbits Bandwidth |
2. Therefore, which type of output technology do you need?
Next, it’s important to match your desired resolution support to an output technology level that supports that resolution. So you can match gold to gold for example from the previous table.
Once you’ve chosen the appropriate level, there can be multiple types of output technology at the same level. So your choice between them may be based on features other than resolution capability. For a full breakdown of the different types of output technology on offer and their key features, you can read our article here.
You can then compare HD matrices looking for the required or your chosen technology.
(NB – Platinum technology will support all Gold technology resolutions, Gold technology will support all Silver technology resolutions and Silver technology will support all bronze technology resolutions.)
|
Output Side Level |
Maximum Resolutions Supported |
Output Technology Choices |
|
Platinum |
4096×2160 @ 60Hz 4:4:4 |
Native HDMI 2.0 |
|
Gold |
3840×2160 @ 60Hz 4:2:0 4096×2160 @ 30Hz 4:4:4 1080p @ 60Hz 3D |
All Platinum Choice and: Native HDMI 1.4 (High Speed) HDBaseT-Pro (100m CATx Soltution) HDBaseT-Lite (70m CATx Solution) |
|
Silver
|
1080p @24Hz 3D
1080p @ 60Hz 720p @ 60Hz 3D |
All Platinum and Gold Choices plus: Some high quality (non-HDBT) SingleWire & TwinWire 2x CATx solutions. Such as the HDAnywhere mHub. |
| Bronze |
1080p @ 24Hz 720p @ 60Hz 1080i @ 60Hz |
All Platinum, Gold and Silver Choices. |
3. Lastly, make sure your matrix doesn’t have a bottleneck.
A HD Matrix is most commonly made up of three main stages. The input stage, the multiplexing stage and the output stage.
It’s vital to check that each stage of the matrix has the same chipset capability or resolution capability. Most manufacturers will list the chipset speeds they are using and will group together the input stage and the multiplexing stage. Always seek clarification if this is not clear.
Some HD Matrices will have a Gold level input specification, but a silver level output. The result of this is that whilst you may be able to send into the HD matrix a 4K signal (such as 3840×2160 @ 60Hz 4:2:0) you cannot output it from the HD matrix to a TV. So the HD matrix does not have 4K support throughout.
If you work through the above and check in enough detail, you should get what you expect from your HD matrix purchase.
Answers to various 4K / Ultra HD questions we’ve been asked recently…
What is the content availability for Ultra HD/4K currently?
Very limited right now. In the US, Sony are shipping pre-loaded media servers with their 4K panels (in what seems to be a stop-gap measure) until an industry-ratified medium comes along. This will most likely be answered by Blu-ray, with the BDA working on defining a new expanded and elevated specification right now, expected for release later this year.
Why do home technology professionals need to be aware of Ultra HD/4K? Are consumers buying into this new technology?
The need to be aware because it’s happening now. It’s possible some are thinking of it as 3D – a passing fad or a peripheral feature. In reality it is similar to the leap we made from SD to 1080p; it’s being supported by SMPTE, studios and vendors alike to such a high level that most in the community are not yet aware. Consumers will inevitably buy into the technology, but it will take time. Serious penetration won’t happen until prices come right down and content is broadly available. Ten years ago you could only get 1080p by upscaling before Blu-ray (and HD-DVD) came along in 2006, but look at it now – 1080p is ‘normal’. The 4K path will be the same, albeit in a much shorter timeframe.
What are some common misconceptions about Ultra HD/4K?
Misconception one – there’s no content. OK, it’s true right now – but it’s close. There is actually already an impressive back catalogue of movies in 4K – but the new BD spec needs to be released (and new players to implement it) before we’ll be able to truly tap in.
Misconception two – it will deliver no benefit: The resolution would exceed our own visual acuity. Look back through recent history – there was a time that an 34” TV (not rear pro) was regarded as HUGE. Now 42” is small, 50-60′ is normal, and even sizes up to 84” are gaining popularity. However we’re not sitting further away than we used to. IMAX cinemas allow a much bigger picture with relatively close seating by increasing picture resolution. 4K panels and content will do the same.
Can you suggest one way Ultra HD/4K will help the bottom line?
There are a few opportunities for 4K to help drive business:
Old install refurbishments: all-new hardware and possibly even new cabling.
New 4K sales and installation requirements.
It defers cloud based delivery methods and in-home wireless technologies (for AV), reducing the DIY plug-n-play capability of consumers. That is, the high bandwidth specialty installation of 4K sustains the need for a professional integrator, with a chance for more hardware sales.
It will even help software (BD disc) sellers as 4K reduces the threat of downloads due to sheer file size and delivery bit rates.
On the technical side, where will the common mistakes be made?
Cables mislabelled: 4K is deliverable via HDMI at one fixed clock speed of 297MHz (up to 30 frames). This equates to an aggregate data rate nearing 9Gbps, which before the year is out will double again with an upcoming new HDMI spec. Although the existing ‘High Speed’ HDMI cable spec technically has this 9Gbps rate covered, many HDMI cables are possibly not accurately labelled.
Devices simply not capable: The big ‘gotcha!’ is with devices and the HDMI silicon they contain. Currently most devices employ HDMI chipsets (transmitters & receivers) that are limited to 225MHz, or 6.75Gbps, emanating from 2006 specifications. This is clearly insufficient for 4K, even with firmware upgrades. The pipe simply isn’t big enough. Many HDMI extenders, switchers, splitters, matrix switchers etc, on the market also contain this restricted silicon, and so are not adaptable to 4K applications. Even if the silicon is upgraded, length potential will be much reduced, perhaps by more the half. CATx cable has become a favourite choice for installers for HDMI extension but 4K fundamentally challenges the limits of this cable type. Technologies like HDBaseT already address this through proprietary firmware driven timing technologies, but it’s no longer native HDMI. Matrix switchers with HDBaseT will generally still perform the cross-point switching in the HDMI space, so they may still be restricted even though the HDBaseT stage is capable of more.
Do you have a final comment?
4K is not only coming, it’s here. We’ll exist in a world of upscaling and some proprietary file delivery for perhaps a year or two, then things will turn very quickly to more mass-market. The challenge for the custom installer is that they are expected to pre-wire jobs for future 4K support NOW, even though they can’t yet even test what they’re putting in for validation. They will need to rely on their product suppliers and a leap of faith that the products will deliver as expected, when expected. The phrase ‘futureproof’ is scarier and more difficult to define than ever.
The new HDMI spec will push data rates up to at least 18Gbps, driving the need for all-active connectivity and pretty much wiping out CATx cable as a viable extension cable option (other than possibly HDBaseT).
It’s exciting times ahead with the best sales opportunities opening-up to those that learn the basics NOW and stay ahead of the curve.