MHUB-OS first boot process
Make sure MHUB is connected up correctly before starting the first boot process on MHUB-OS
HDANYWHERE(HDA) recommends that every MHUB install goes through its first boot process to ensure that the MHUB is setup correctly. Please follow the quick start guide (inside MHUB packaging) to make sure your MHUB is connected correctly to your source devices, displays and has an active network connection before proceeding.
I don’t want to use MHUB-OS or go through the first boot process, will MHUB work like a normal matrix?
Yes. You do not need to access MHUB-OS if you don’t want to. MHUB will work distributing video as normal and will be controllable using the included remote controls. Please note that you will not be able to access advanced features such as voice control, the uControl app or build Sequences.
Accessing MHUB-OS (MOS)
There are two ways to access MOS:
- Download our app, uControl, from the iOS or Google Play Store and let it find MHUB (and run you through the first boot) for you
- Go to your MHUB and press and hold the “MENU” button for 5 seconds to reveal its IP address. Make a note of it then put that address in to any web browser on the same network. You will be forwarded to the first boot process.
First boot process
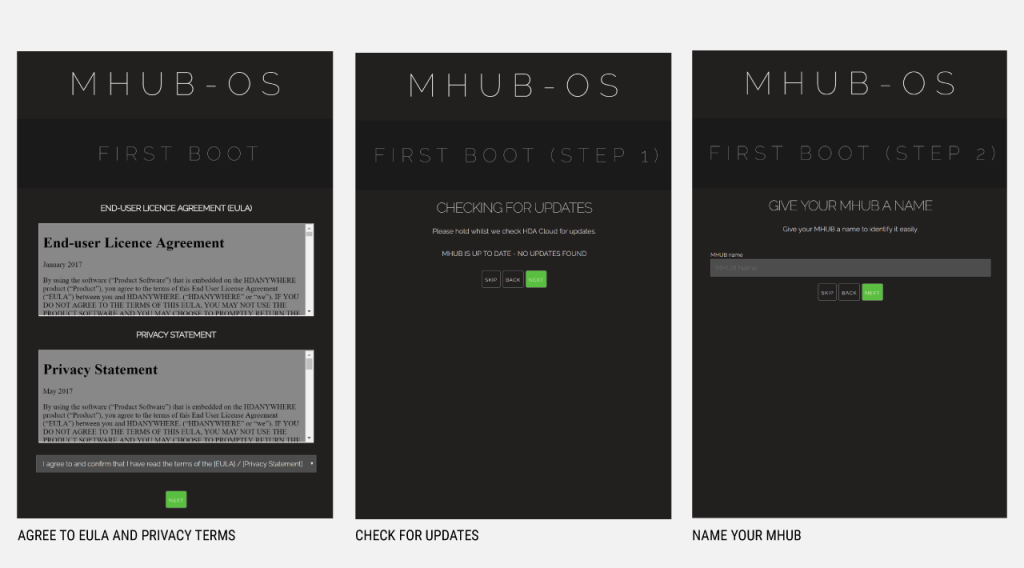
- BEFORE STARTING:Read and agree to the End User Licence Agreement (EULA) and Privacy Statement
- First Boot Step 1 – Check for MOS updates
This is where your MHUB requests available updates from HDA cloud so your unit will update to the latest version. This is done before proceeding.
- First Boot Step 2 – Name your MHUB
Here you can give your MHUB a personal name, this can also be used to differentiate multiple installations by HDA Pro’s - First Boot Step 3 – Name your sources/inputs
On this page you can label your input devices, such as Sky, Apple or Tivo. These labels are used in the uControl app and with voice control. Please go here for best practices when adding names. [Best Practices]
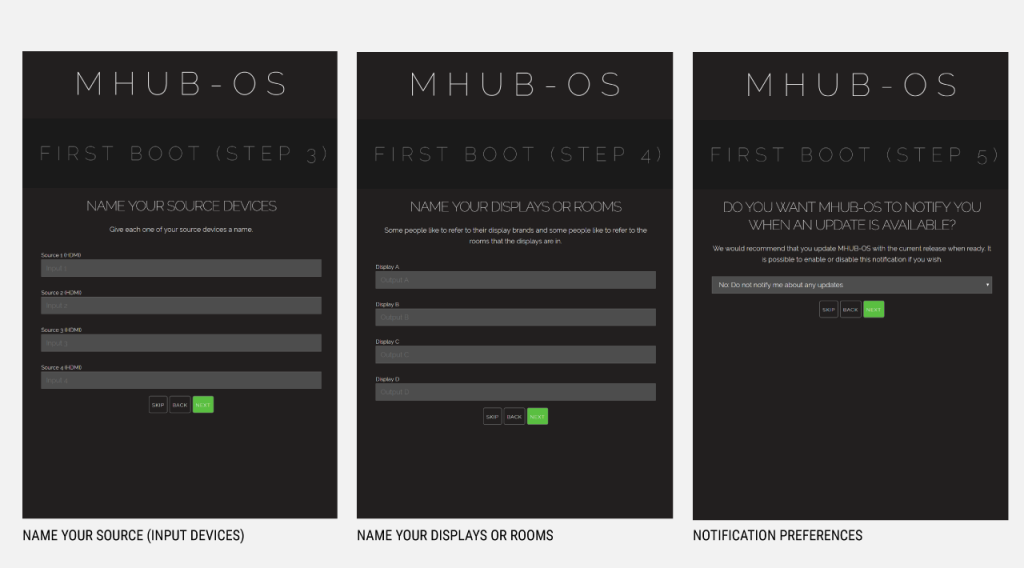
- First Boot Step 4 – Name your Displays/Rooms/outputs
This page is similar to the previous step. You can choose to label them as display manufacturers or room names. Again please follow best practice guidelines available here – [Best Practices] - First Boot Step 5 – Turn update notifications On/Off
MOS updates are released periodically, here you can choose to be notified when an update is available

- First Boot Step 6 – Create or link your MHUB to a HDA cloud account, read and agree to our Terms and Conditions
MHUB4K(3rd gen) and MHUB4KPRO units can be linked to a cloud based account. When registering as a homeowner this enables a couple of things. Firstly when you register, your warranty period is extended by 1 year, in addition to that cloud access is required when using the uControl IRengine feature allowing you to control source and display devices. Cloud access is also required for voice integration. For a HDA PRO the cloud account allows you to manage your MHUB installations remotely, getting system information as well as a host of other features. - First Boot Step 7 – Secure MHUB with a PIN number
If you wish you can lock local access to MOS stopping any unwanted configuration changes from being made. - First Boot Step 8 – Complete First Boot Setup
Once you have completed the first boot process you can either ‘COMPLETE SETUP’ and go to the MOS DASHBOARD pag, . or goto the uControl page to start adding device/source control. For more information on uControl go here uControl