How to setup Siri Shortcuts
HDMI Specification 2.1 or HDMI 2.1 is the most recent update of the HDMI specification (June 2021). The headline is that any source, display and everything in between must support HDMI 2.1 in order to take advantage of the higher video resolution support (8K up to 10K!) and faster refresh rates (4K up to 120fps and 8K at 60fps). If you have an older HDMI cable then it is unlikely that it will be able to handle the bandwidth that’s required for HDMI 2.1.
Answer
If your MHUB has been configured with a fixed IP address and you changed your network infrastructure then your MHUB may become unreachable by your new router.
With MHUB PRO models you can enable DHCP from the MENU button on the front panel by holding it down for 3 seconds. For MHUB 100A & MHUB U (4×1+1) 40 models you need to follow Guide 1, for MHUB U (4×3+1) 40 & (8×6+2) 40 models follow Guide 2 and for older MHUB U (micro USB on front) models use Guide 3.
To reset DHCP on an MHUB (4×4, 6×6, 8+8×8) 100A you can either use the Hercules method which is included below, or you can hold down Output A on the front panel of the matrix for 10 seconds.
To reset an MHUB S (16+16×16) 100A press and hold button 1 for 10 seconds.
To reset to DHCP on an MHUB U (4×1+1) 40 you can press and hold the 2 front panel buttons for 10 seconds.
Serial to phoenix Cable
If your MHUB U has a micro USB port on the right hand side of the front panel then please follow these steps to reset your system. Using Hercules from the steps above, send the following command:
4K is a complicated subject matter. 4K isn’t one format, it’s an umbrella term for many combinations of resolutions, frame rates and colours. Talking about 4K in too generalised a way is dangerous. When I discuss 4K with anyone, in as non-patronising a way as possible to simplify and aid understanding, I refer to ‘i’ and ‘p’, (like 1080i and 1080p) but my ‘i’ and ‘p’ doesn’t mean interlaced and progressive, I mean first generation 4K and next-generation 4K, or in other words ’interim’ and ‘proper’. P could also quite easily stand for ‘premium’.
This is my take on the two-speed world of 4K UHD devices at the moment. It may be labelled and marketed as 4K, it may even support HDCP 2.2 – but is it 4Ki or 4Kp?
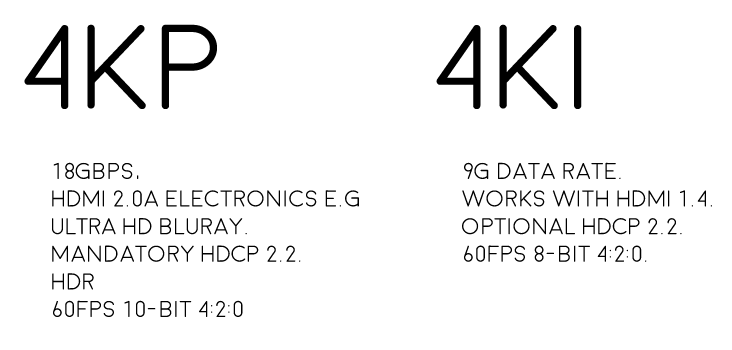
Proper 4K (4Kp) is next-generation HDMI 2.0 spec 4K, it’s what Ultra HD Blu-ray is and what premium 4K content will be. Ultra HD video refreshes at a smooth 60 frames per second in amazing 10-bit 4:2:0 colour (or if your display doesn’t support 10-bit) 8-bit 4:4:4 colour – basically hugely superior colours than what we have seen before over HDMI. 4Kp can also support HDR content and runs at very high 18Gbps data rates and, as a result, will require all new high-bandwidth HDMI 2.0a* spec electronics. 4Kp will also have HDCP 2.2 copy protection encrypting the content, which I’ll touch on later.
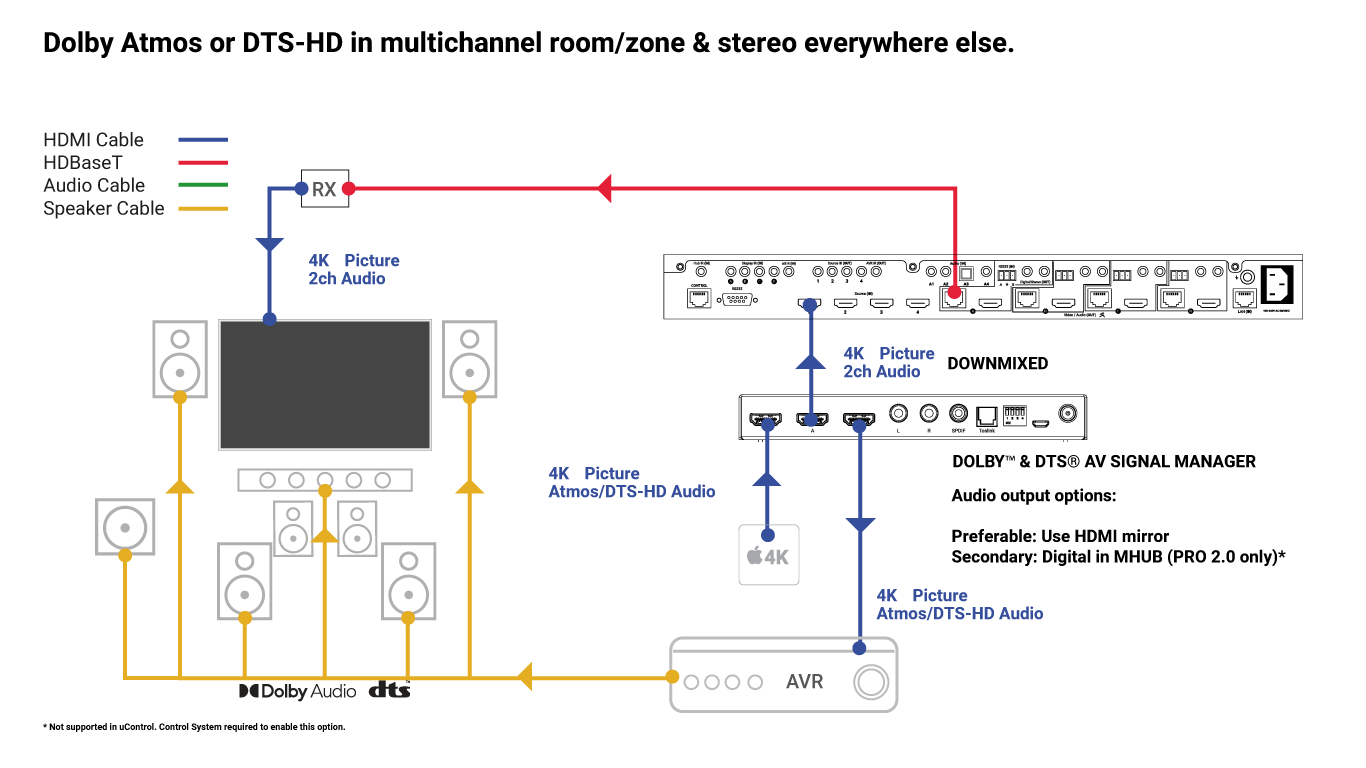
What is most important from integrator perspective is that single-cable HDBaseT DOES NOT carry 4Kp. It will only carry 4Ki because HDBaseT is max 10.2Gbps and 4Kp requires 18Gbps.
Most devices out there today labelled as ’4K’ do not support 4Kp, they only support 4Ki. And by most, I mean over 95%. But this is improving, more and more displays are coming out now that support HDMI 2.0 and have a 10-bit panel. Ultra HD Blu-ray is likely going to be the first 4Kp source device we see. So what is 4Ki?
Interim 4K (4Ki) runs at a 9G data rate (half that of 4Kp) and doesn’t necessarily require new HDMI 2.0 electronics. It will work on older HDMI 1.4 spec devices. It may or may not have HDCP 2.2 encryption. And colour-wise if it’s running at 60fps it can only be the lesser 8-bit 4:2:0 quarter colours. For 4:4:4 a lower 30fps refresh rate is used instead and smooth panning shots are sacrificed. 10-bit colour content just flatly isn’t supported full stop.
What is so important about colours?
4Kp/60 and 4Ki/60 if watched in black and white are EXACTLY the same. The same number of pixels wide and high, refreshing at 60 times per second, with the same pixel data for light and dark contrast. So no difference in sharpness, motion or contrast.
Where they differ is with a compromise on colour. The resolution of the colour layer that gets laid over the top of the black and white frame when combined to make the final image. With 8-bit 4:4:4 each pixel can choose a colour, whereas with 4:2:0 every 4 pixels have to share a single colour choice. Even though a cluster 4 pixels are sharing the same colour, the overlay of the black and white image creates different shades. The resulting 4:2:0 video content, although a lesser quality, is not as substantially different from 4:4:4 as you might think. In fact, when viewing the two from a couple of metres away, the human eye really struggles to differentiate them.
OK, now that you’re thinking is in tune with there being two primary types of 4K material and you understand the difference between the two.
You also NEED to be aware of a couple of associated meteors about to hit the AV side of the CI industry that relate to the facilitation of working 4K HDMI systems. (Remember HDMI is a system, NOT a cable) One is called ‘HDMI 2.0′ and the other is ‘HDCP 2.2′. The two meteors should really hit simultaneously, but not necessarily.
Meteor 1: HDMI 2.0 is the new twice-as-big digital pipeline to accommodate the higher data rates of proper 4K jumping from 9G to 18G bandwidth. Its not a new cable design, its new electronics at either end of the existing (short) HDMI cable we use. So that is new source devices (Ultra HD Blu-ray players for example) and new displays (10-bit SUHD Samsung panels for example). However for longish cable distances, say 3m and over, current passive cables may struggle with the higher data rates. We’ll begin to see some new breeds of HDMI cable types appear to solve this. Some will use integrated active/powered boosting chips and others are likely to be a copper/fibre hybrid cable. Existing long length HDMI cables, that may be buried in walls for example will be able to be utilised through the use of restorative dongles that can be placed at the start and end of the cable run. I expect to see this HDMI cable rescue/fixer market grow over the coming years sharply.
Meteor 2: HDCP 2.2 is the new 128 bit encryption designed to secure 4K content from being pirated. It is the same level of security encryption as credit card issuers use for internet transactions. Unless every device in the signal path is HDCP 2.2-capable, theoretically the content will not be shown. Source, matrix, AVR, balun, display, projector must all support HDCP 2.2. One weak link means black screen. The thing about HDCP 2.2 support is that it’s essential to ensure the best chance of displaying 4K content from your favourite content providers (i.e Hollywood and sports). The HDCP 2.2 event horizon will largely be determined by the release of Ultra-HD 4K Blu-ray and 4K content being delivered via our set-top-boxes.
Conclusion
In summary, until more next-gen 4Kp source devices, like Ultra HD Blu-ray, set-top-boxes, and media players are released we live in a kind of interim 4K limbo land, a phoney, interim 4K world with no proper, premium 4K content to enjoy. In addition to this, more displays with HDMI 2.0, HDCP 2.2 and 10-bit panels need to be released so that users can take full advantage of the advancements in picture quality offered by 4Kp. Month-on-month this situation improves.
From an integrator perspective, quite rightly there is a lot of emphasis currently on HDCP 2.2 support within matrixes. But even when HDCP 2.2 compliant, single-cable HDBaseT is a bottleneck in many video distribution systems, which will result in premium 4K content video quality being downgraded when distributed. There is a quality compromise currently in order to deliver a distributed solution over a single network cable.
SIDELINE RED HERRING: What about 4K streaming like Netflix?
Well it’s not 4Kp and it’s not 4Ki… It’s dynamically compressed, streamed 4K content using AVC H.264 and HEVC H.265 codecs with varying quality from home to home according primarily to the speed and quality of their network. For the purposes of this article, I am talking about uncompressed 4K content.
More info here: http://www.dailytech.com/Netflix+to+Stream+House+of+Cards+in+4K+via+HEVC+H265+Compression/article33962.htm
Your MHUB is similar to a central heating system in that there are many components that all need to come together to deliver a working system. An intermittent or full loss in picture on one or more displays can be down to a number of things.
Unfortunately, there is no fast way to determine this. To do this test correctly you will need to test for several days to ensure the results are accurate and your system is stable.
The first thing to do is disconnect all sources and outputs from MHUB so you are left with 1 source (preferably the source you notice picture loss on) and 1 output (preferably the display you notice picture loss most frequently on).
Grab a piece of paper and log the following outcomes when you test the following:
Start by disconnecting your source from MHUB (and the HDMI cable) and plug it directly into a test display using the same HDMI cable.
Grab a piece of paper and log the following outcomes when you test the following:
If you log any problems or positives with each test then let us know and we can assist you further.
Today’s TVs are very thin with the latest models able to be rolled away into a box! A thinner TV is lighter, easier to install and generally more pleasing to the eye as these new advancements can radically change how your traditional TV looks or is installed into your property.
These advancements have reduced the space inside the TV to an absolute minimum and often a causality of this is the internal TV speaker. Speakers are either located on the rear of the panel (leading to muffled audio) or underneath and in many cases can not provide the type of audio amplification to match the large screen sizes found in the marketplace today.
Soundbars have plugged this gap as customers try to achieve audio reproduction that matches their picture quality. Whilst a soundbar is a simple solution to the problem it fair to say that it doesn’t present itself as the most elegant in that it’s additional (visible) hardware that you need to add to your AV setup. The soundbar is also tied to the function of the TV; so it’s not very easy to listen to music on the same device, for example.
Using MHUB it’s possible to extract the audio that would be sent to your TV – or even the audio generated from your TV apps like Disney+ or Netflix and send that to speakers in your room. Additionally, when the TV is off you can listen to music on the same speakers. If your speakers are embedded in your walls or are in the ceiling then you won’t even notice them, but you’ll hear the difference.
Watch the setup video instead.
To achieve this you will need to use MHUB PRO 2.0 and MHUB AUDIO operating together as one system which we call V&A (video & audio).
Download the MHUB (V&A) guide.
The MHUB PRO 2.0 can de-embed the audio from any video stream or TV app (using ARC) and downmix it into 2 channel stereo. This audio is then fed into the inputs on MHUB AUDIO which manages amplification of that audio. If you have inputs that require amplification then you can stack another MHUB AUDIO (up to three times using uControl) or as many as you want if you’re using a control system.
.
Contacting us is super easy and we respond fast. Let us know if you have any questions about setting up a V&A system.
If you are planning a cinema or media room supplied by MHUB that requires a multichannel audio signal like Dolby Atmos or DTS-HD then you will need additional hardware to achieve this result.
In order to enjoy Dolby or DTS audio in a cinema or media room you will need to instruct your source device (AppleTV / Bluray / Set top box etc) to output its audio in Dolby Atmos or DTS-HD only.
If all the zones in your property can accept a multichannel Dolby or DTS signal then you will have no problem but the chances are that the rest of the rooms in the property will just have a standard TV with a left and right speaker only – think of a kitchen TV display or a TV in a kids room.
You therefore need a device that sits in-line (between) your HDMI video source and the MHUB that does the following important things:
The device that you need is called the Dolby™ & DTS® AV Signal Manager.
It will work with MHUBs and XTND hardware which feature HDMI mirrored outputs.
As TVs have become thinner, the space required for housing speakers within them have diminished, often leaving TV audio weak, lacking in depth and richness. Soundbars are an effective solution to that problem and HDANYWHERE works with them absolutely fine.
There are generally three types of soundbar available.
1. Stereo soundbars
If you have #1 (stereo soundbars) then you’re good to go. This will work all over your property as the speaker arrangement and capability is just a better version of what your TV already supports.
2. Multichannel soundbars
If you intend on fitting #2 then you will need to consider what capability your other rooms/zones can handle around your property. If your soundbar supports 5.1, then we suggest reading the guidance here.
What the guidance above says (briefly).
If you want your soundbar to output 5.1 then you will need to make sure your source is also set to output 5.1. When you do this all displays connected to MHUB will receive a 5.1 audio signal and if that display can’t decode 5.1 audio and downmix it into stereo then you will have an audio problem.
3. Multichannel (Immersive) soundbars
If you intend on installing a soundbar with this capability and require the source to be distributed then you will need additional hardware to manage the signal. We would recommend that you read Using MHUB and providing Dolby Audio (Atmos) and DTS (DTS-HD) audio.
Confused? Help is available, drop us an email for a fast response.
Adding a cinema or media room to MHUB is a relatively easy task for the MHUB to do but if you are planning to have a room with equipment inside it that is of a higher specification to the rest of the property then you need to do a little pre-planning beforehand.
The chances are that this room will have the best display capability and the best audio capability. Because all HDMI sources (bluray, AppleTV, Amazon Fire etc) can only output one format of video and one format of audio at any given time you should ideally serve this room with sources dedicated to it. This way the source can be set to output the correct video resolution and audio format without having to readjust when the stereo 1080p TV accidentally tries to request a picture from the source.
If you have MHUB PRO then we recommend using the HDMI cable direct to your AVR and then the digital coax after.
Other displays in your property (like that 1080p display in the kitchen) are able to contact your source device to downgrade it’s audio and video capability. You can block this from happening by selecting an appropriate EDID profile for your source from within MHUB-OS.
You don’t need to do this if you fix the output from the source device to your room but we recommend it to make sure your system doesn’t suffer from strange behaviour.
If the source is fixed to output 5.1 then MHUB will deliver 5.1 audio to all HDBaseT outputs connected to MHUB. If your TV or display can decode and downmix multichannel audio into stereo (many now do) then you will hear the content correctly in stereo. If the TV is unable to decode the 5.1 audio then you are likely to have audio problems or hear nothing at all.
Yes. Many modern TVs can accept a 5.1 audio signal so that they can work with 5.1 compatible soundbars over HDMI ARC or Optical connections. Depending on the TV specification, it can work in two ways:
This will mean that you get 5.1 audio in rooms where you need it and stereo everywhere else. It is important that you check the specification of your displays carefully before considering this option. Older TVs are not likely to handle multichannel audio at all ruling out this option entirely.
If you see the label “DRIVER REQUIRES LICENSE ACTIVATION FROM VENDOR” then this means you need to create an account and generate a license key before the driver will work. As always, the driver remains FREE OF CHARGE. The process takes under 5 minutes to complete and offers HDA Pros the following benefits:
1. Track and find your drivers for every install you commission.
2. Be kept updated if the driver gets patched or improvements are added.
3. Check to see if the driver is operating correctly.
4. The ability to improve your HDA Pro listing
Some devices no longer have built in IR receivers. To enable them to be used with the uControl app you can add a third party device called FLIRC. This connects to a source device via USB and turns IR codes into control commands the source device recognises.
There are two Flirc devices that we are compatible with, the first part of this guide is for the older model which can be found here. The second part of this guide is for the Flirc device that is specifically for the Amazon Fire TV and can be found here.
If you are using the older model of Flirc you will need an OTG cable like this -
Install the Flirc software on your computer and install this profile onto your laptop/PC – Fire TV
Load up the Flirc software and in the top left click File, and then Load Configuration and choose the Fire TV profile you have just downloaded.
Remove your Flirc from the laptop/PC and connect it to the female USB port on the OTG cable. Then taking the male micro USB section of the cable plug it into the Firestick. Lastly plug your power into the female micro USB port.
Next place the IR transmitter from you HDANYWHERE device on or near to the Flirc. You may need to move it around to test which positioning works best, but we recommend taping it to the top of the Flirc.
Once this is done you can install the FireTV(FLIRC) IR pack and control your Amazon device with uControl.
If you are using the Fire TV specific Flirc you will not need the OTG cable, but will need to install the Flirc software on your computer and install this profile onto your laptop/PC – Fire TV
Load up the Flirc software and in the top left click File, and then Load Configuration and choose the Fire TV profile you have just downloaded.
Remove the Flirc from your laptop/PC and connect the power lead to the micro female USB port on the Flirc. Plug the other side of the Flirc (male USB) into the side of the Firestick, and then plug the Firestick into your desired input.
Lastly place the IR transmitter from you HDANYWHERE device on or near to the Flirc. You may need to move it around to test which positioning works best, but we recommend taping it to the side, adjacent to the Flirc.
Once this is done you can install the FireTV(FLIRC) IR pack and control your Amazon device with uControl.
This bug has been resolved in uControl on iOS (2.4.7.1.0.2). You must delete uControl from your iOS device first and reinstall it from the App Store for the patch to apply.
We have received reports from customers informing us that input labels and switching ability has been lost in the latest release of uControl on iOS (version 2.4.6.1.0.4).
The problem exists exclusively within uControl on iOS. We recommend that you do not change your MHUB settings, run any updates or change any configuration. The repair will be delivered via a patch applied to the uControl app.
The error involves MHUB systems from late 2016 / early 2017 which were sold on MHUB-OS version 7.0 or lower and then upgraded. When these systems were upgraded to MHUB-OS version 8.0+ a one-time script was required to convert data from the old format (version 7 and below) to the new format (version 8 and above) which is active today still. To maintain backwards compatibility the original data format was kept on older systems.
uControl (version 2.4.6.1.0.4) contains updates for brand new systems (MHUB PRO 2.0) and MHUB AUDIO operating in stacked mode and removes the backwards check for compatibility. This has been confirmed as the source of the issue.
This blog post will update daily to help keep track of our progress and attempt to rectify the problem.
Wednesday 24th June 2020
Testing confirmed OK overnight. uControl on iOS (2.4.7.1.0.2) deployed to general userbase.
We recommend a fresh install, by deleting the app from your iOS device then reinstalling from the app store.
Tuesday 23rd June 2020
Patch is being tested. Please email us (support@hdanywhere.com) if you would like to beta test this release.
Monday 22nd June 2020
Cause has been identified and work on patch is underway.
Sunday 21st June 2020
Senior technical staff upgrade issue urgency level. Developers begin work to start identifying cause.
Saturday 20th June 2020
First notice of problem reported. Customer services respond using standard procedures.
Friday 19th June 2020
uControl on iOS (2.4.6.1.0.4) deployed to general userbase.
Control4 does not natively support Audio Return Channel (ARC). With more and more content coming from the likes of Netflix, AppleTV, Disney+ Youtube and BBC iPlayer, this presents a problem for installers who want to take this audio and feed it to external speakers as part of their Control4 project.
This video shows you how MHUB and our Control4 driver makes the impossible possible and describes the steps you need to follow in Composer to achieve ARC in Control4.
Please ensure that both your MHUB and the Control4 driver supports ARC.
http://support.hdanywhere.com/hda-control-drivers/
https://hdanywhere.com/why-c4-dealers-prefer-mhub-pro-2
The table below details the PSU DC rating, the system power draw in watts and BTU(British thermal unit) heat output of each device.
Product Code | Release | PSU Rating (DC) | Power Draw (watts) | BTU | |||||
---|---|---|---|---|---|---|---|---|---|
XTND |
|||||||||
XTND2K30 | 2017 | 5V 1A | 2.5 | 9 | |||||
XTND4K40ARC | 2018 | 24V 1A | 20 | 68 | |||||
XTND4K100TPC | 2018 | 24V 1A | 12 | 41 | |||||
MHUB |
|||||||||
MHUBAUDIO64 | 2018 | 24V 13.4A | 520 | 1774 | |||||
MHUBMAX44 | 2018 | 24V 2.71A | 19.2 | 66 | |||||
MHUB431U | 2018 | 24V 2.71A | 36 | 123 | |||||
MHUB862U | 2018 | 24V 2.71A | 28 | 198 | |||||
MHUBPRO4440 | 2018 | 24V 2.71A | 40 | 136 | |||||
MHUBPRO8870 | 2018 | 24V 6.3A | 98 | 334 | |||||
MHUB4K44PRO | 2016 | 24V 2.71A | 42.72 | 146 | |||||
MHUB4K88PRO | 2016 | 24V 6.3A | 100 | 341 | |||||
MHUBPRO24440 | 2019 | 24V 5A | 68 | 232 | |||||
MHUBPRO288100 | 2019 | 24V 6.3A | 130 | 444 | |||||
SPLITTERS AND SCALERS |
|||||||||
SPLITTERMAX12 | 2019 | 5V 1A | 2 | 7 | |||||
SPLITTERMAX14 | 2019 | 5V 1A | 2 | 7 | |||||
SIGNALMANAGER | 2018 | 5V 1A | 1.65 | 6 |
*Before you activate the Alexa Voice Service with your MHUB, make sure Amazon support your territory and version. We cannot guarantee voice services or offer support to those territories not officially supported by Amazon. Check here: https://www.amazon.co.uk/gp/help/customer/display.html?nodeId=202207000
Let’s take the command “Alexa, Turn on football” as an example.
It might appear like a very simple command but there are a number of things that need to happen in order to watch football! First the TV might need to turn on, but in which room? The volume might need to be set to a desired limit. The correct source input might need to be selected on MHUB and finally that source will need to navigate to the channel hosting the football.
You can configure all those actions in what we call a “Sequence”.
Taking the example above:
Alexa (this wakes up your Amazon Dot/Echo/Show)
Turn on… (this invokes the smarthome skill)
football (this is your custom name for the Sequence, it can be anything you want)
Inside MHUB-OS we can configure exactly what “football” does.
Read more about Sequences and Scheduling.
Now you’re ready to go. Take a look at a full list of commands that you can say to your Echo.