Search by Support Category: App
How to setup Siri Shortcuts
Some devices no longer have built in IR receivers. To enable them to be used with the uControl app you can add a third party device called FLIRC. This connects to a source device via USB and turns IR codes into control commands the source device recognises.
There are two Flirc devices that we are compatible with, the first part of this guide is for the older model which can be found here. The second part of this guide is for the Flirc device that is specifically for the Amazon Fire TV and can be found here.
Regular Flirc
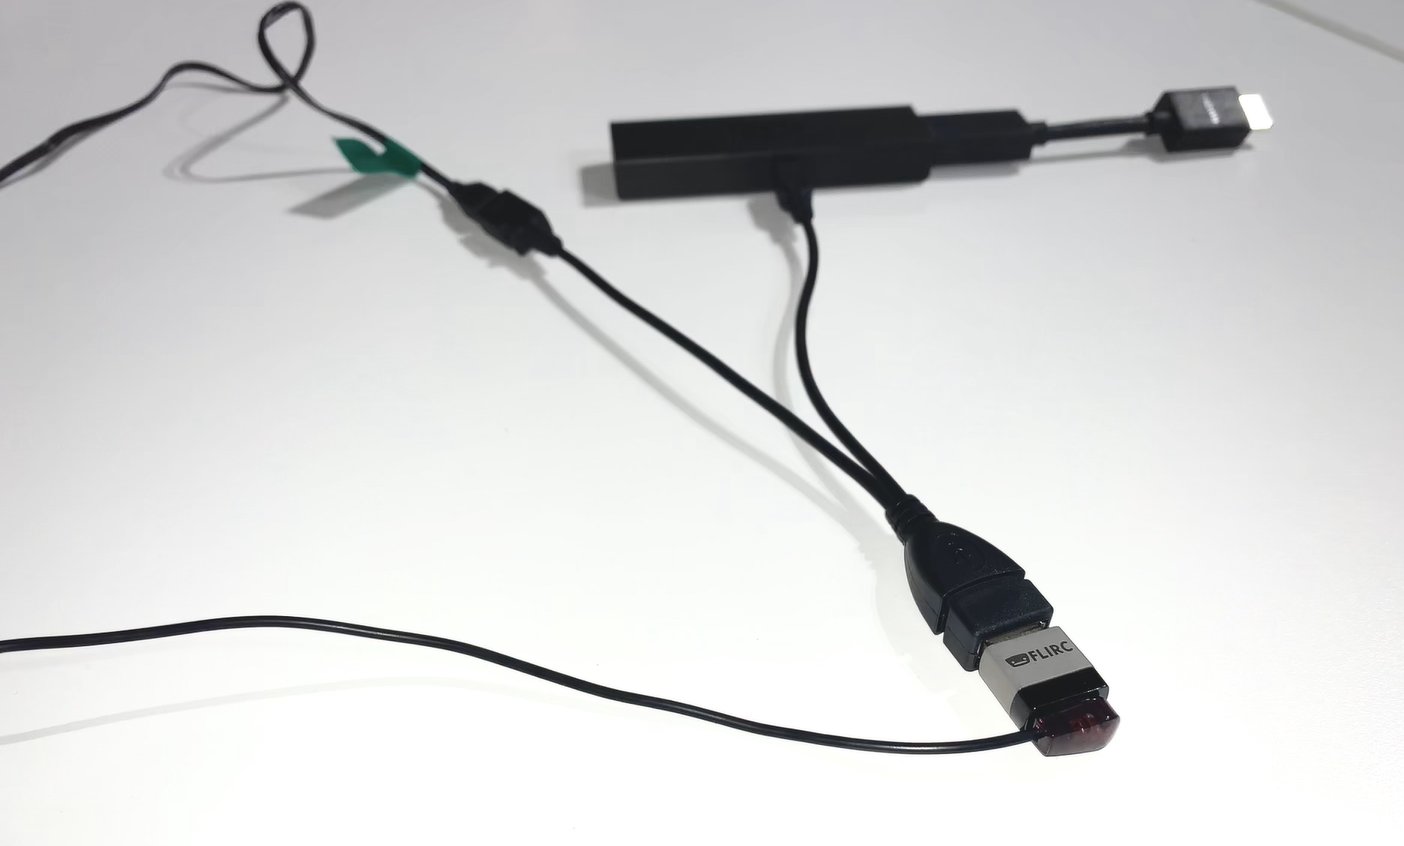
If you are using the older model of Flirc you will need an OTG cable like this -

Install the Flirc software on your computer and install this profile onto your laptop/PC – Fire TV
Load up the Flirc software and in the top left click File, and then Load Configuration and choose the Fire TV profile you have just downloaded.
Remove your Flirc from the laptop/PC and connect it to the female USB port on the OTG cable. Then taking the male micro USB section of the cable plug it into the Firestick. Lastly plug your power into the female micro USB port.
Next place the IR transmitter from you HDANYWHERE device on or near to the Flirc. You may need to move it around to test which positioning works best, but we recommend taping it to the top of the Flirc.
Once this is done you can install the FireTV(FLIRC) IR pack and control your Amazon device with uControl.
Amazon Fire TV Flirc
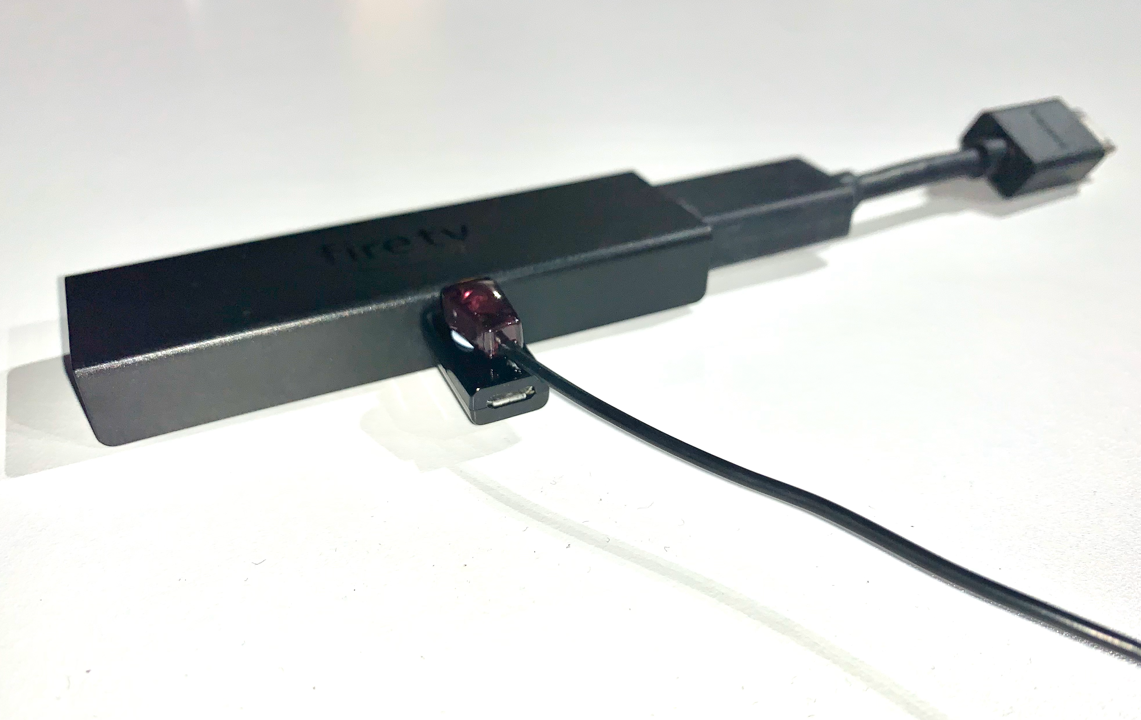
If you are using the Fire TV specific Flirc you will not need the OTG cable, but will need to install the Flirc software on your computer and install this profile onto your laptop/PC – Fire TV
Load up the Flirc software and in the top left click File, and then Load Configuration and choose the Fire TV profile you have just downloaded.
Remove the Flirc from your laptop/PC and connect the power lead to the micro female USB port on the Flirc. Plug the other side of the Flirc (male USB) into the side of the Firestick, and then plug the Firestick into your desired input.
Lastly place the IR transmitter from you HDANYWHERE device on or near to the Flirc. You may need to move it around to test which positioning works best, but we recommend taping it to the side, adjacent to the Flirc.
Once this is done you can install the FireTV(FLIRC) IR pack and control your Amazon device with uControl.
This bug has been resolved in uControl on iOS (2.4.7.1.0.2). You must delete uControl from your iOS device first and reinstall it from the App Store for the patch to apply.
We have received reports from customers informing us that input labels and switching ability has been lost in the latest release of uControl on iOS (version 2.4.6.1.0.4).
Affected systems will present the following symptoms:
The problem exists exclusively within uControl on iOS. We recommend that you do not change your MHUB settings, run any updates or change any configuration. The repair will be delivered via a patch applied to the uControl app.
- App will find and connect to MHUB as normal.
- App will load in to zone as normal.
- App will not display switching/uControl pack options
The error involves MHUB systems from late 2016 / early 2017 which were sold on MHUB-OS version 7.0 or lower and then upgraded. When these systems were upgraded to MHUB-OS version 8.0+ a one-time script was required to convert data from the old format (version 7 and below) to the new format (version 8 and above) which is active today still. To maintain backwards compatibility the original data format was kept on older systems.
uControl (version 2.4.6.1.0.4) contains updates for brand new systems (MHUB PRO 2.0) and MHUB AUDIO operating in stacked mode and removes the backwards check for compatibility. This has been confirmed as the source of the issue.
This blog post will update daily to help keep track of our progress and attempt to rectify the problem.
Update timeline
Wednesday 24th June 2020
Testing confirmed OK overnight. uControl on iOS (2.4.7.1.0.2) deployed to general userbase.
We recommend a fresh install, by deleting the app from your iOS device then reinstalling from the app store.
Tuesday 23rd June 2020
Patch is being tested. Please email us (support@hdanywhere.com) if you would like to beta test this release.
Monday 22nd June 2020
Cause has been identified and work on patch is underway.
Sunday 21st June 2020
Senior technical staff upgrade issue urgency level. Developers begin work to start identifying cause.
Saturday 20th June 2020
First notice of problem reported. Customer services respond using standard procedures.
Friday 19th June 2020
uControl on iOS (2.4.6.1.0.4) deployed to general userbase.
The latest control driver from Loxone can be downloaded here
The Loxone API 2.0 driver is compatible with the following HDANYWHERE products:
MHUB431U
MHUB862U
MHUB4KPRO44
MHUBPRO4440
MHUB4KPRO88
MHUBMAX44
MHUBAUDIO64
and the following Loxone products:
Miniserver
Miniserver Go
IMPORTANT
Before setting up the Loxone driver, the MHUB must have been through its first boot process. This can be done by navigating to the MHUB’s IP address in a web browser or in uControl and following the onscreen instructions. No other setup of the matrix is required.
Add the HDANYWHERE MHUB device template as a “Virtual Output”
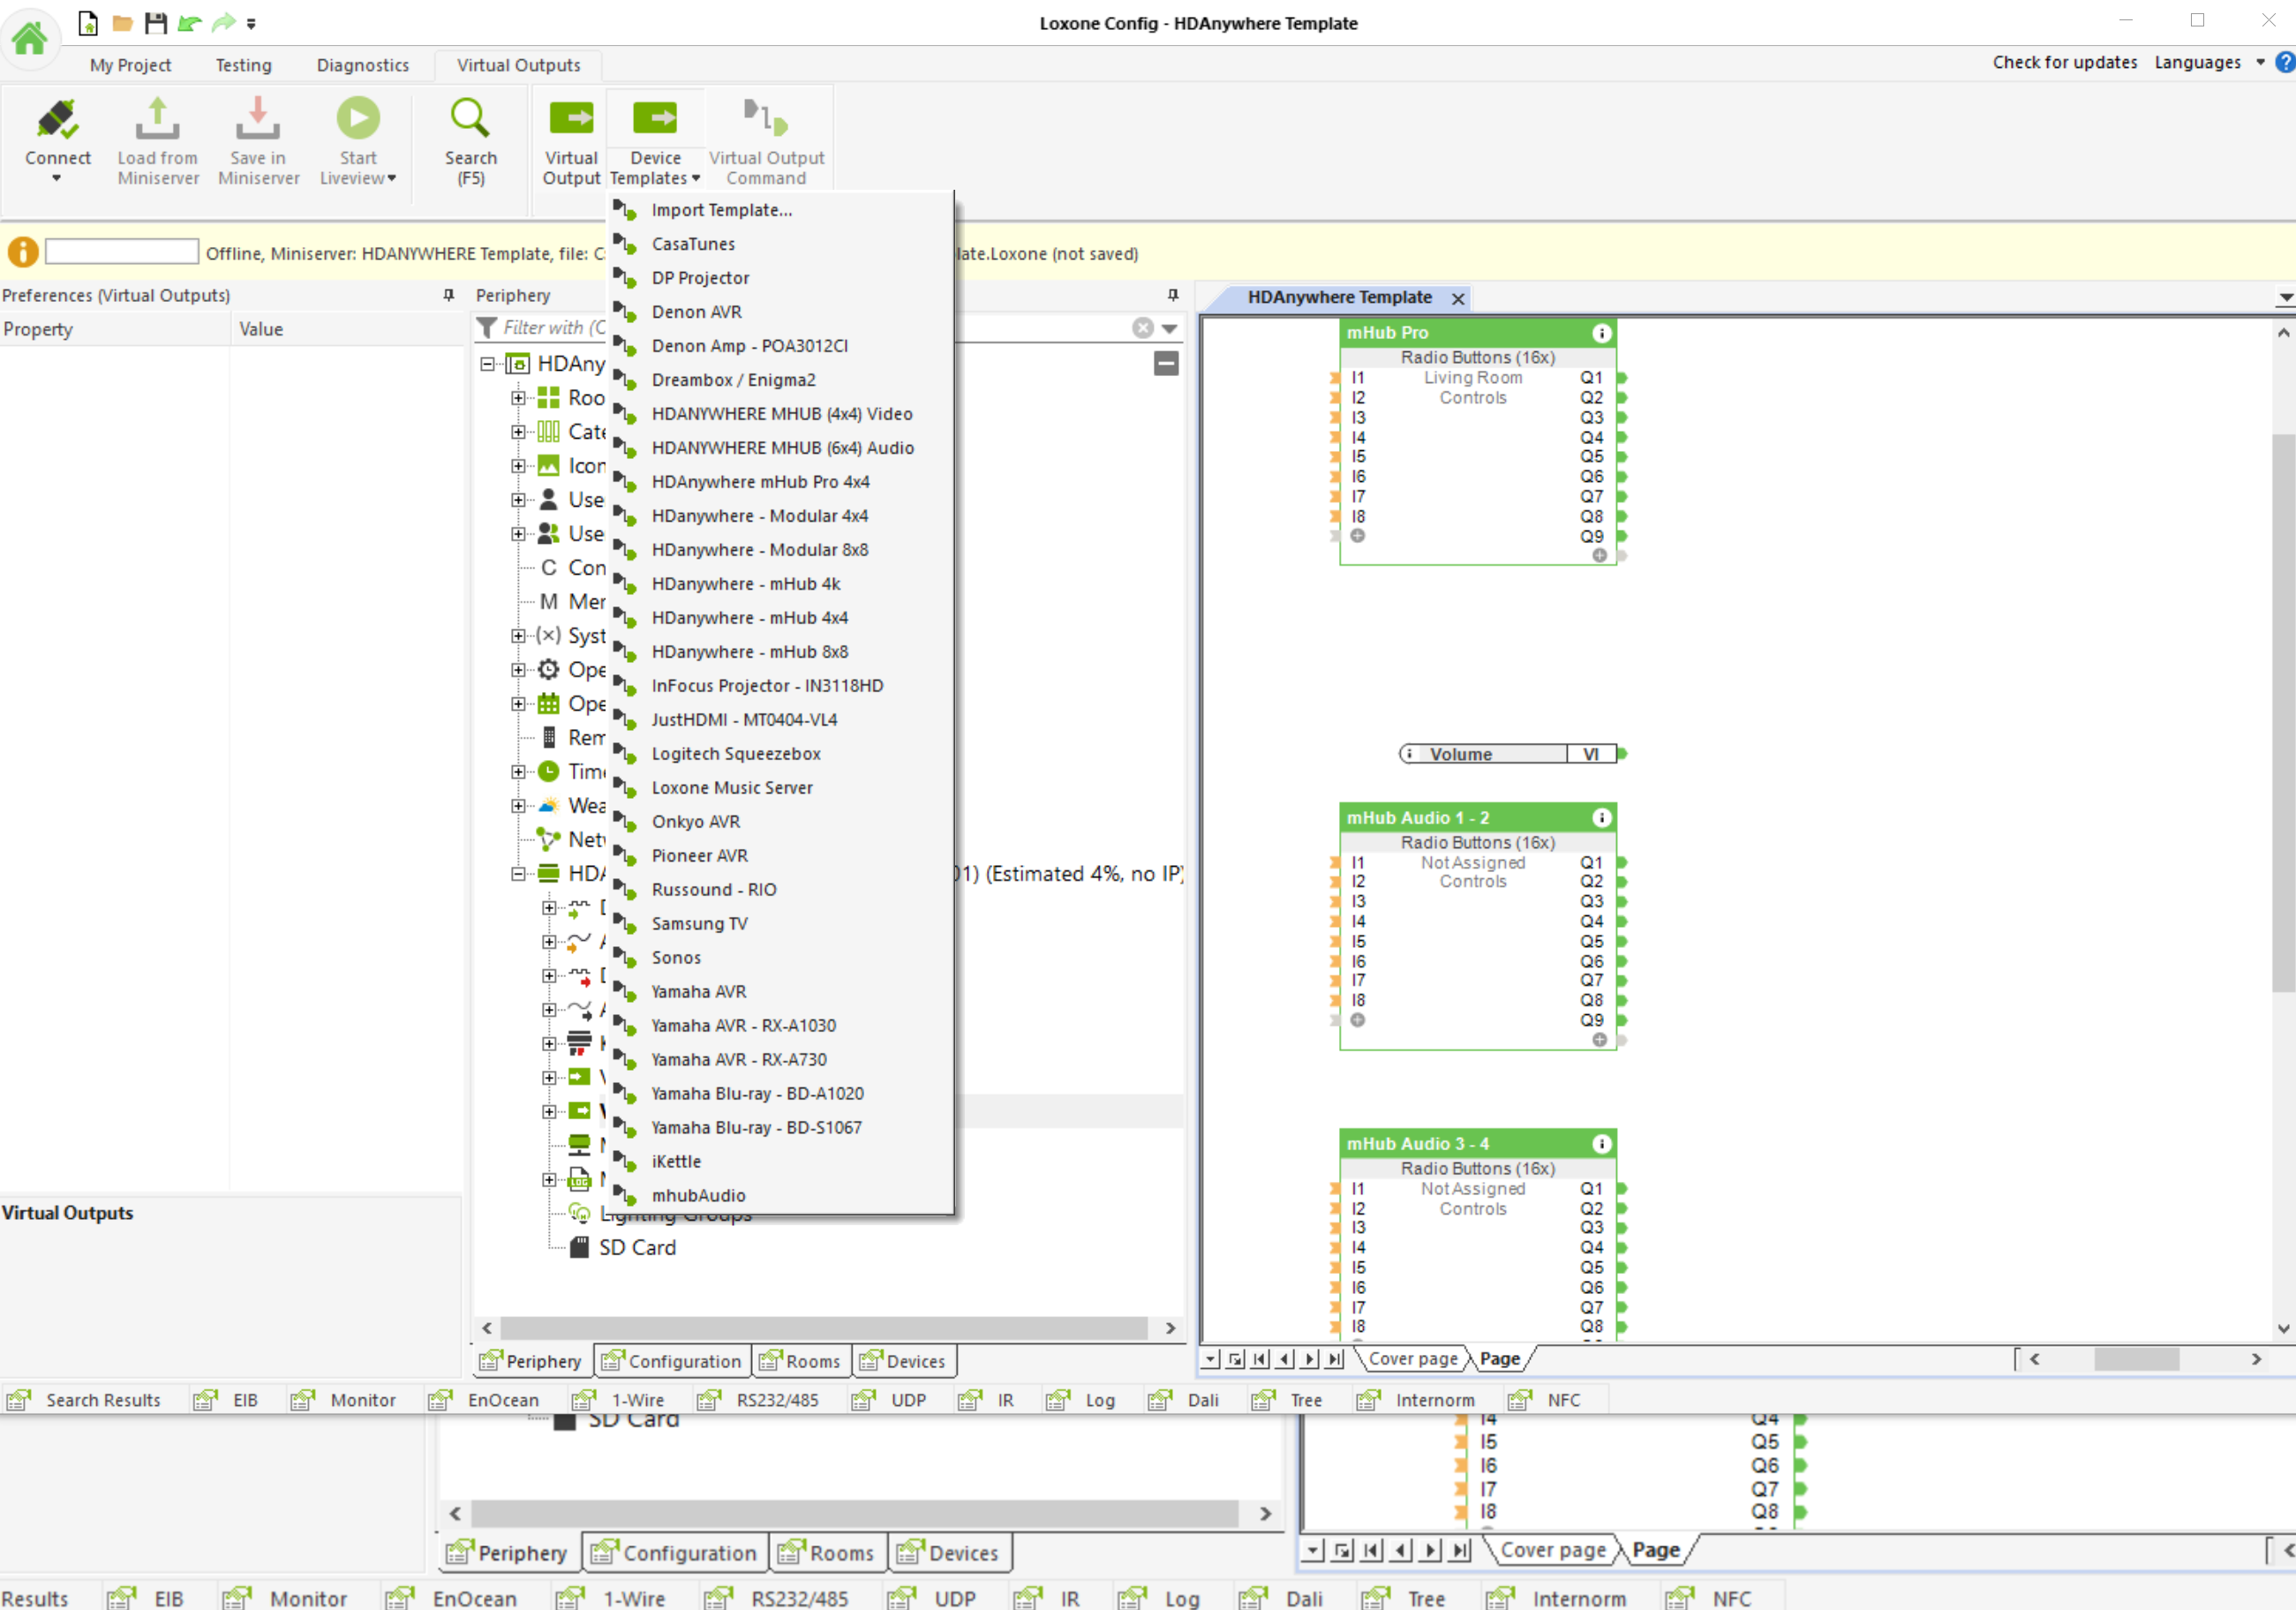
Next, assign your Inputs and outputs

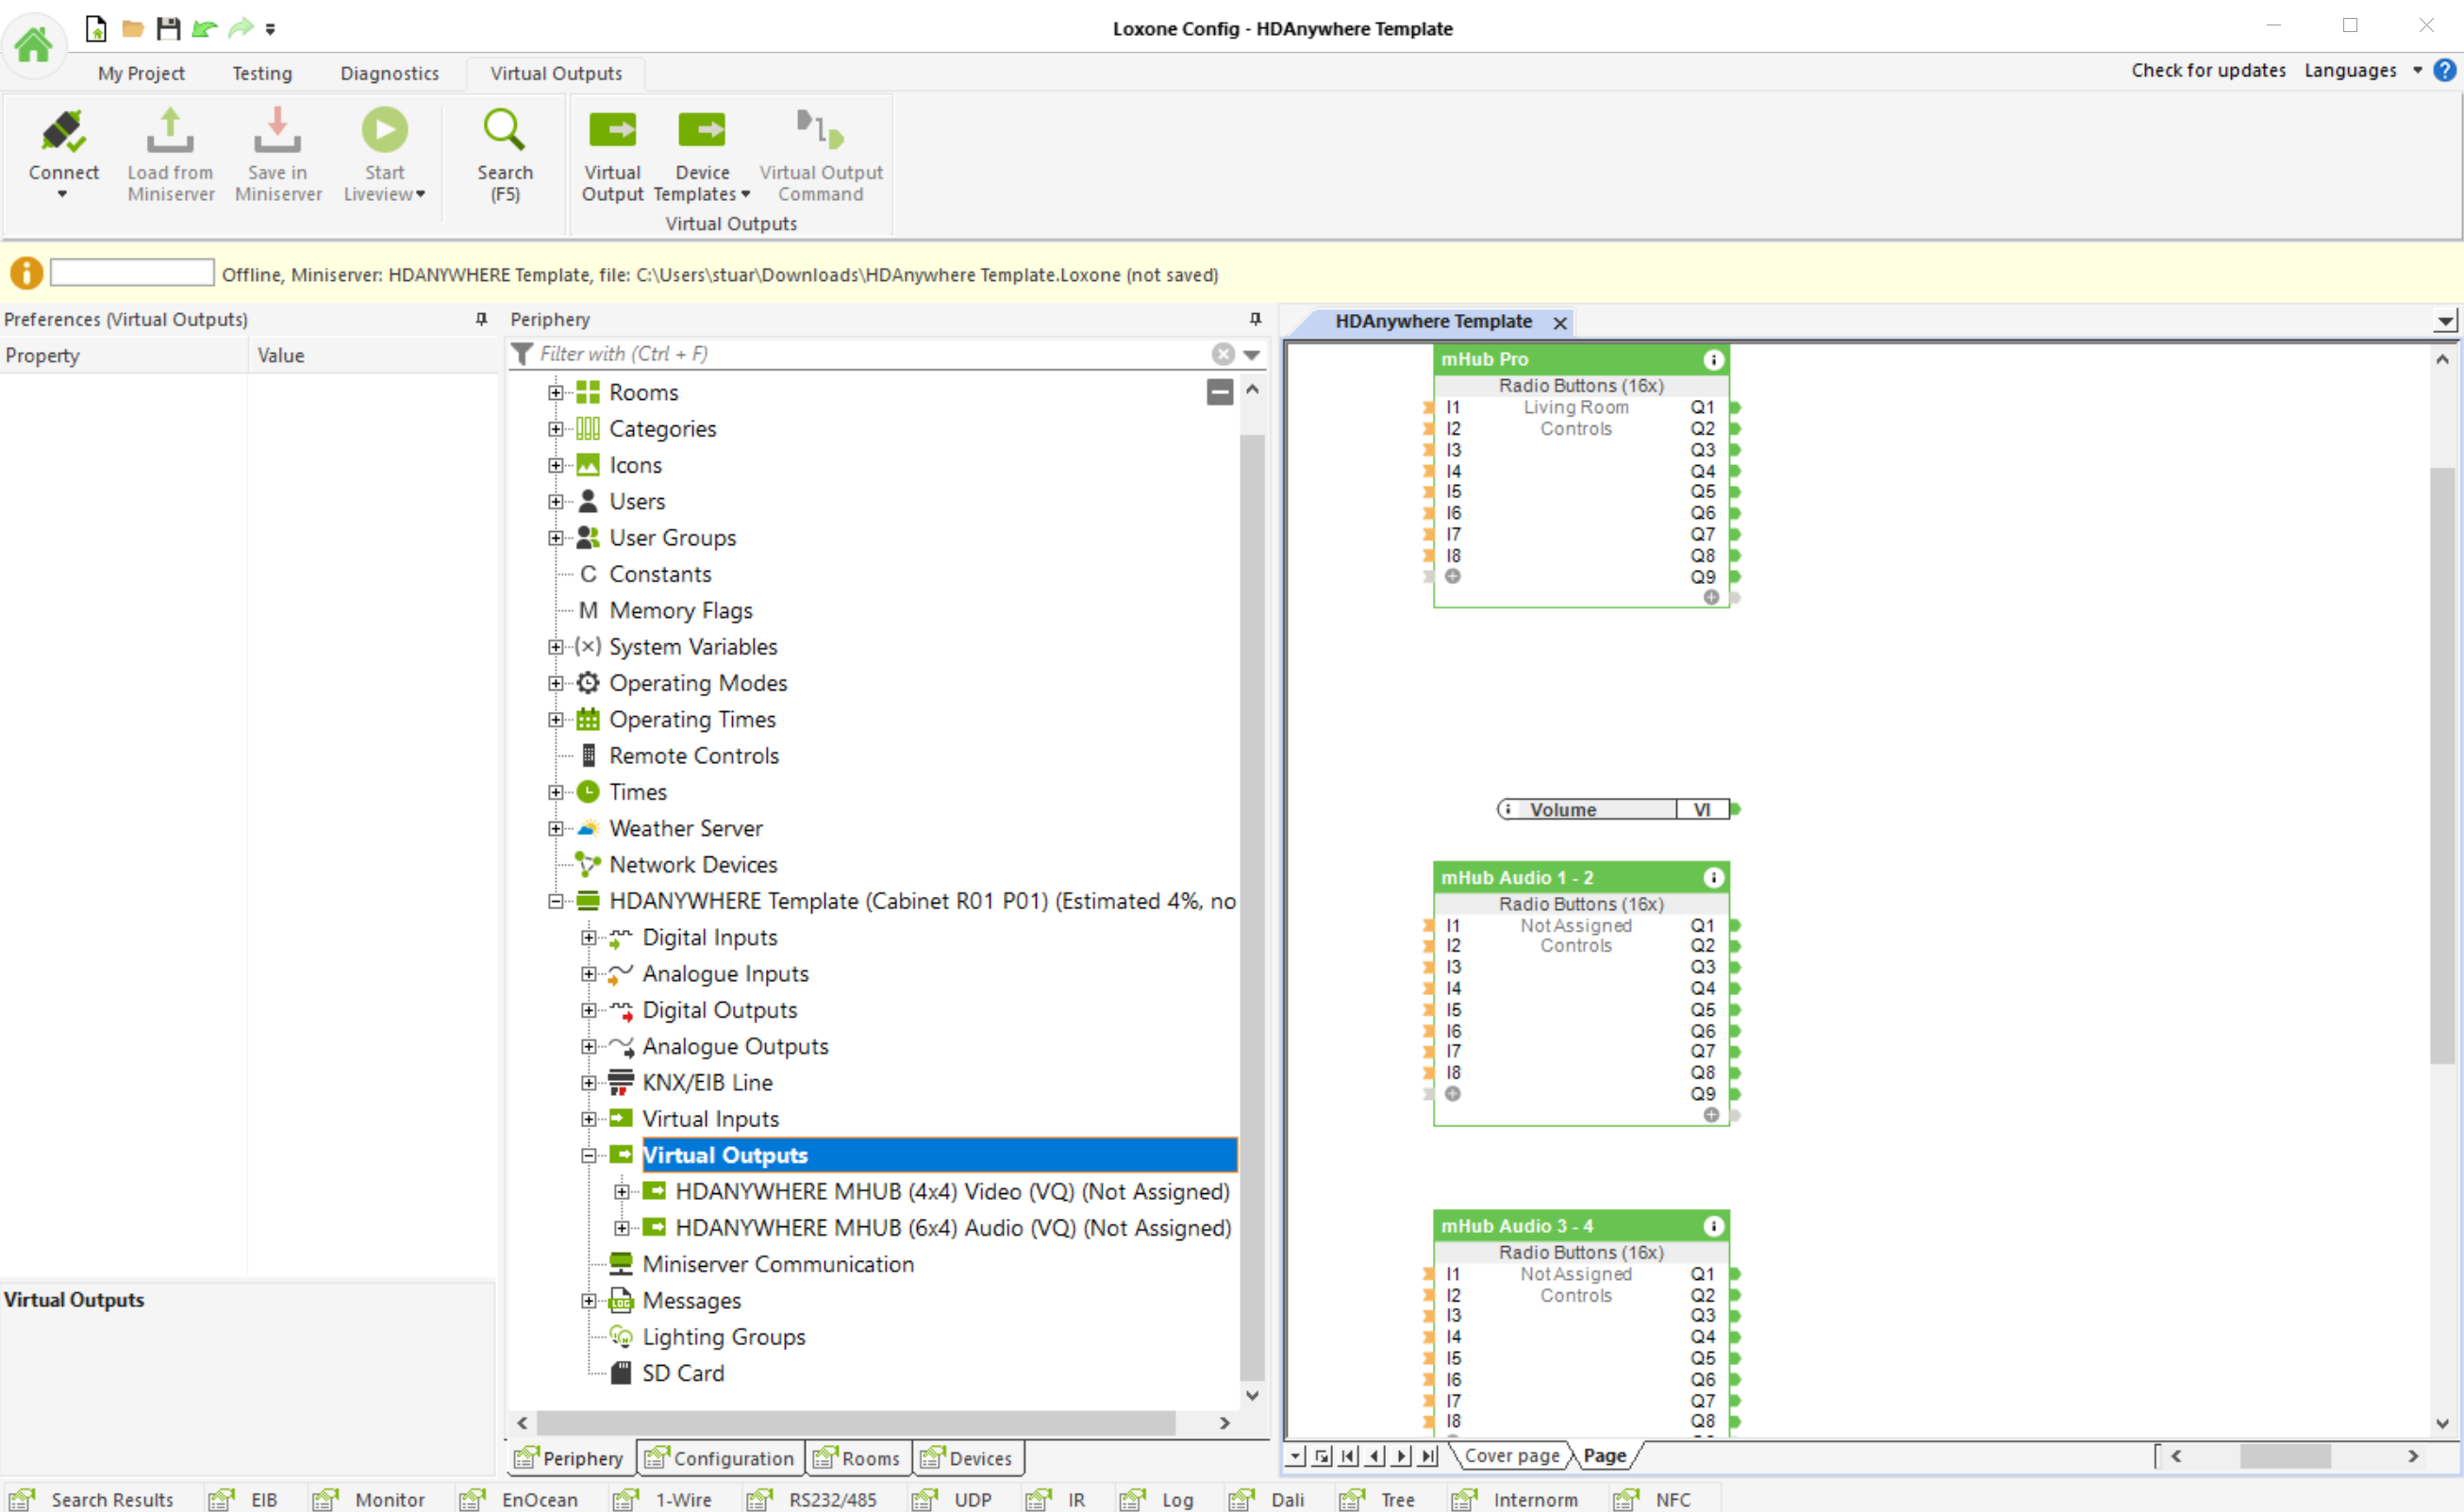
The video below shows the entire process
The latest control driver from Chowmain software can be downloaded here included in the download is also an in-depth guide to installing the driver
The HDAnywhere MHUB RTI driver allows for control of the HDAnywhere range of Video and Audio distribution products. The driver allows for direct switching of inputs to outputs, the ability to switch preconfigured zones, control of audio levels (volume, mute, etc) and the ability to send IR codes as well as being able to reboot or restart the system. It is compatible with the following systems:
MHUB431U
MHUB862U
MHUB4KPRO44
MHUBPRO4440
MHUB4KPRO88
MHUBMAX44
MHUBAUDIO64
and the following RTI products:
RP-4RF
XP-3
XP-6
XP-6s
XP-8s
XP-8v
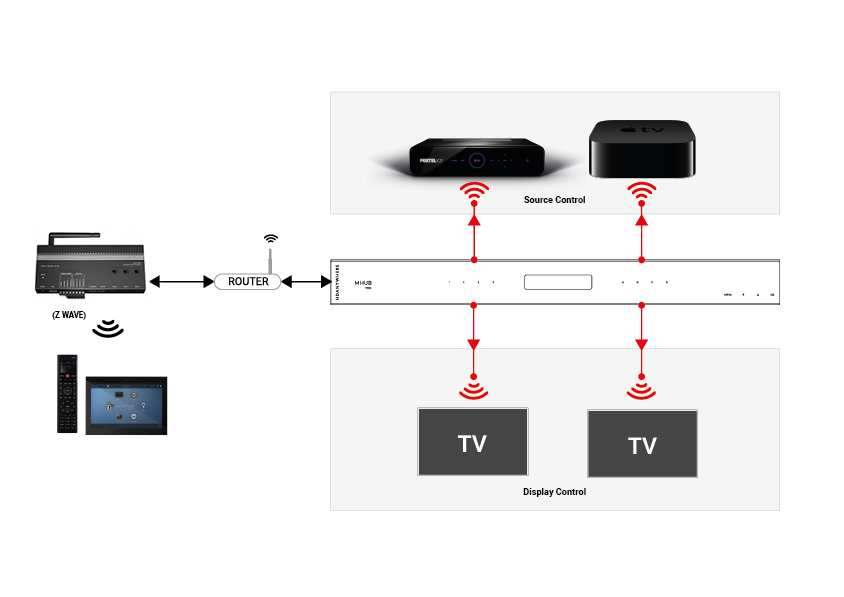
IMPORTANT
Before setting up the RTI driver, the MHUB must have been through its first boot process. This can be done by navigating to the MHUB’s IP address in a web browser or in uControl and following the onscreen instructions. No other setup of the matrix is required, but this step must be completed before the RTI processor can utilise the matrix I/O ports. It is not required otherwise.
The latest control driver from Chowmain software can be downloaded here
It allows the Control processor to utilise the IR inputs and outputs of the HDANYWHERE matrix as if it was there own. Allowing installers to spec smaller Control 4 processors than they would typically need and is compatible with the following HDANYWHERE products:
MHUB431U
MHUB862U
MHUB4KPRO44
MHUBPRO4440
MHUB4KPRO88
MHUBMAX44
MHUBAUDIO64
and the following Control 4 products:
CA-1
EA-1
EA-3
EA-5
HC250
HC800
HC1000
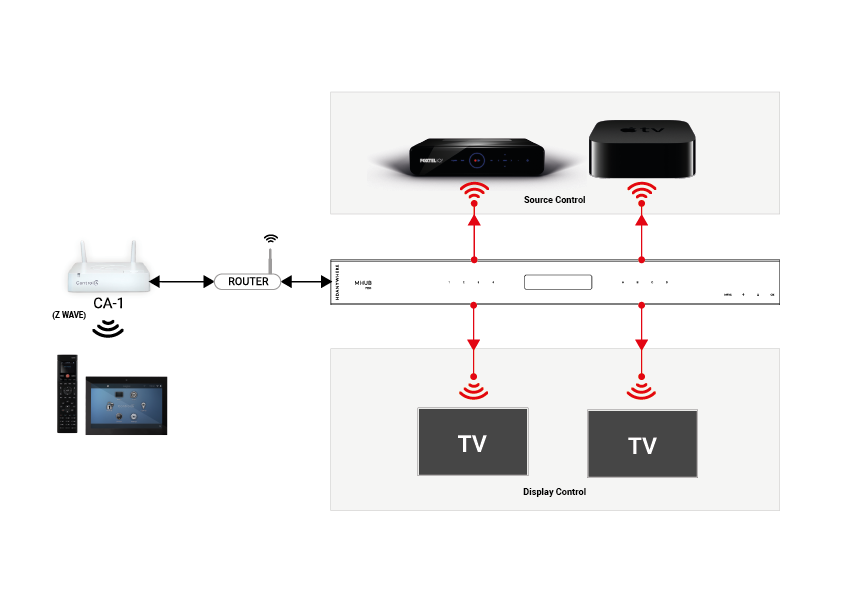
IMPORTANT
Before setting up the Control 4 driver, the MHUB must have been through its first boot process. This can be done by navigating to the MHUB’s IP address in a web browser or in uControl and following the onscreen instructions. No other setup of the matrix is required, but this step must be completed before the C4 processor can utilise the matrix I/O ports. It is not required otherwise.
Add the HDANYWHERE driver as you would any other driver, the driver will auto-discover a video matrix or multiple Audio Matrices
The next step is to setup your control and AV connections. Traditionally in a normal Control 4 setup, you would bind the source devices ‘control inputs’ with an IR output on the C4 controller. Instead, with the MHUB Video driver’s you can route the control through the MHUB’s IR ports utilising the IP>IR Engine. Similarly, Display IR is routed through the Display IR ports on the matrix. This video shows how to make these bindings
Description
When I try to install the software, I receive this warning:
“The application has failed to start because its side-by-side configuration is incorrect. Please see the application event log for more detail.”
This issue is typically caused by a conflict between the program and one or more of the files in the C++ runtime libraries. These libraries are part of the Windows operating system and are used, and potentially updated, by installing or updating several Microsoft or other third party products.
If you are experiencing this error when launching or installing the program, and if the program repair option does not resolve the issue, the most effective method to correct this error is to uninstall and reinstall any Microsoft Visual C++ installations currently available on your computer before proceeding with the installation.
To uninstall all current Microsoft Visual C++ installations
Open the Control Panel and locate the list of programs.
Windows 8/10
From within the Start screen, type “Control Panel” and click on the Control Panel search result when it appears.
Select Programs and Features.
Windows 7/Vista
Click Start> Control Panel
If viewing categories, click Programs> Uninstall a Program
If viewing icons, click Programs and Features
Windows XP
Select Start> Control Panel> Add or Remove Programs
Scroll down to locate the Microsoft Visual C++ entries.
Select each one, starting from the top entry, and choose Uninstall.
Do this for each entry, until there are no more Microsoft Visual C++ entries listed.
To reinstall new Microsoft Visual C++ packages follow the instructions on this page –
Once every package has been downloaded and installed, restart Windows.
Finally, launch the program. If the error message persists after following all of these instructions, then please contact HDanywhere technical support on 01684 576348