Search by Support Category: uControl
As part of the ongoing evolution of the HDA platform, MHUB and MZMA devices are transitioning to uOS Core.
At a Glance
- MHUB and MZMA devices now run uOS Core — a streamlined OS focused on switching performance and cloud connectivity.
- The full uOS platform is now called uOS Studio and runs on the uControl Processor.
- uOS on MHUB/MZMA is discontinued as of 11 August.
- From 11 March 2026, existing systems will only receive small stability and security updates.
- If you want to add new uOS features or integrations, you will need a device that runs uOS Studio (such as a uControl Processor).
- If your system is working well today, there is nothing you need to do.
This update simplifies the role of MHUB devices, allowing them to focus entirely on what they do best: reliable switching, distribution, and secure cloud connectivity. At the same time, the full automation and integration capabilities of the platform are moving to uOS Studio, running on the uControl Zone/Connect Processor.
This architecture reflects how most professional installations are already designed — with a dedicated controller managing the system and distribution hardware handling switching.
The result is a more stable, scalable, and future-proof platform for both integrators and end users.
What this means for existing systems
If your MHUB or MZMA system is currently working well, there is nothing you need to do. Your system will continue to operate normally.
However, the way new features and system expansion will be delivered is changing.
| Topic | What’s Changing | What It Means For You |
|---|---|---|
| Operating System on MHUB / MZMA | MHUB and MZMA devices now run uOS Core, a streamlined version of uOS focused on switching and connectivity. | This improves reliability and simplifies setup, particularly when using third-party control systems. |
| Full uOS Feature Set | The full uOS platform is now called uOS Studio and runs on the uControl Processor. | Advanced automation features such as sequences, scenes and integrations are now handled by a dedicated controller. |
| Support for uOS on MHUB | uOS running directly on MHUB and MZMA devices is now discontinued as of 11 August. | Existing systems will continue to operate, but new platform development will focus on uOS Studio. |
| Future Software Updates | From 11 March 2026, uOS on MHUB/MZMA will only receive small stability and security patches. | No new features will be added to MHUB-based uOS systems. |
| Expanding or Upgrading Your System | To continue adding new uOS features, systems must include a device that runs uOS Studio. | This typically means adding a uControl Processor to your system. |
| System Architecture | Systems using uOS Studio operate as a stacked system. | The uControl Processor becomes the system controller, while MHUB handles video distribution. |
Do I need to upgrade?
If you are happy with your current system and it is performing well, there is nothing you need to do.
Your MHUB or uControl system will continue to operate normally.
You may want to consider upgrading if you plan to:
- Add new integrations or automation features
- Expand your system with additional rooms or devices
- Take advantage of future uOS platform developments
In these cases, adding a uControl Processor running uOS Studio will unlock the full feature set.
When upgrading, your system will need to be reset and configured as a stacked system, where the uControl Processor manages the MHUB and any other HDA devices.
Need help or more information?
In these cases, adding a uControl Processor running uOS Studio will unlock the full feature set.
When upgrading, your system will need to be reset and configured as a stacked system, where the uControl Processor manages the MHUB and any other HDA devices.
With uOS 11.08 support for ADB control of android devices is now included.
Supported Devices
- Amazon FireTV
- Nvidia Shield
- Android/Google Powered TV’s
To enable ADB control, ensure the device you want to control is powered on and awake. You will need to know the device’s IP address.
Step 1 – Enabling Developer Options
To be able to use ADB control you will need to enable Developer Mode.
For Amazon devices, follow the instructions here – Enabling Developer Tools
For other devices -
- Open the menu and go to Device Preferences > About.
- Scroll down until Build is highlighted, then tap ok several times. You will get an onscreen message that developer mode has been enabled.
- Click back, scroll to the bottom of the menu you will see { } Developer Options.
- Open the menu and enable developer options
- Scroll down to Enable network debugging
Step 2 – Installing the ADB pack.
In the example below we will install the pack for FireTV.
2a – Select the pack
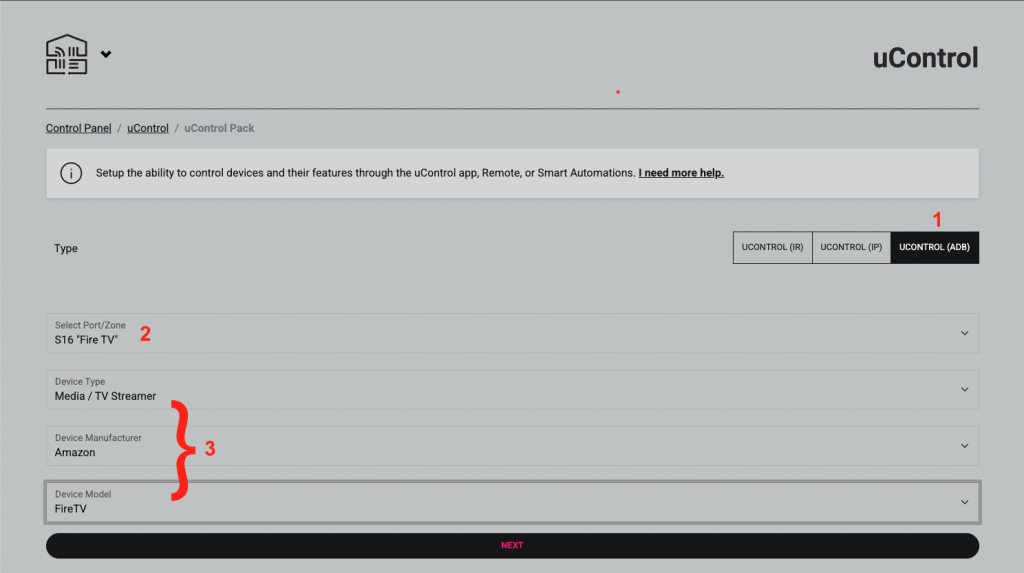
- Select uControl (ADB)
- Select the port or zone when the pack will be installed
- Select the device
2b – Test and confirm installation
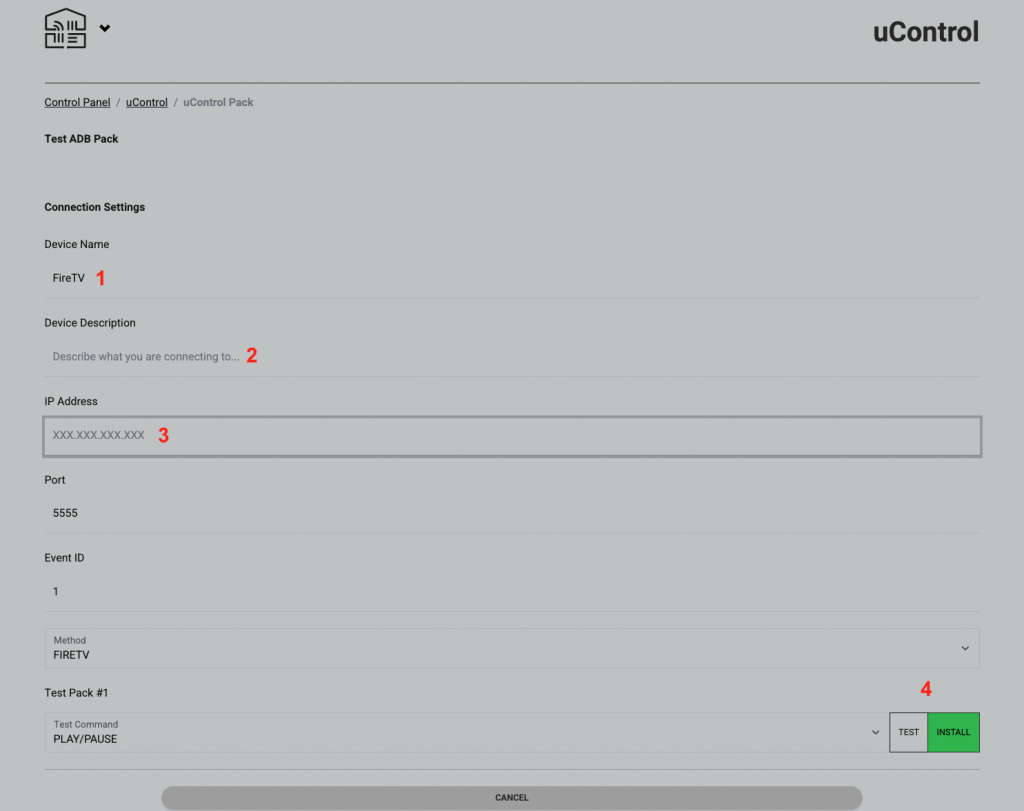
- Use the default name or enter a custom one. This will be displayed on the uControl app and remote
- Describe what you are connecting to, this field is not compulsary to install the pack
- Enter the IP address in the fireTV in the format
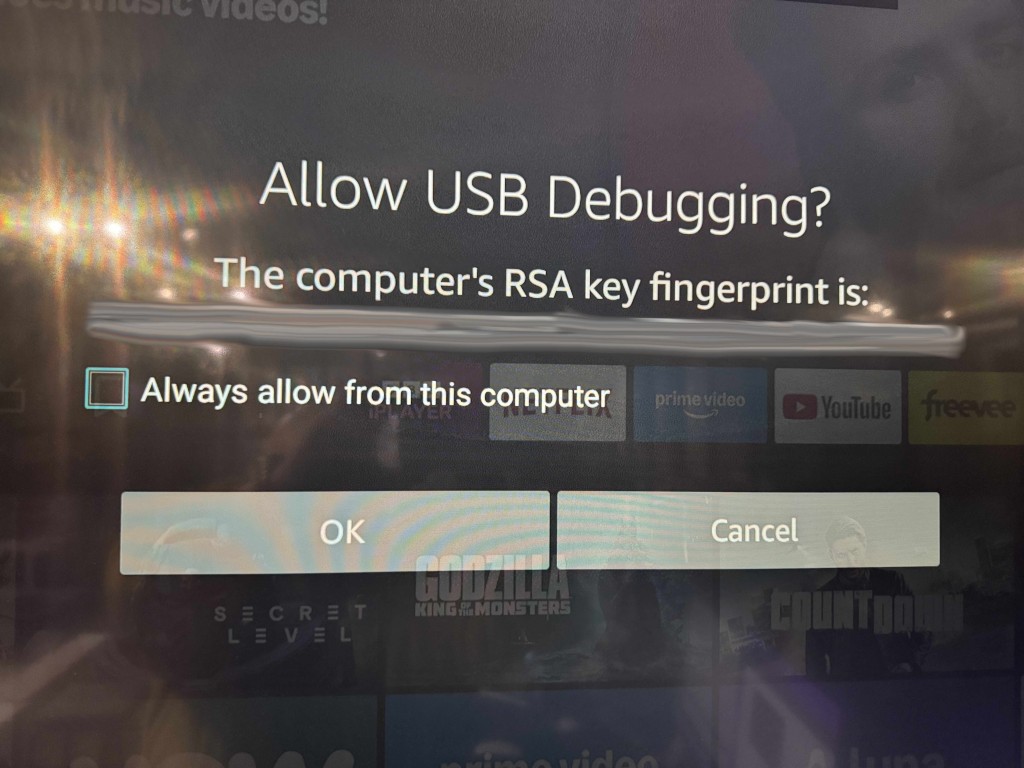
xxx.xxx.xxx.xxxFor example, 192.168.0.25. - IMPORTANT – the first time to connect to the device you will get an onscreen message like the one shown below. Please select always allow then click ok.
- Once tested, click install and the pack is ready to use
strong>Ver 2.0 (07/25)
WiFi Version: 6.0.20250728
Filesystem Version: 2.3.3
BLE Version: 2.1.3
-Added support for WPA3 wireless security
-Battery performance improvements
-Revised WiFi reconnection logic
-Bug fixes and improvements
Ver 1.02 (05/25)
WiFi Version: 6.0.20250512
Filesystem Version: 2.2.12
BLE Version: 2.0.20
-Updated internal WiFi reconnection processes
-Added onscreen message when WiFi disconnected and IP command attempted
-Menus can be scrolled by holding UP/Down keys
-Battery performance improvements
-Added support for Samsung Frame TV off via IR
-Bug fixes and improvements
Ver 1.01 (04/25)
WiFi Version: 6.0.202500414
Filesystem Version: 2.2.11
BLE Version: 2.0.19
-Removed password requirement when provisioning remote
-Updates Battery Icon to better show current level
-Bug fixes and improvements
Ver 1.00 (01/25) Release Version
WiFi Version: 6.0.202500204
Filesystem Version: 2.2.8
BLE Version: 2.0.15
-Added HI, LO and FULL to battery icon
-Updated remote data transfer process from uOS
-Bug fixes and improvements
This guide will show you how to trigger events in a Loxone system using a ‘Virtual Text Input’. This allows us to send a command that can trigger switching, lighting actions, shading and more.
Before you begin, you will need:
- The Loxone Miniserver IP address
- A fully-commissioned Loxone system with the Miniserver on the same network as the HDA system
- A fully-commissioned HDA or uControl system with the latest version of uOS (MHUB-OS does not support IP integrations) on the same network as the Loxone system.
- A laptop running the Loxone config software
- Access to uOS using any of the most popular browsers (or an iPhone with the uControl app, at the very least) on the same network as the HDA system
- Step 1 – Adding the Virtual Text Input to Loxone Config
- Step 2 – Building a Function
- Example Commands
Step 2:Build an IP Connection in uOS
Examples of the most popular Loxone commands – Loxone Command Examples
This guide will show you how to trigger Scenes or even individual Lights and Blinds using the Rako API
Rako Hub API
Before you begin, you will need:
- The Rako Hub IP address
- A fully-commissioned Rako system with a Rako Hub on the same network as the HDA system
- A fully-commissioned HDA or uControl system with the latest version of uOS (MHUB-OS does not support IP integrations) on the same network as the Rako system.
- A tablet or laptop using any of the most popular browsers (or an iPhone with the uControl app, at the very least) on the same network as the HDA system.
Step 1:Get data about the Rako system
You need to know:
- Room ID
- Channel ID
- Scene ID
Use your browser: type http://[Rako Hub IP]/rako.xml (e.g.http://192.168.1.13/rako.xml)
The Example below shows Room ID 17, Channel ID 1 and Scene ID 1
 <Room id="17"> -Room ID

    <Type>Lights</Type>

    <Title>Office</Title>

    <Channel id="1"> -Channel ID

    <type>Default</type>

    <Name>Office Spotlights</Name>

    <Levels>FFBF7F3F000000000000000000000000</Levels>

    </Channel>

    <Scene id="1"> -Scene ID

    <Name>White</Name>

    </Scene>

    </Channel>
If no scenes are listed, default scenes are set as -
Scene 1 – All on 100%
Scene 2 – All on 75%
Scene 3 – All on 50%
Scene 4 – All on 25%
Scene 0 – All Off
Based off this we can build the command
SUB,BASIC,V4,uControl
SEND,17,1,SCENE,1
Step 2:Build an IP Connection in uOS
Examples of the most popular Rako commands – Rako Command Examples
Rako Bridge API
Before you begin, you will need:
- A fully-commissioned Rako system with a Rako Hub on the same network as the HDA system
- A fully-commissioned HDA or uControl system with the latest version of uOS (MHUB-OS does not support IP integrations) on the same network as the Rako system.
- A tablet or laptop using any of the most popular browsers (or an iPhone with the uControl app, at the very least) on the same network as the HDA system.
Step 1:Get data about the Rako system
You need to know:
- Room ID
- Channel ID
- Scene ID
– Use Rasoft Pro if you set up the Rako yourself or have been given the Project File.
– Use your browser: type http://[Rako Hub IP]/rako.xml (e.g.http://192.168.1.13/rako.xml)
Example of Rako XML data
Step 2:Build an IP Connection and Function in uOS
Step 3:Build Functions to control individual Channels or trigger Scenes
Examples of the most popular Rako commands – Rako Command Examples
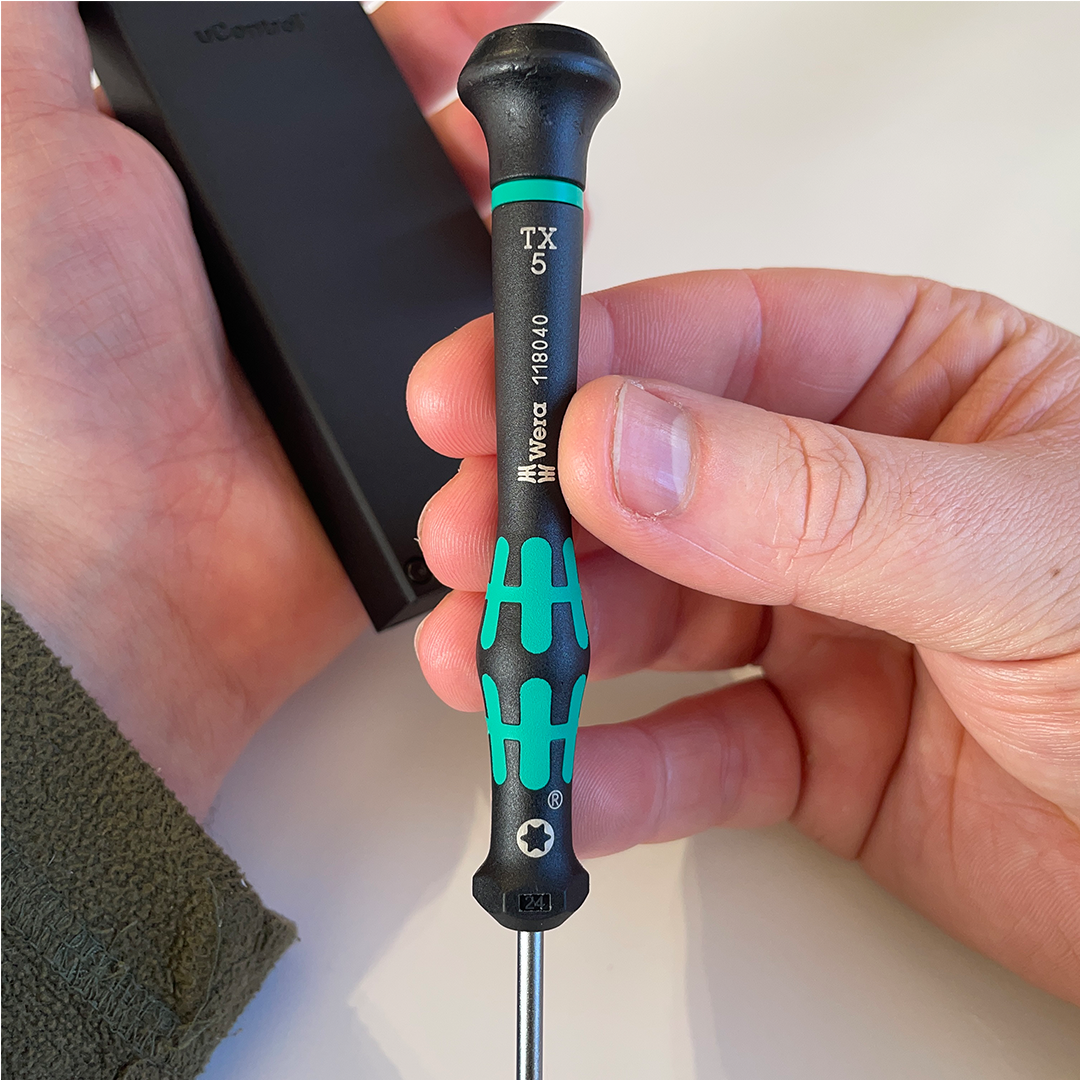
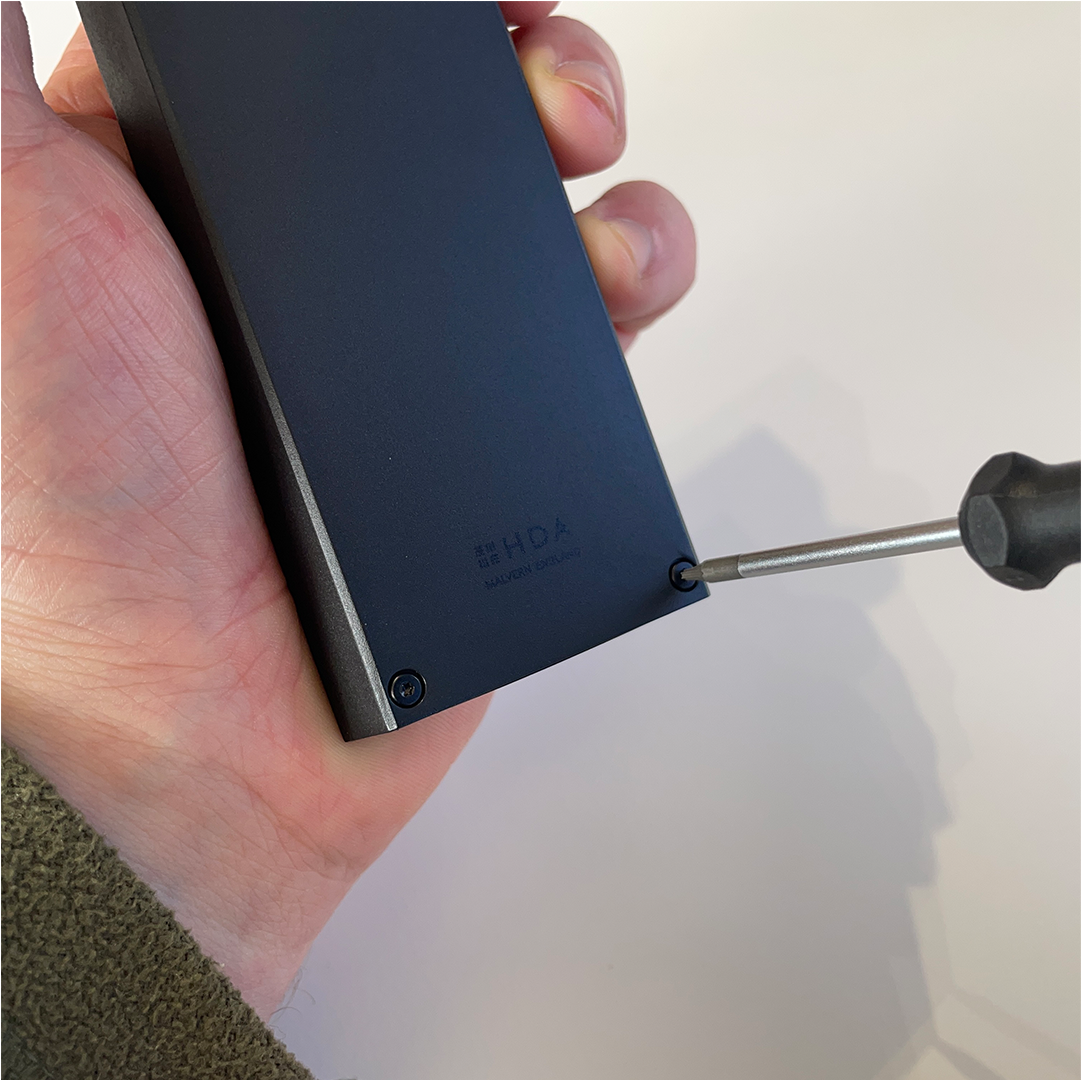
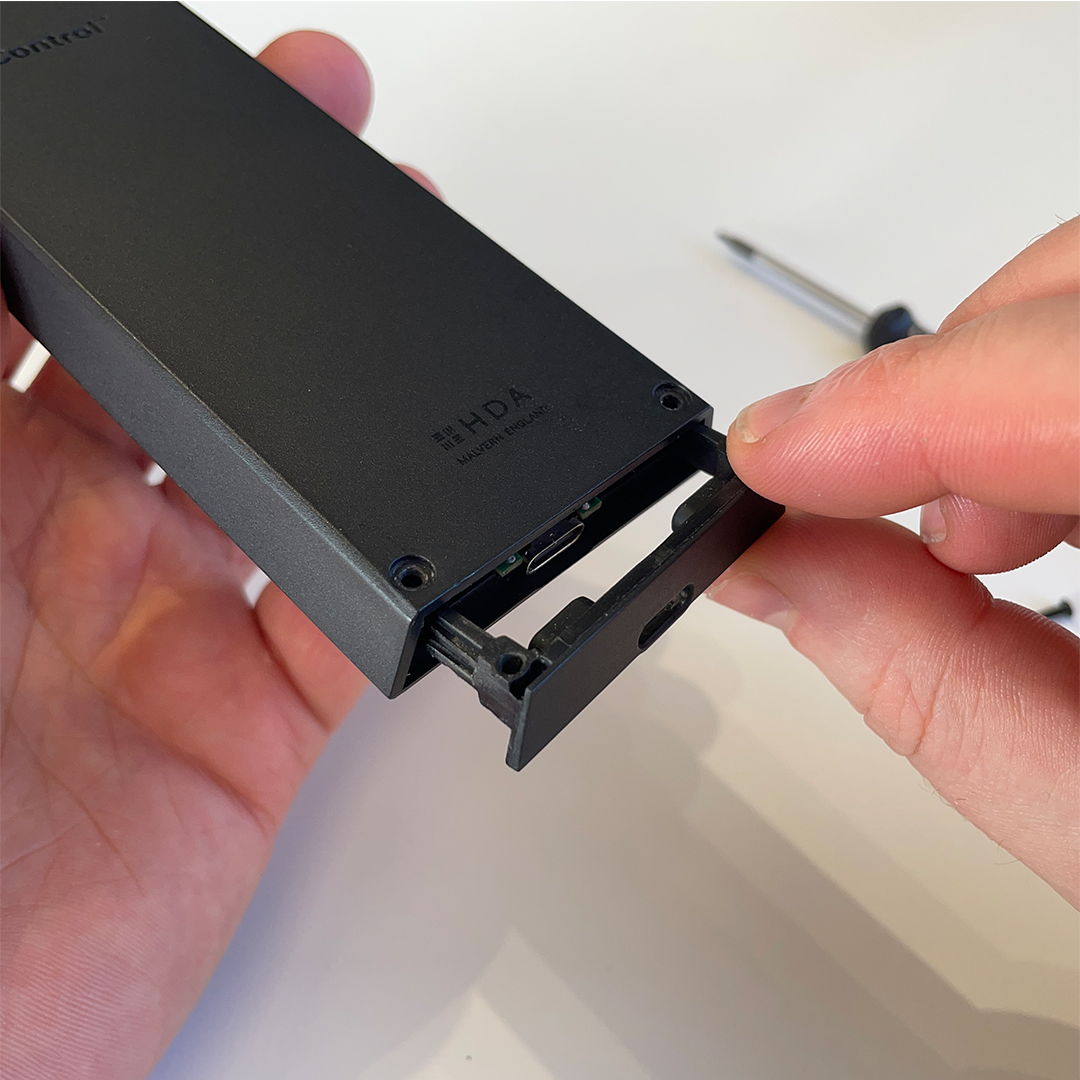
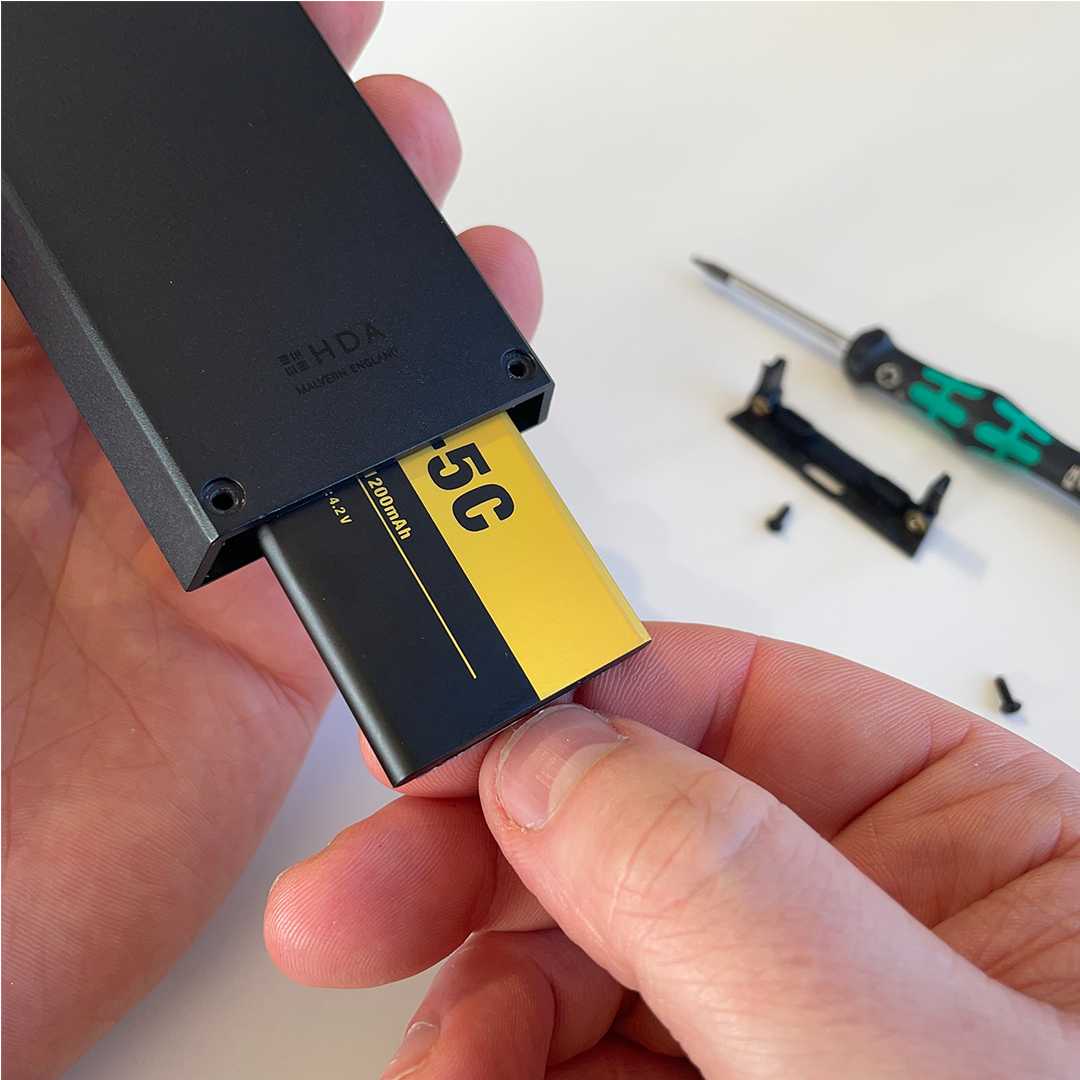
Required tools

Please read this first before updating your system:
This guide will assist you with updating your MHUB, MZMA or Zone Processor to uControl OS (uOS) 11.
The update will enable support for both the new uControl App and the uControl Remote which can be configured after completing the steps in this support post.
It is strongly recommended that you read this guide carefully before you start the update process.
15 minutes (approximately). Difficulty: Easy.
What this guide will cover:
Before you start the update, check that:
- Your HDA controller is currently running uOS (10.XX)
- You have uControl 2016 app installed
- Your HDA controller and uControl 2016 app have access to the Internet
- All HDA devices and uControl 2016 app are visible on your network.
- A note of all HDA device IPs on your network, or the ability to scan for them using an app like Fing.
- IMPORTANT:Once your system has updated, uOS will need some additional configuration applied before the new uControl app or uControl Remote will start to work.
STACKED SYSTEMS:
It is recommended that every device in your stacked system is updated to uOS 11. Start by updating your master controller, followed by each MHUB or MZMA in your stack. If parts of your stacked system feature older MHUB’s or MHUB Audio systems running MHUB-OS then you will not need to update these.
1. Load uControl 2016 app to start the update process.
Load the uControl 2016 app and follow the instructions in this guide to update your system(s). Ensure that you complete this process for all HDA devices which can be upgraded to uOS 11 (see checklist above). Please note that any MHUB operating on MHUB-OS (black background colour) can not be updated to uOS 11.
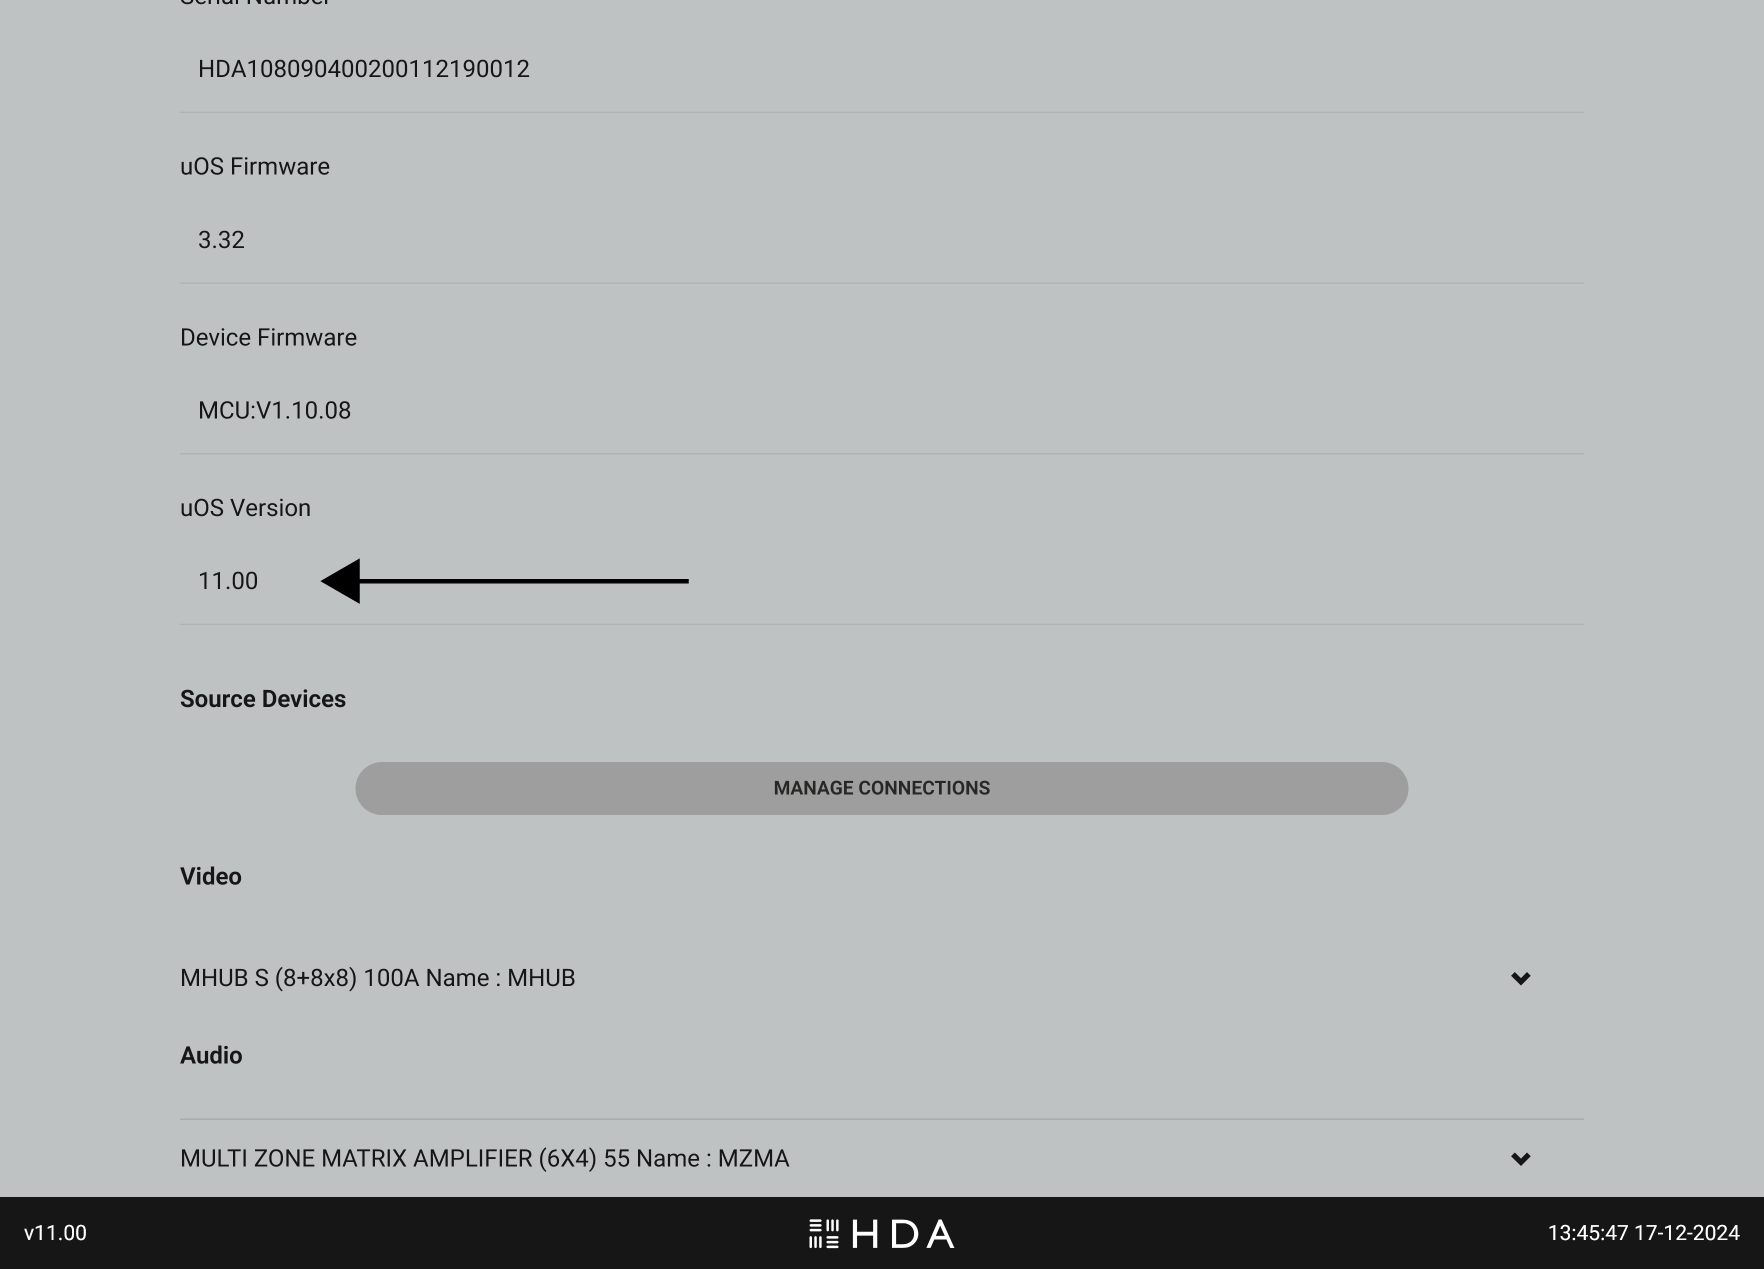
2. Check that your HDA system has updated to uOS 11.
After the update completes, check uOS to confirm that it is running uOS 11 which can be done by visiting the IP address of your HDA device. Repeat this step for each HDA device on your network if you are operating a stacked system.
If you are using a control system (Crestron, Control4, Savant, URC etc) then you’re complete at this stage. If you plan to use a HDA interface like uControl Remote or uControl app to control your system then continue to Step 3 below.
3. You’re almost there! Prepare uOS for uControl app and uControl Remote.
You need to make two small changes in uOS to make ensure that the new uControl app or uControl Remote will work when you are ready to configure them.
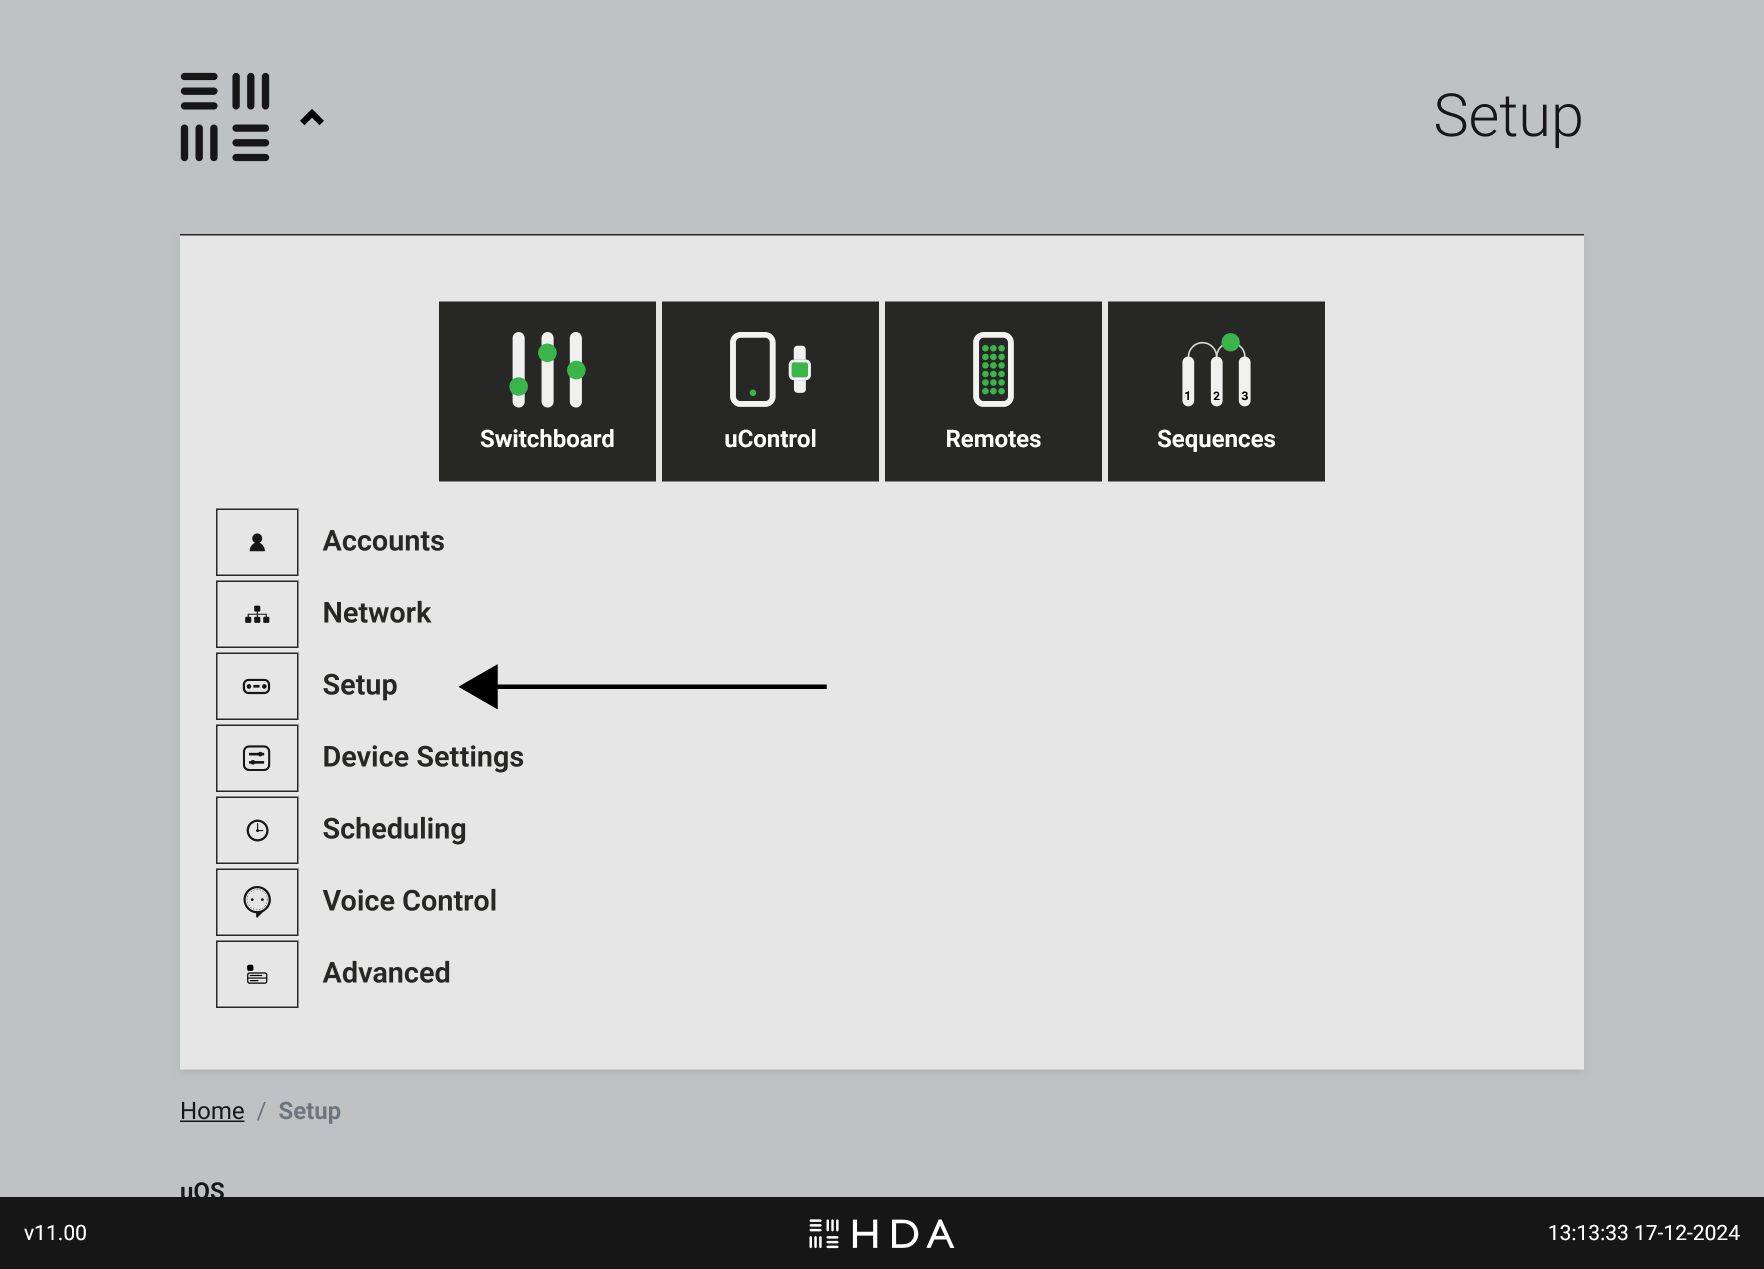
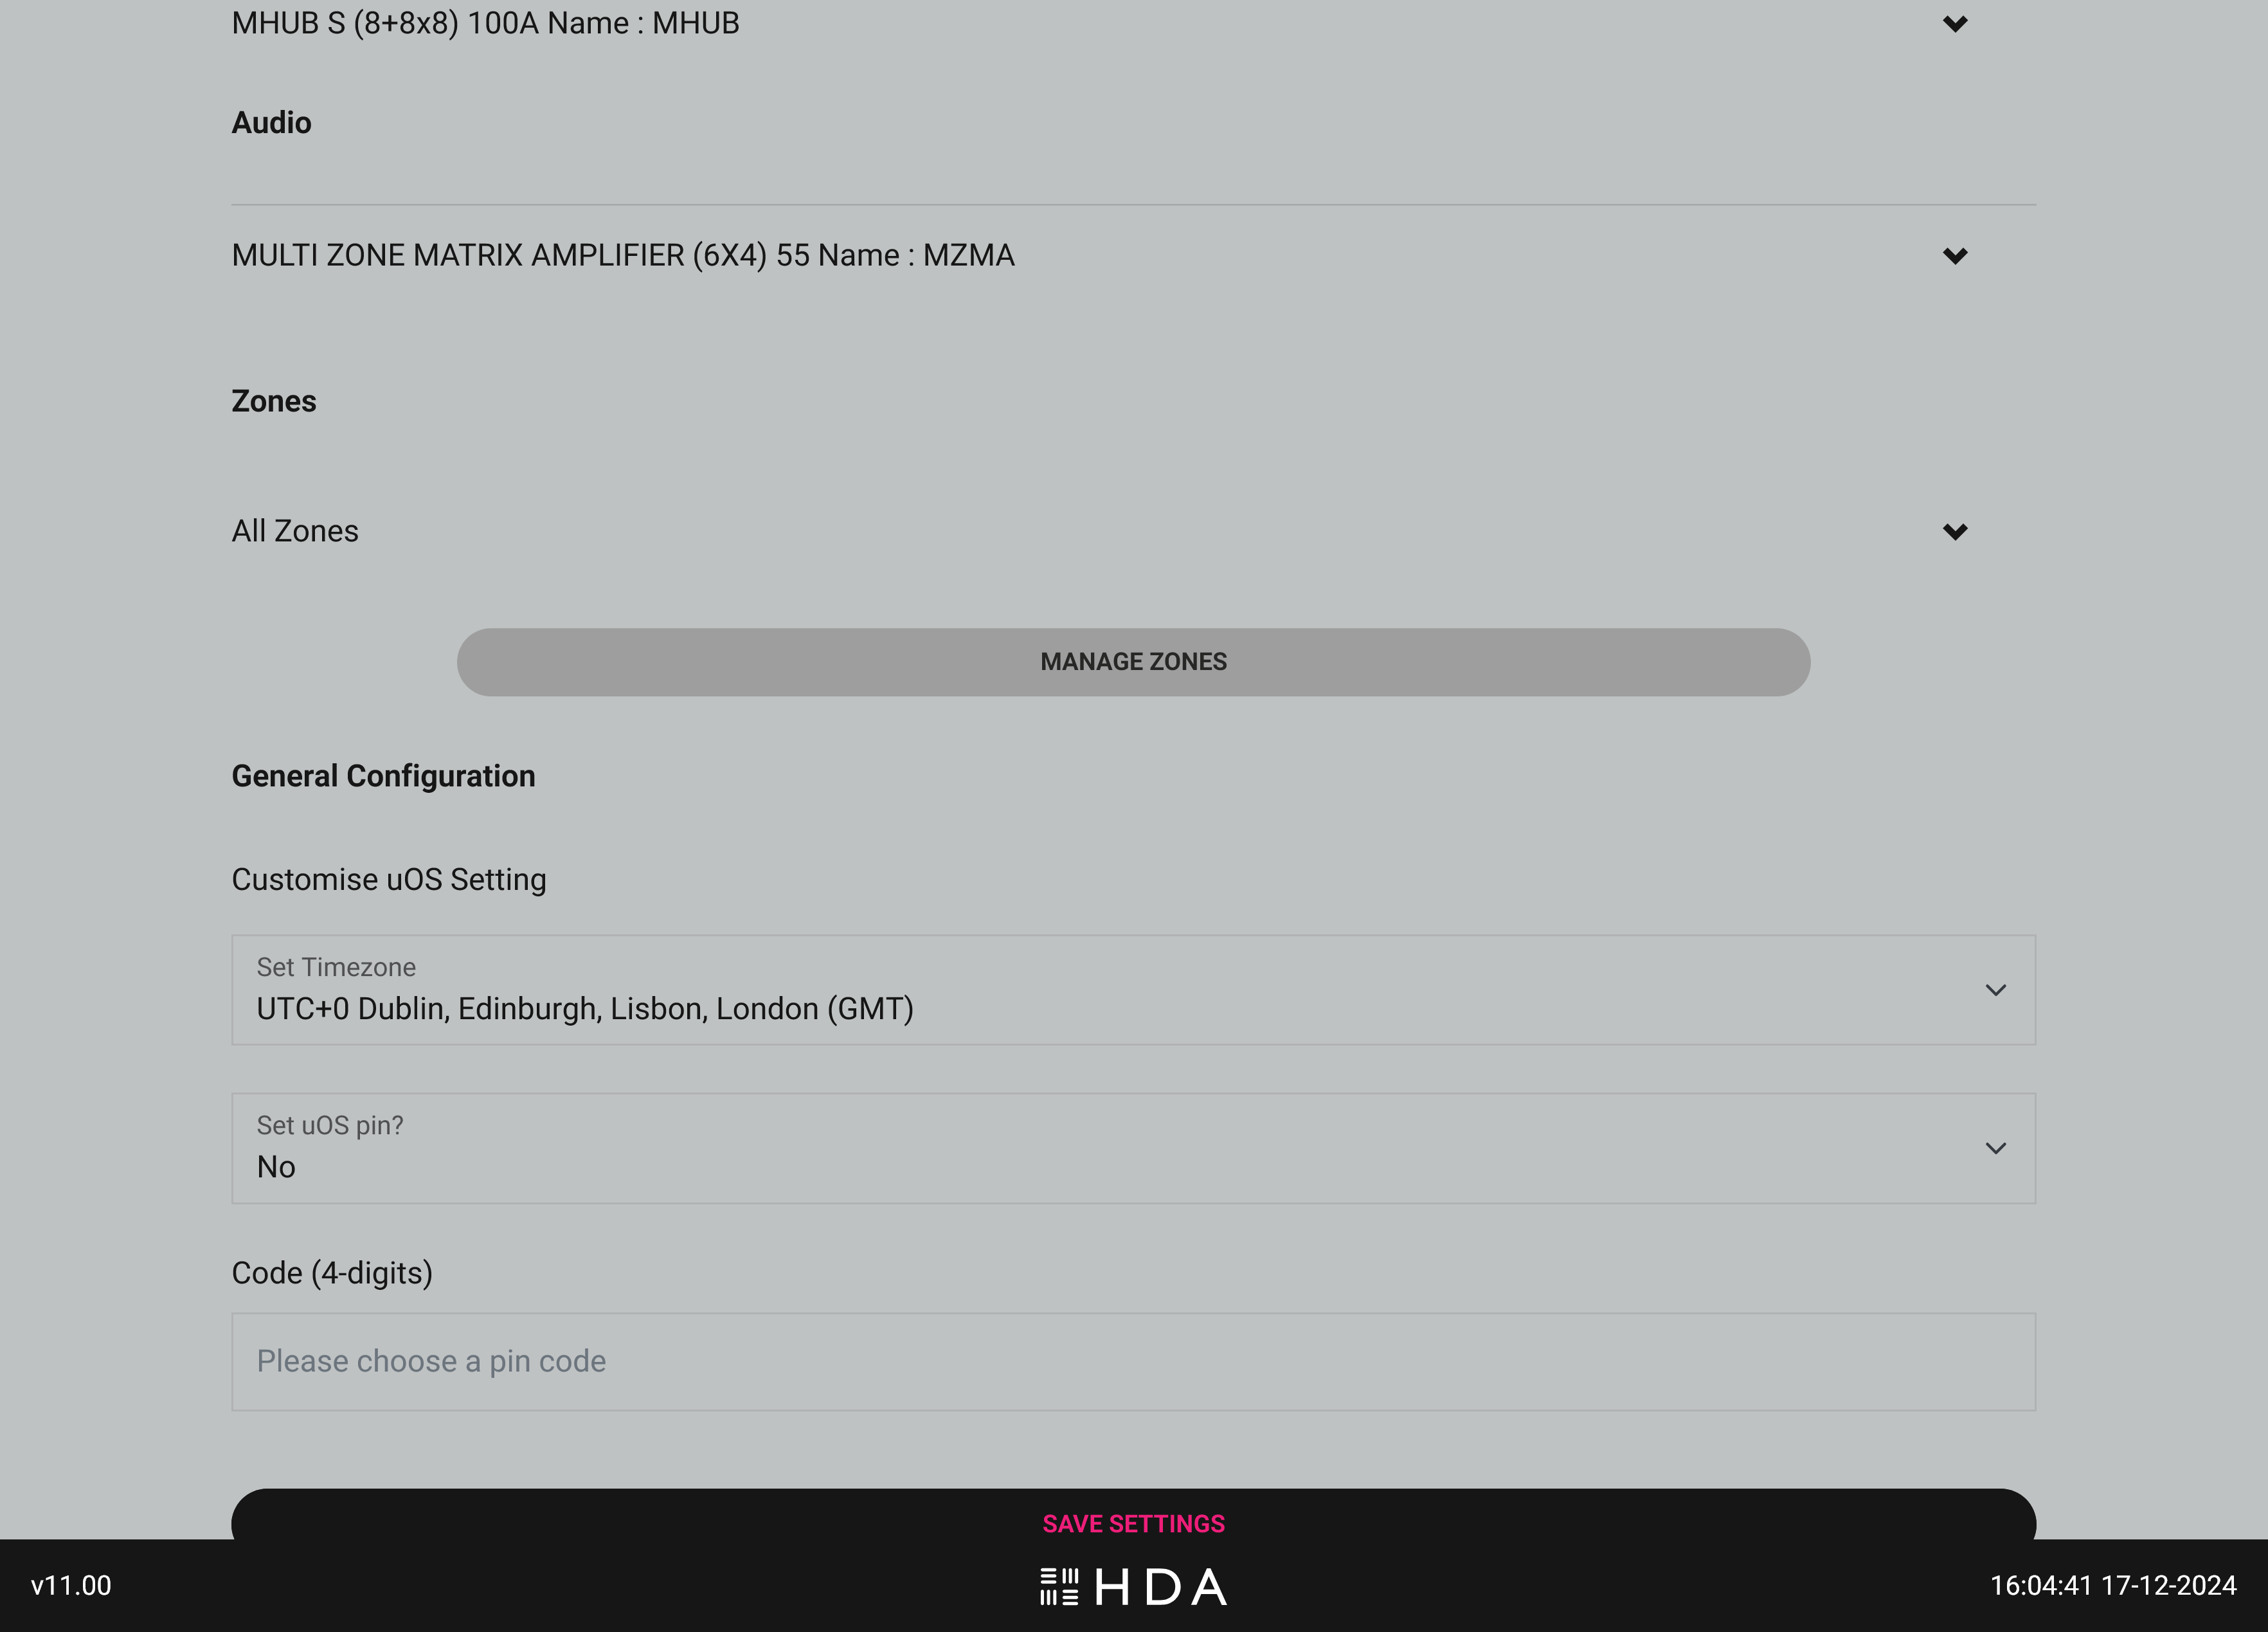
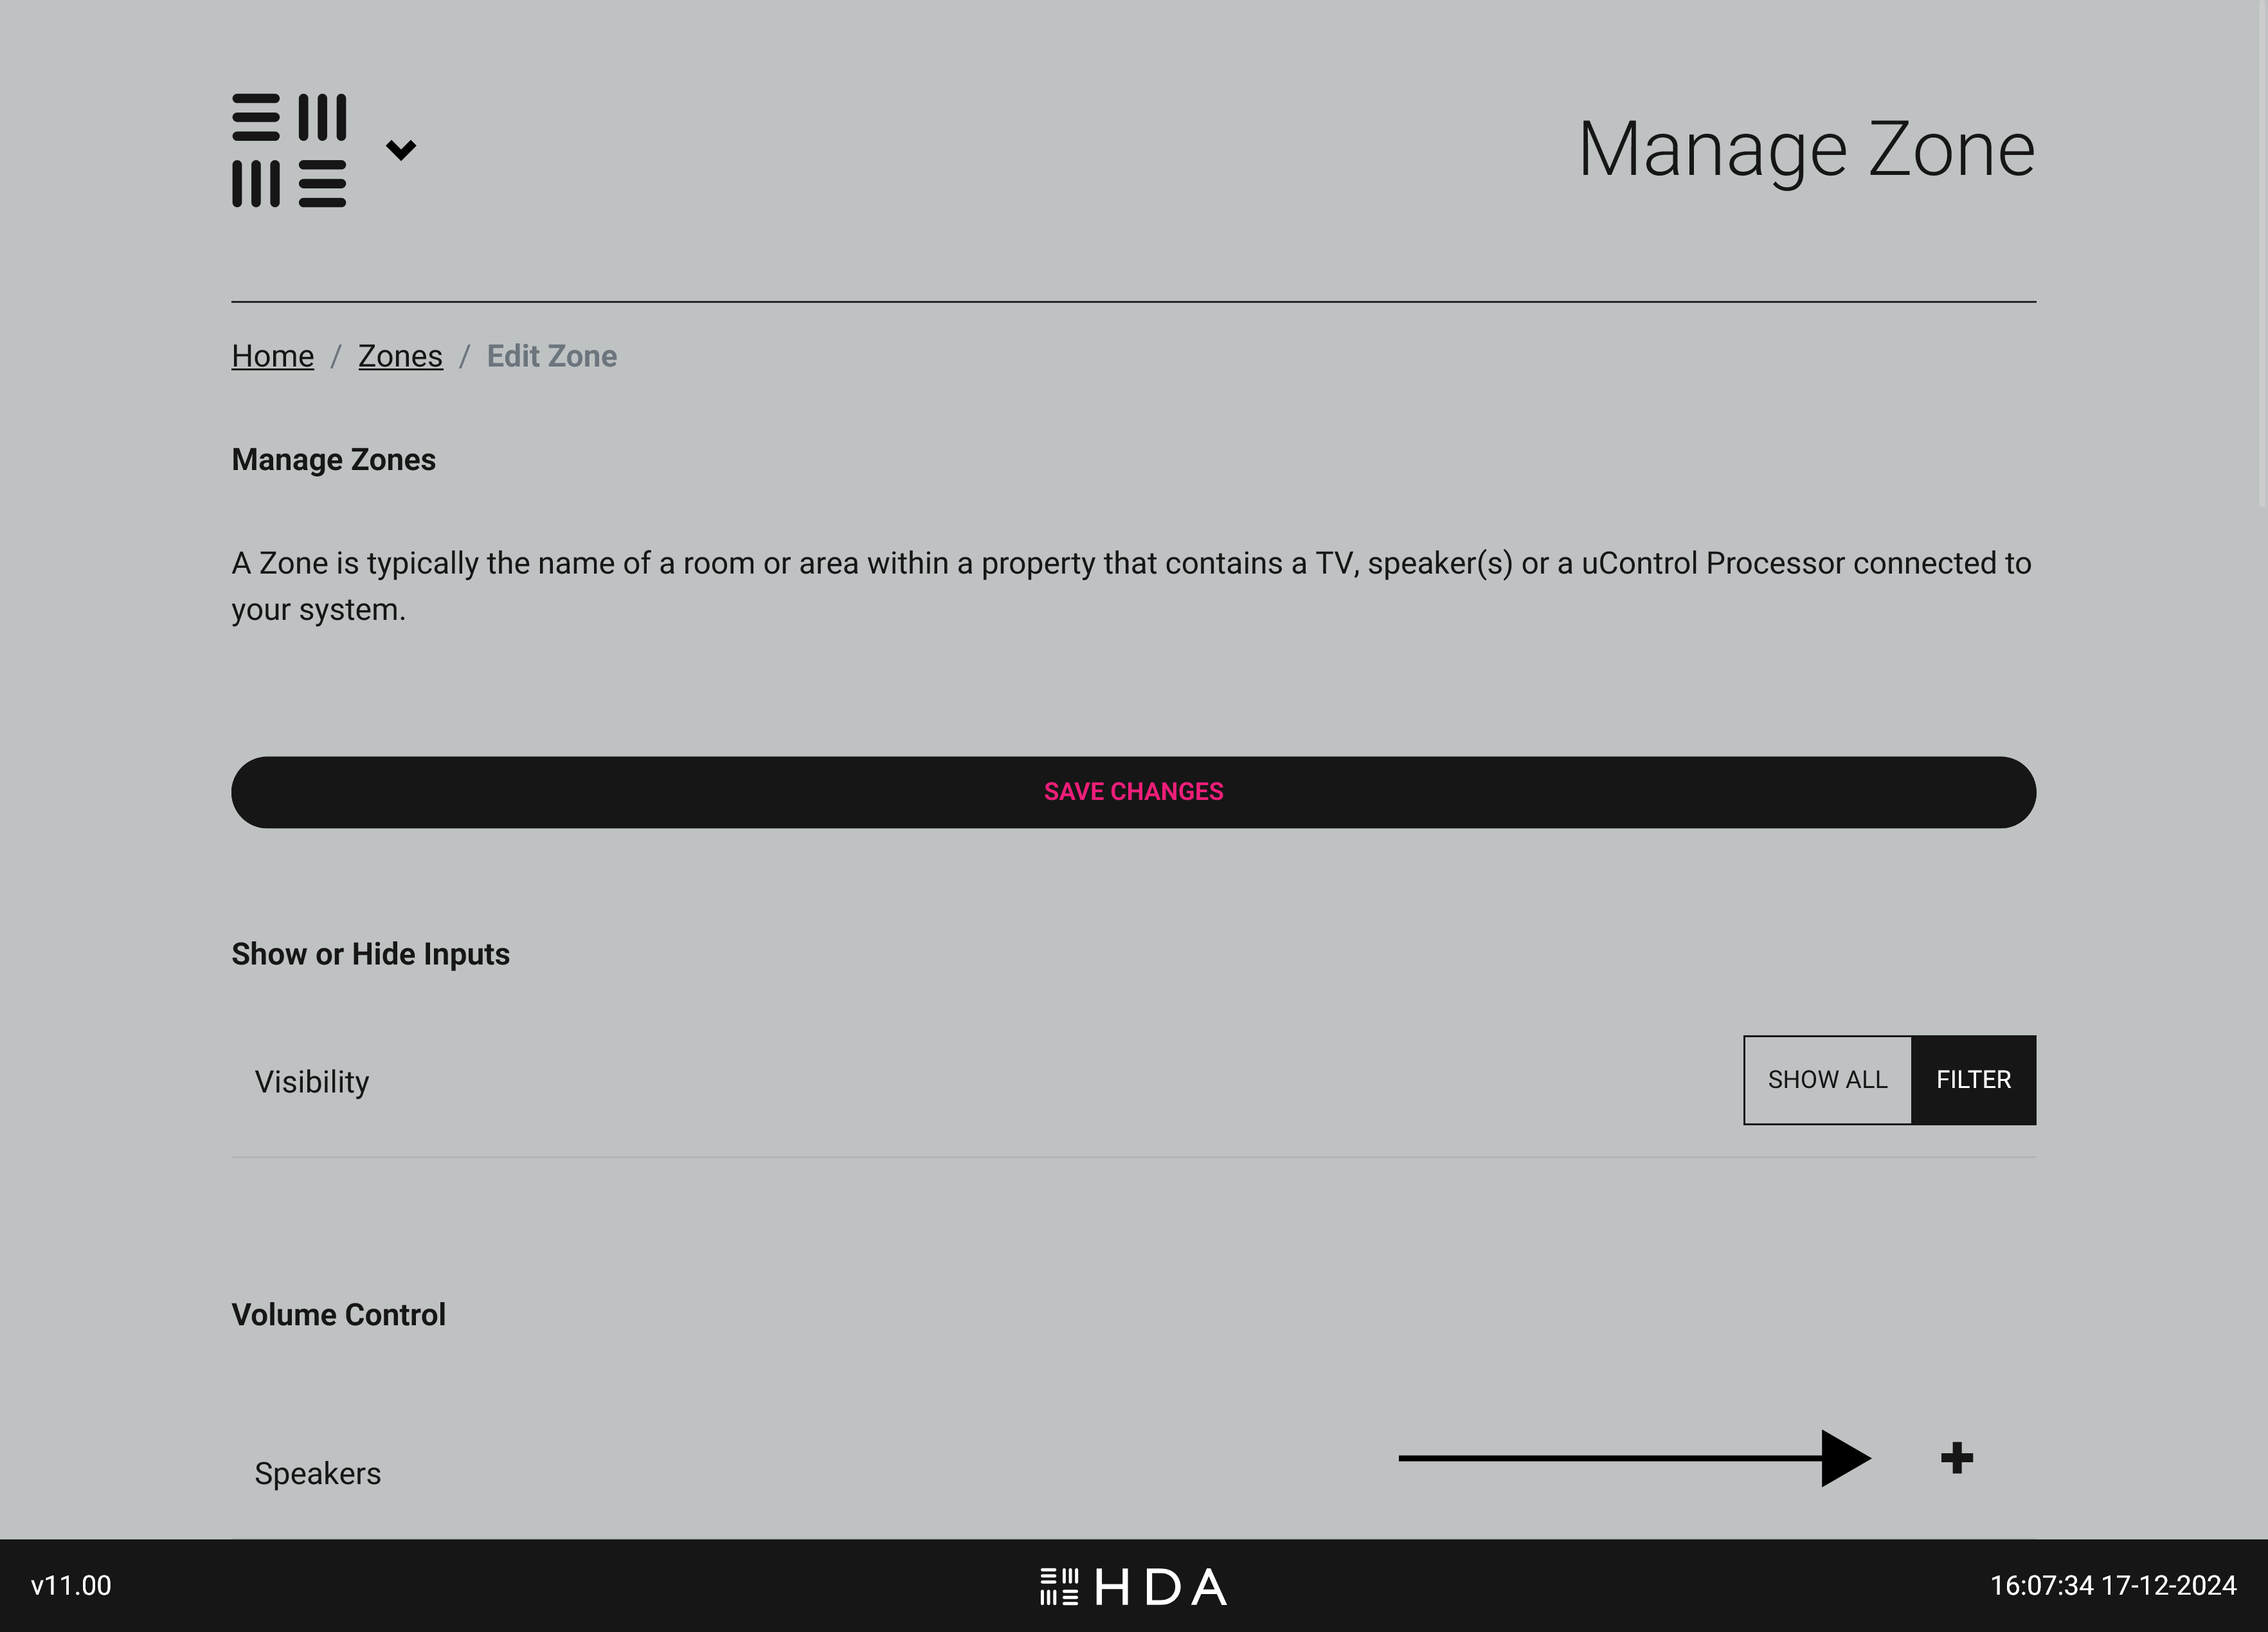
Return back to the uOS “Setup” page and scroll down until you see the “Manage Zones” button, then select it.
A page will load with a table that lists all the Zones you have defined in uOS. Select the Zone that you wish to edit by tapping on the edit button (pencil icon)
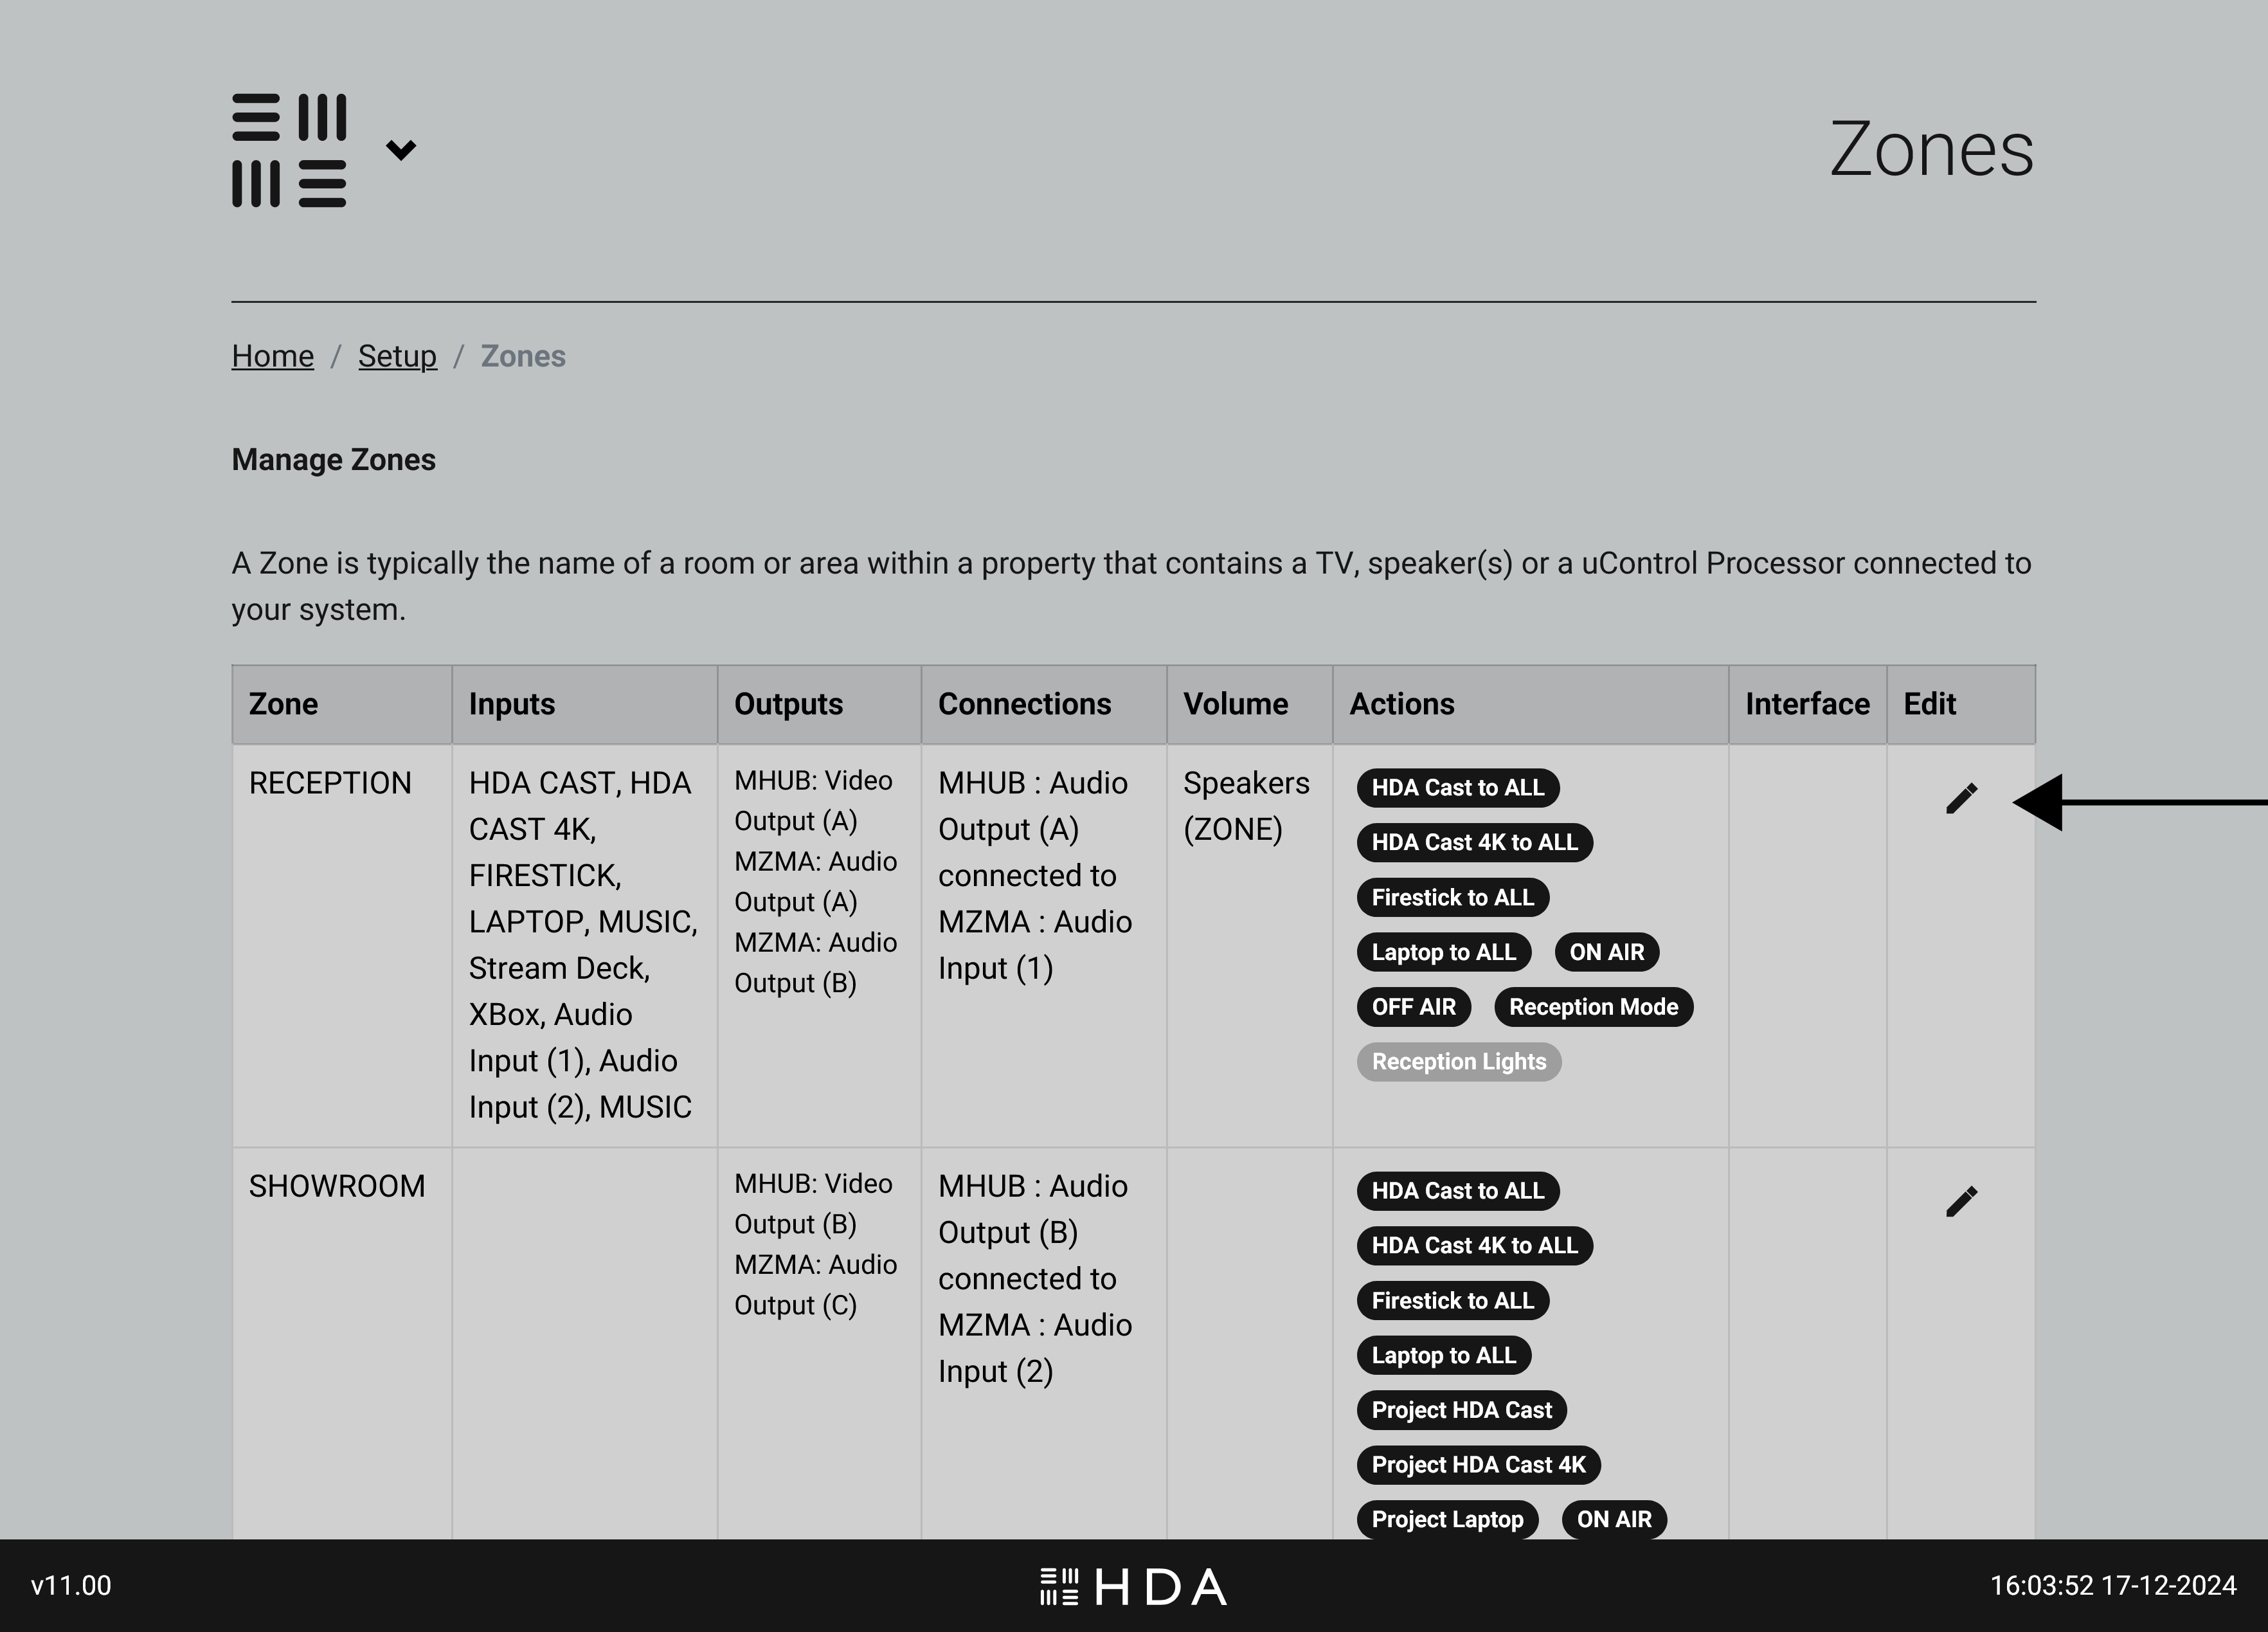
You will now see all information pertaining to that particular zone, you will need to make two small changes for every zone in your system..
Change #1: Choose your video & audio source visibility.
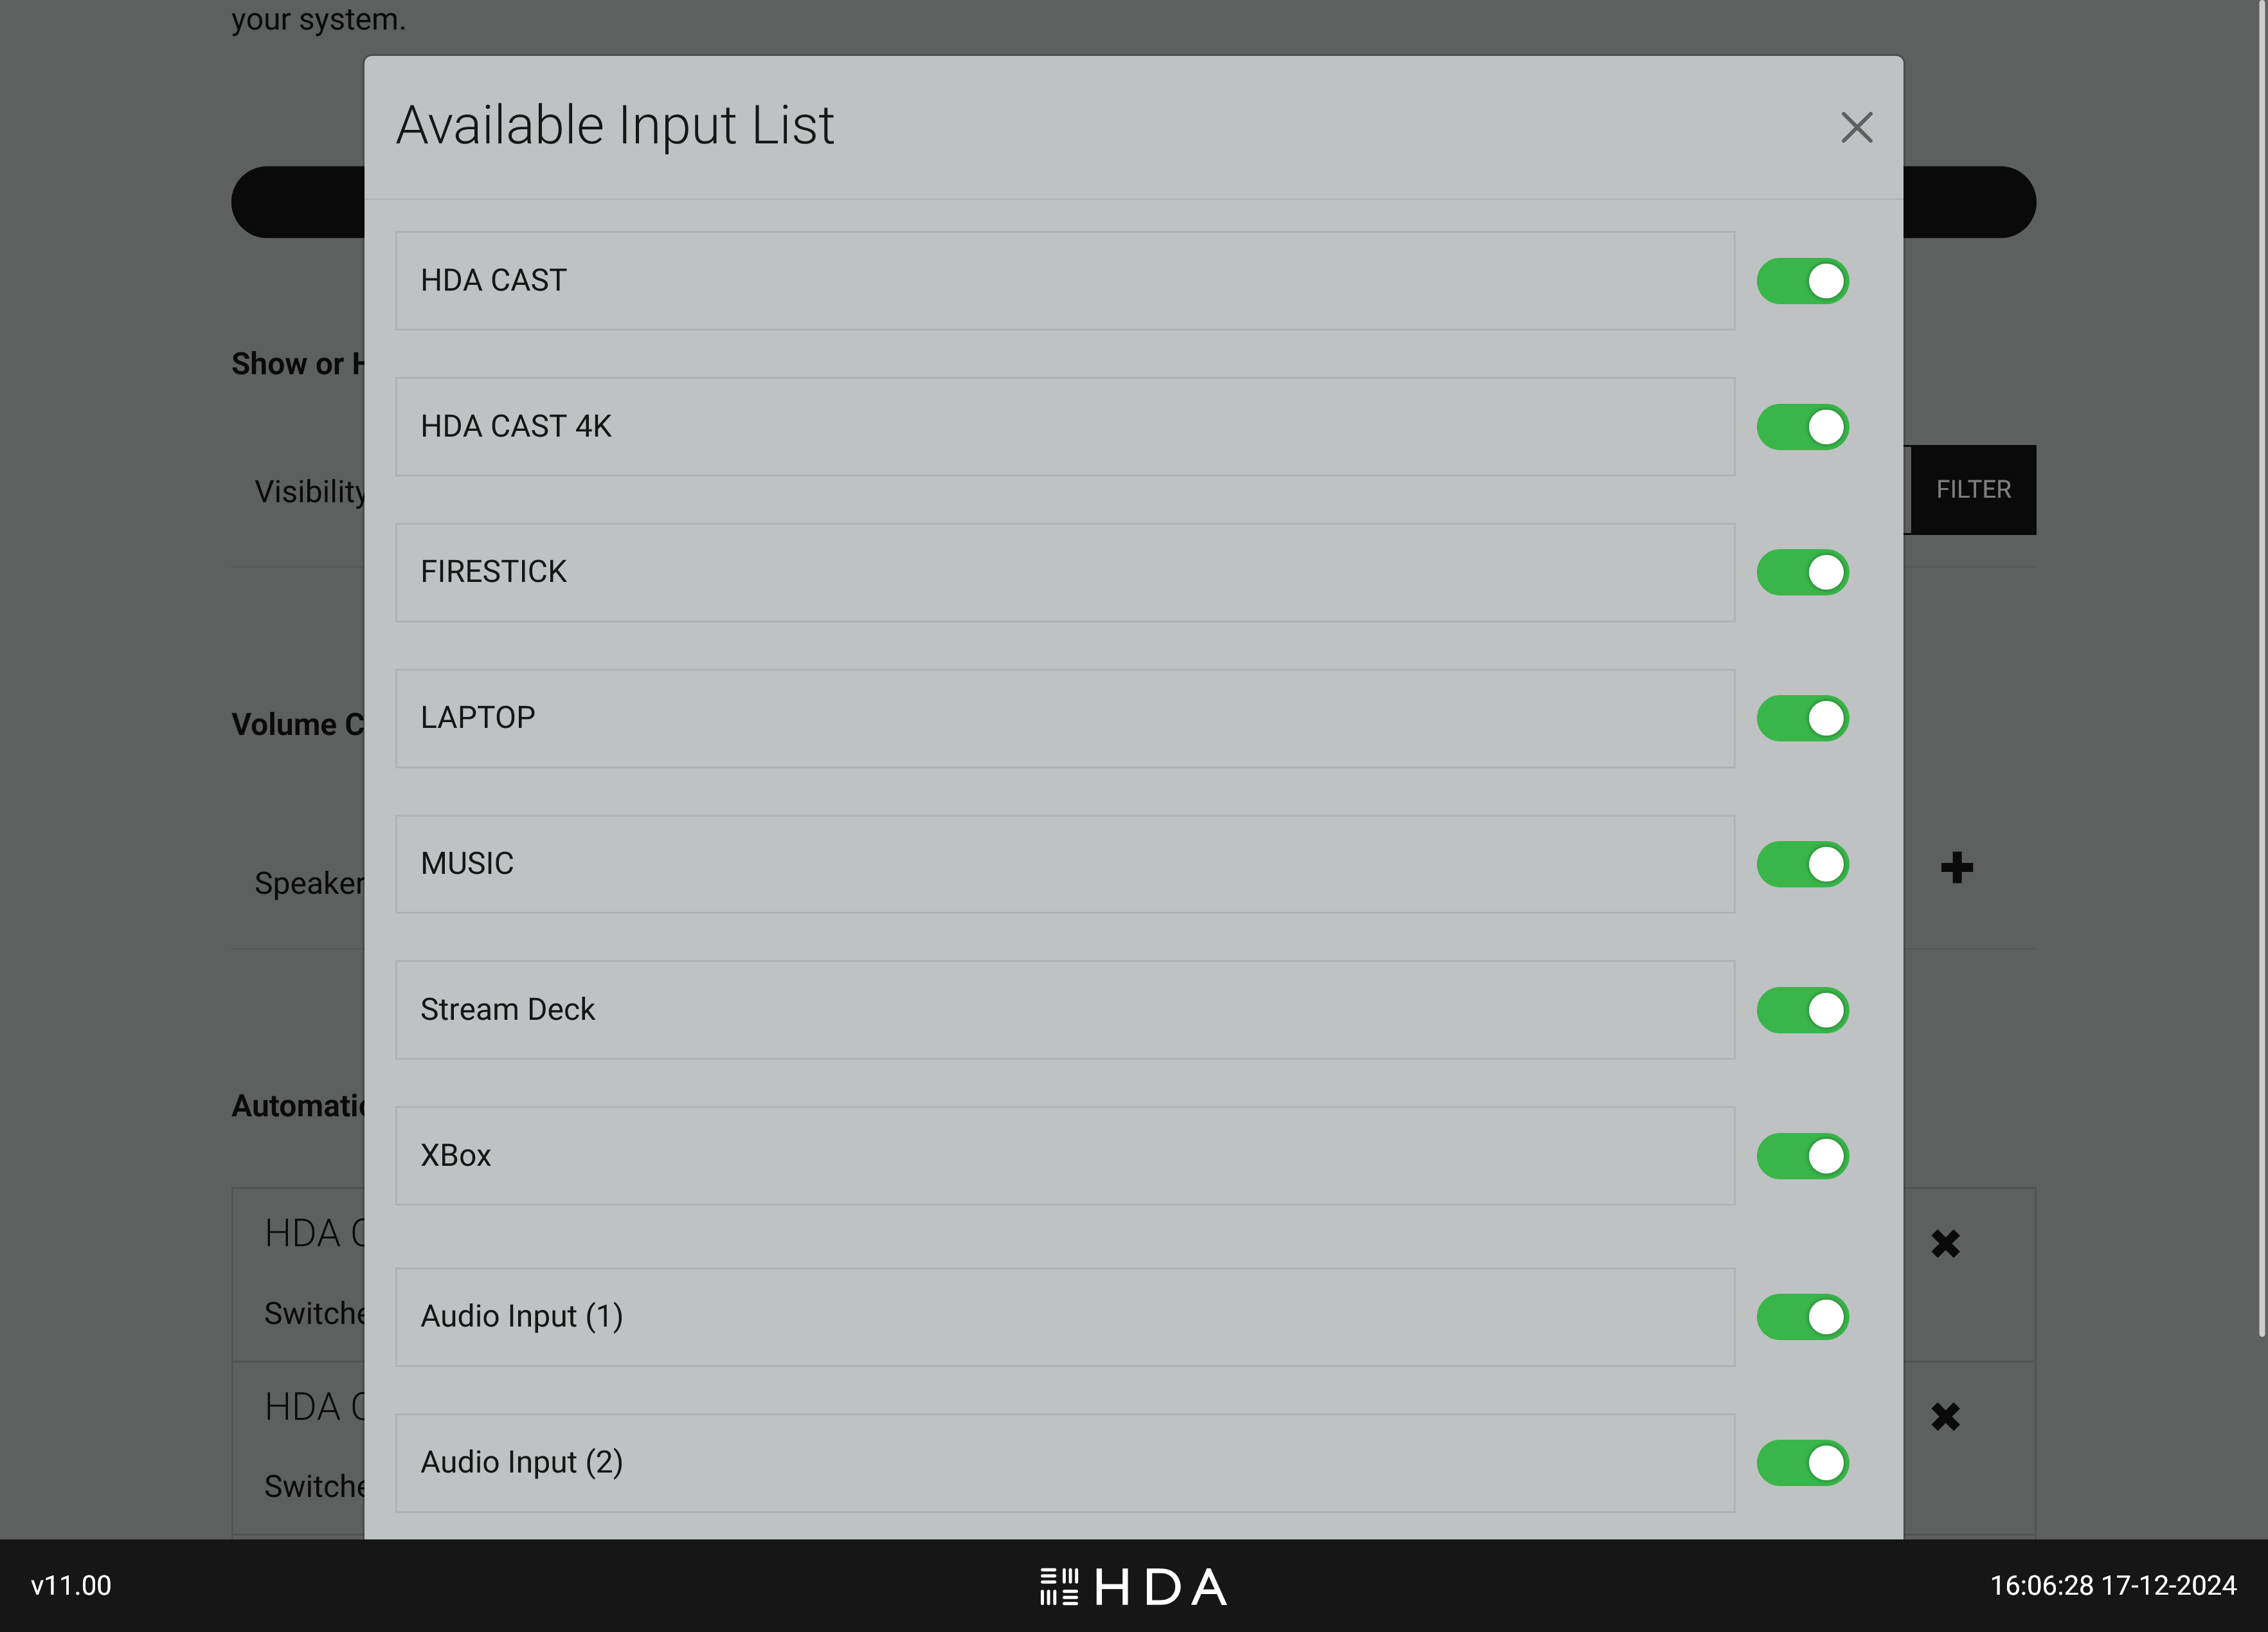
uOS 11 gives you the ability to show or hide any input that is connected to your HDA system. You can choose to show all inputs or filter them so that only AV inputs you select are visible in that zone. If you’re unsure or in a rush you can choose “Select All” and edit this option later.

If you select “Filter” a list of all inputs that your HDA system is controlling will appear with a green coloured switch, here you can choose to turn that input on or off inside that zone.
Change #2: Set the default volume for every zone.
New to uOS 11 is a declaration of what device is controlling the volume. This is a new setting and will ensure that both uControl app and uControl Remote’s default volume keys are mapped to the device you choose here.
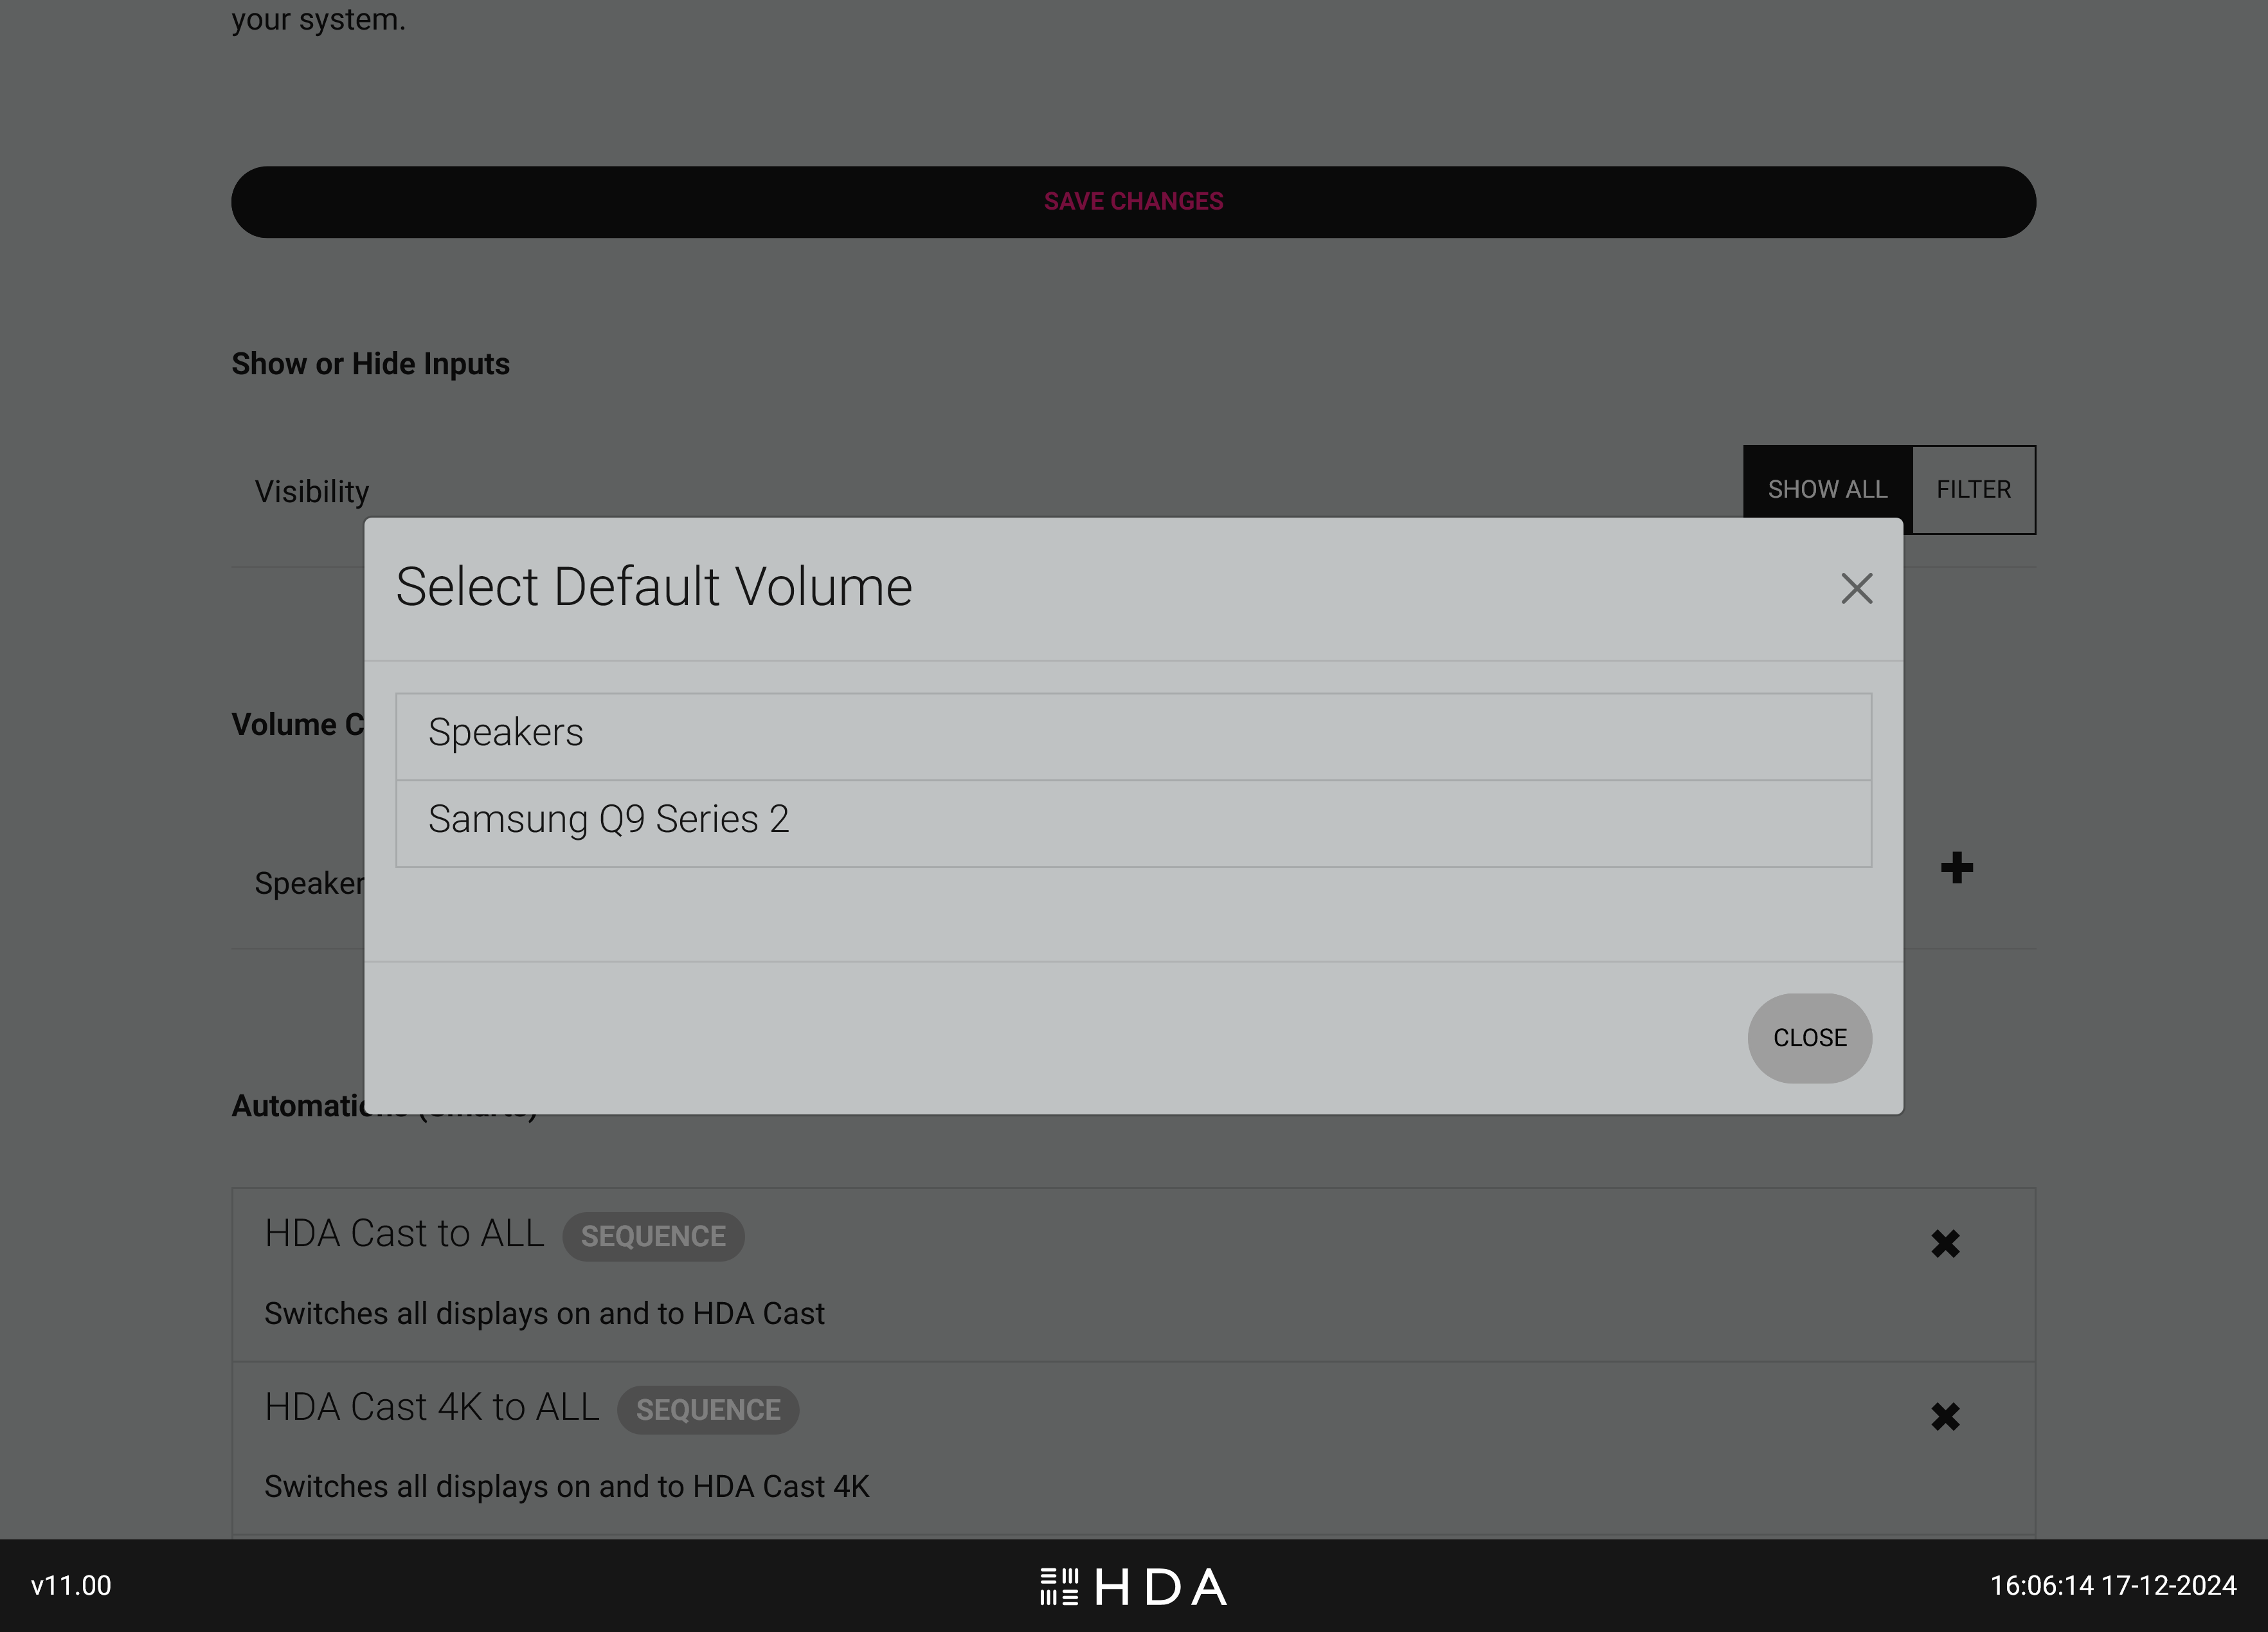
IMPORTANT:
You must repeat this step for every zone in your system if you wish to use the new uControl App or uControl Remote. If you fail to do this step uControl App will not work correctly and you may experience problems when configuring uControl Remote.
Your HDA system is now ready to use!
Congratulations, your HDA system is now updated and ready to work with the new uControl app and uControl Remote.
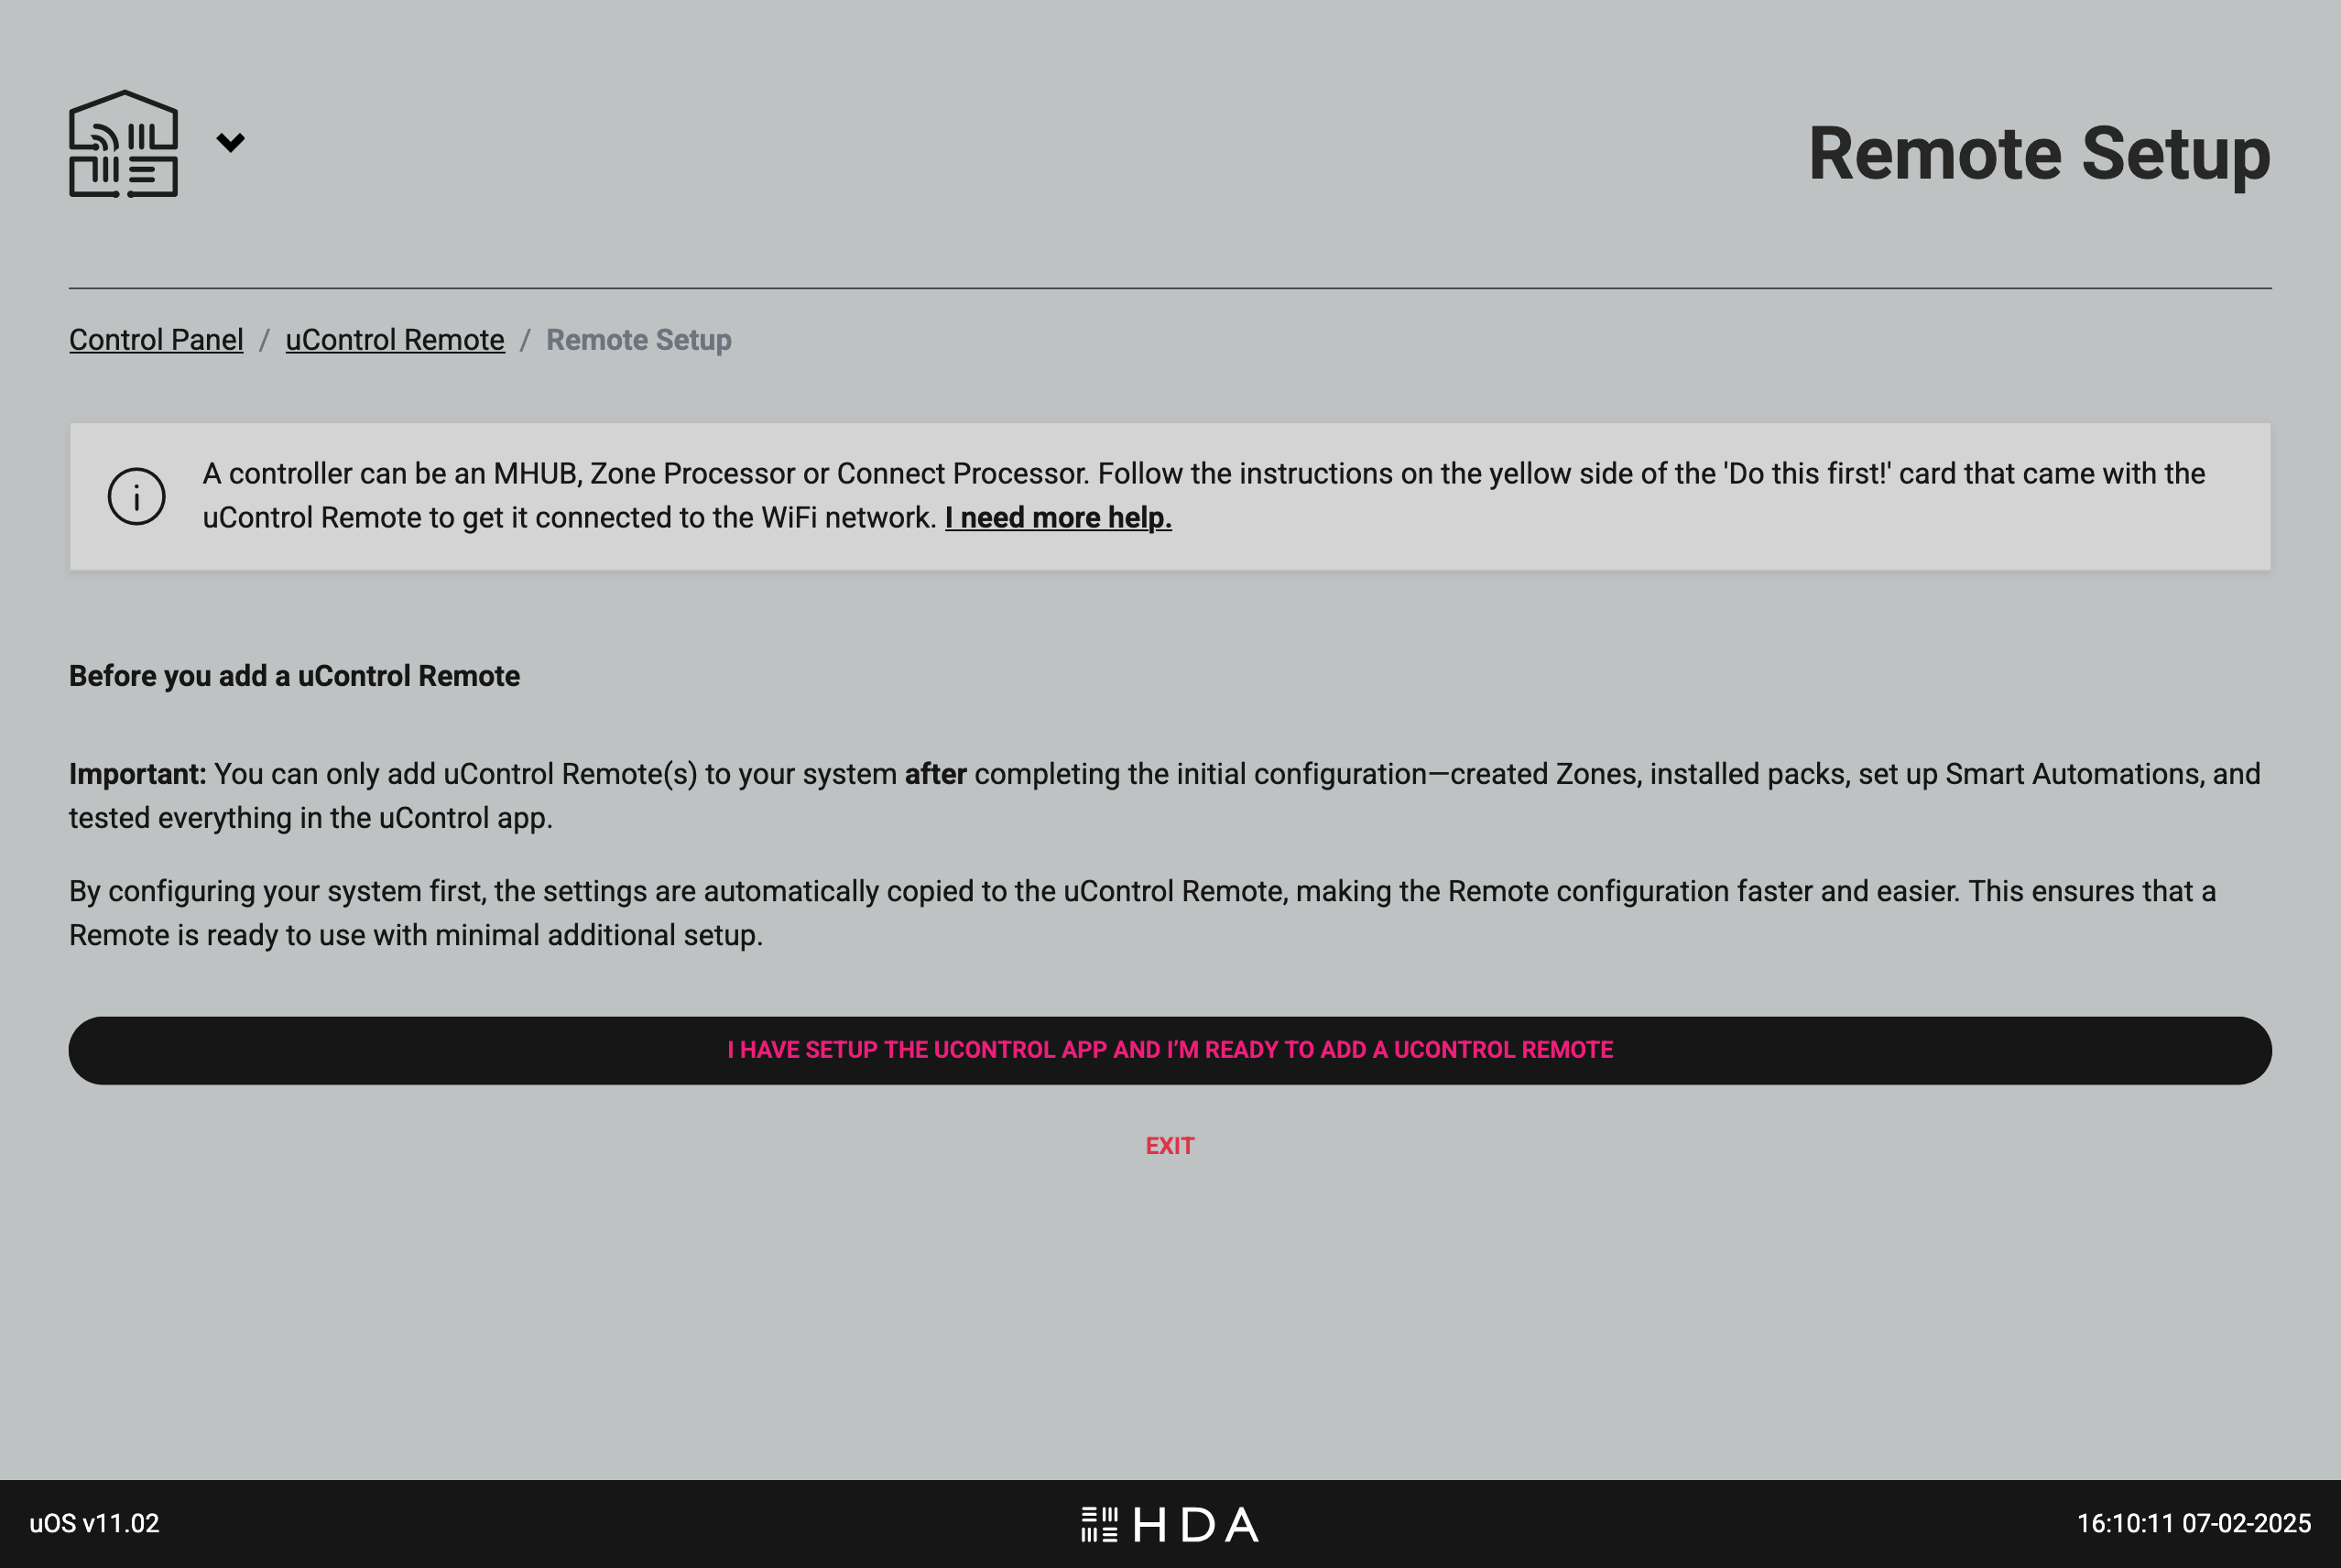
Before you begin:
To ensure a smooth setup process for your uControl Remote, please make sure you have the following in place before you start:
uOS 11 or above: The uControl Remote will work correctly with uOS 11 or above. Ensure that you have checked for updates beforehand.
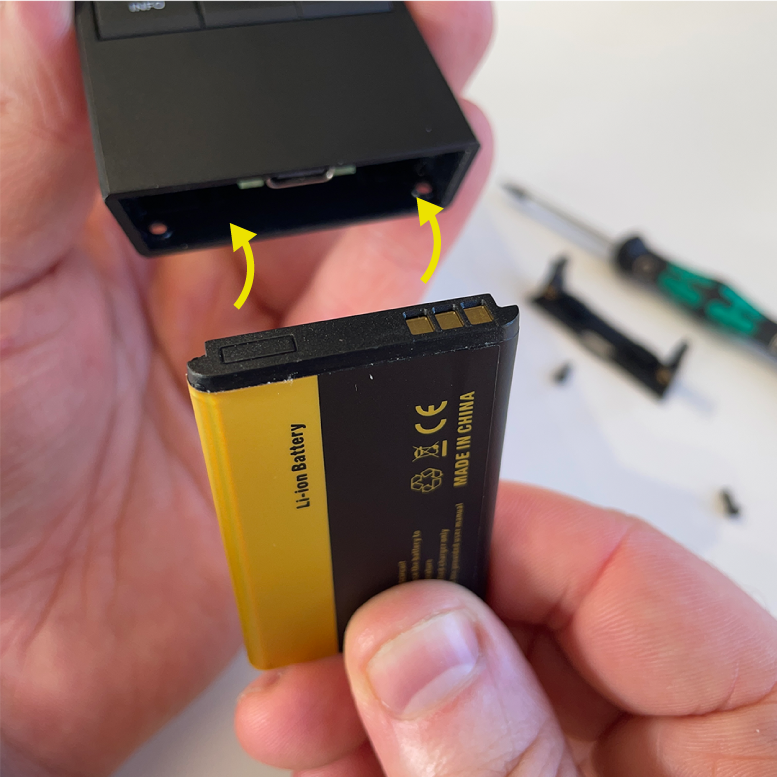
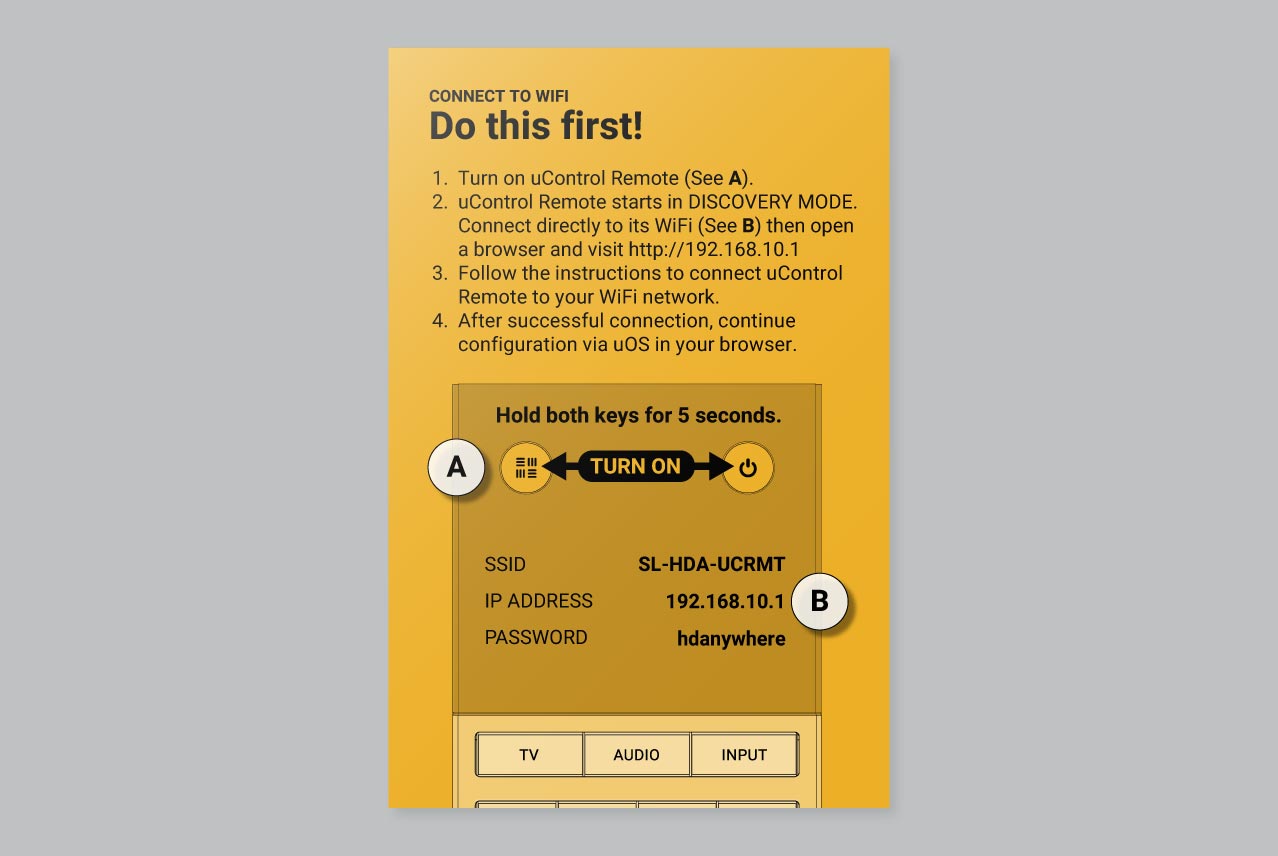
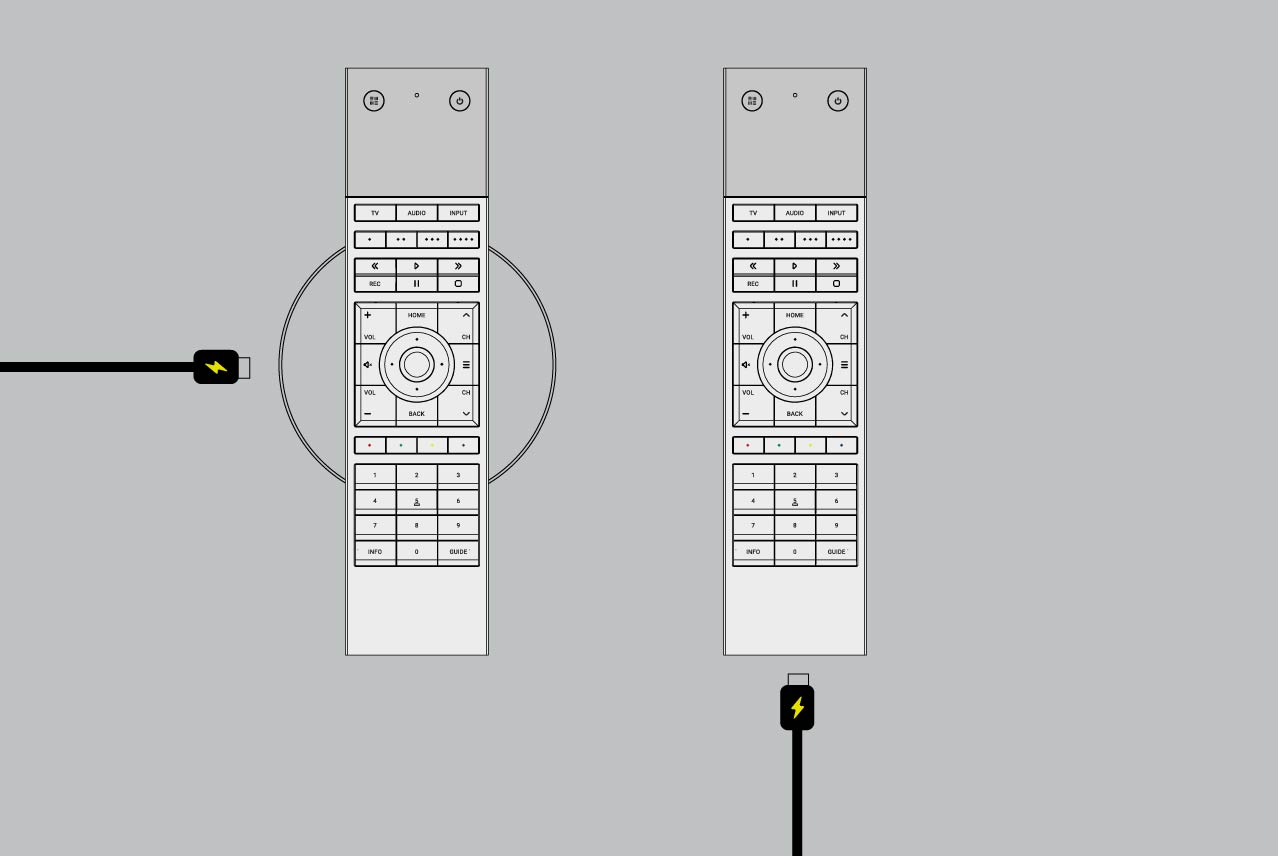
Powered On: Press and hold the HDA Key (top left circular button) and the Power Key (top right circular button) simultaneously for 5 seconds.
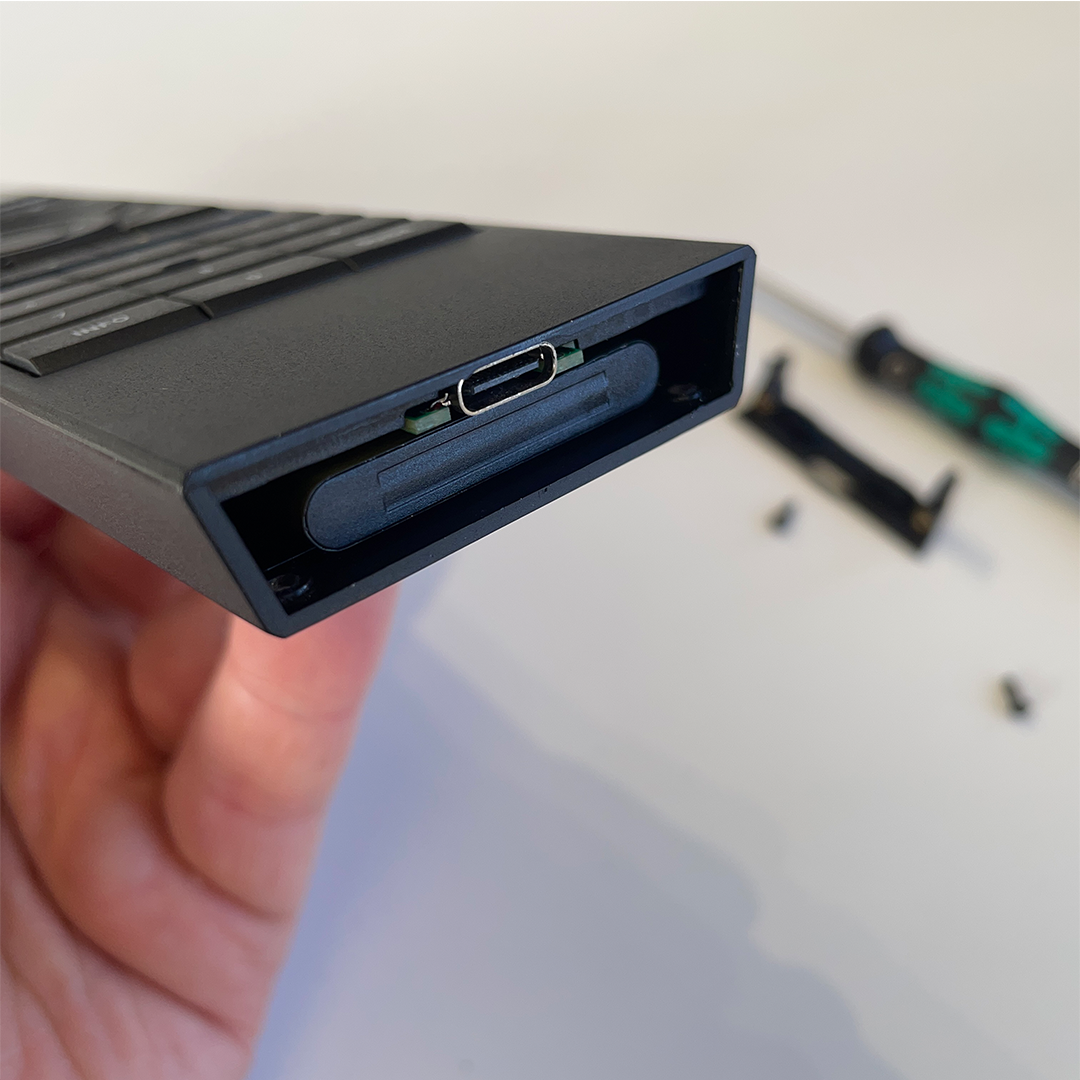
Sufficient Power: Ensure the Remote is charging using the provided USB-C cable or a wireless charger.
Setup tested on uControl app: uControl Remote should be the last device setup in uOS. It is recommended that all uControl packs have been downloaded, all Smart Automations have been created and tested inside uControl app before transfering any configuration to .
20 minutes (approximately) to work through.
Contents:
In a hurry? Refer to the quick start guide in your packaging
The fastest way to connect your uControl Remote to your WiFi network is to refer to the quick start guide found inside your packaging.
If you need more help then a detailed version of this process is described below.
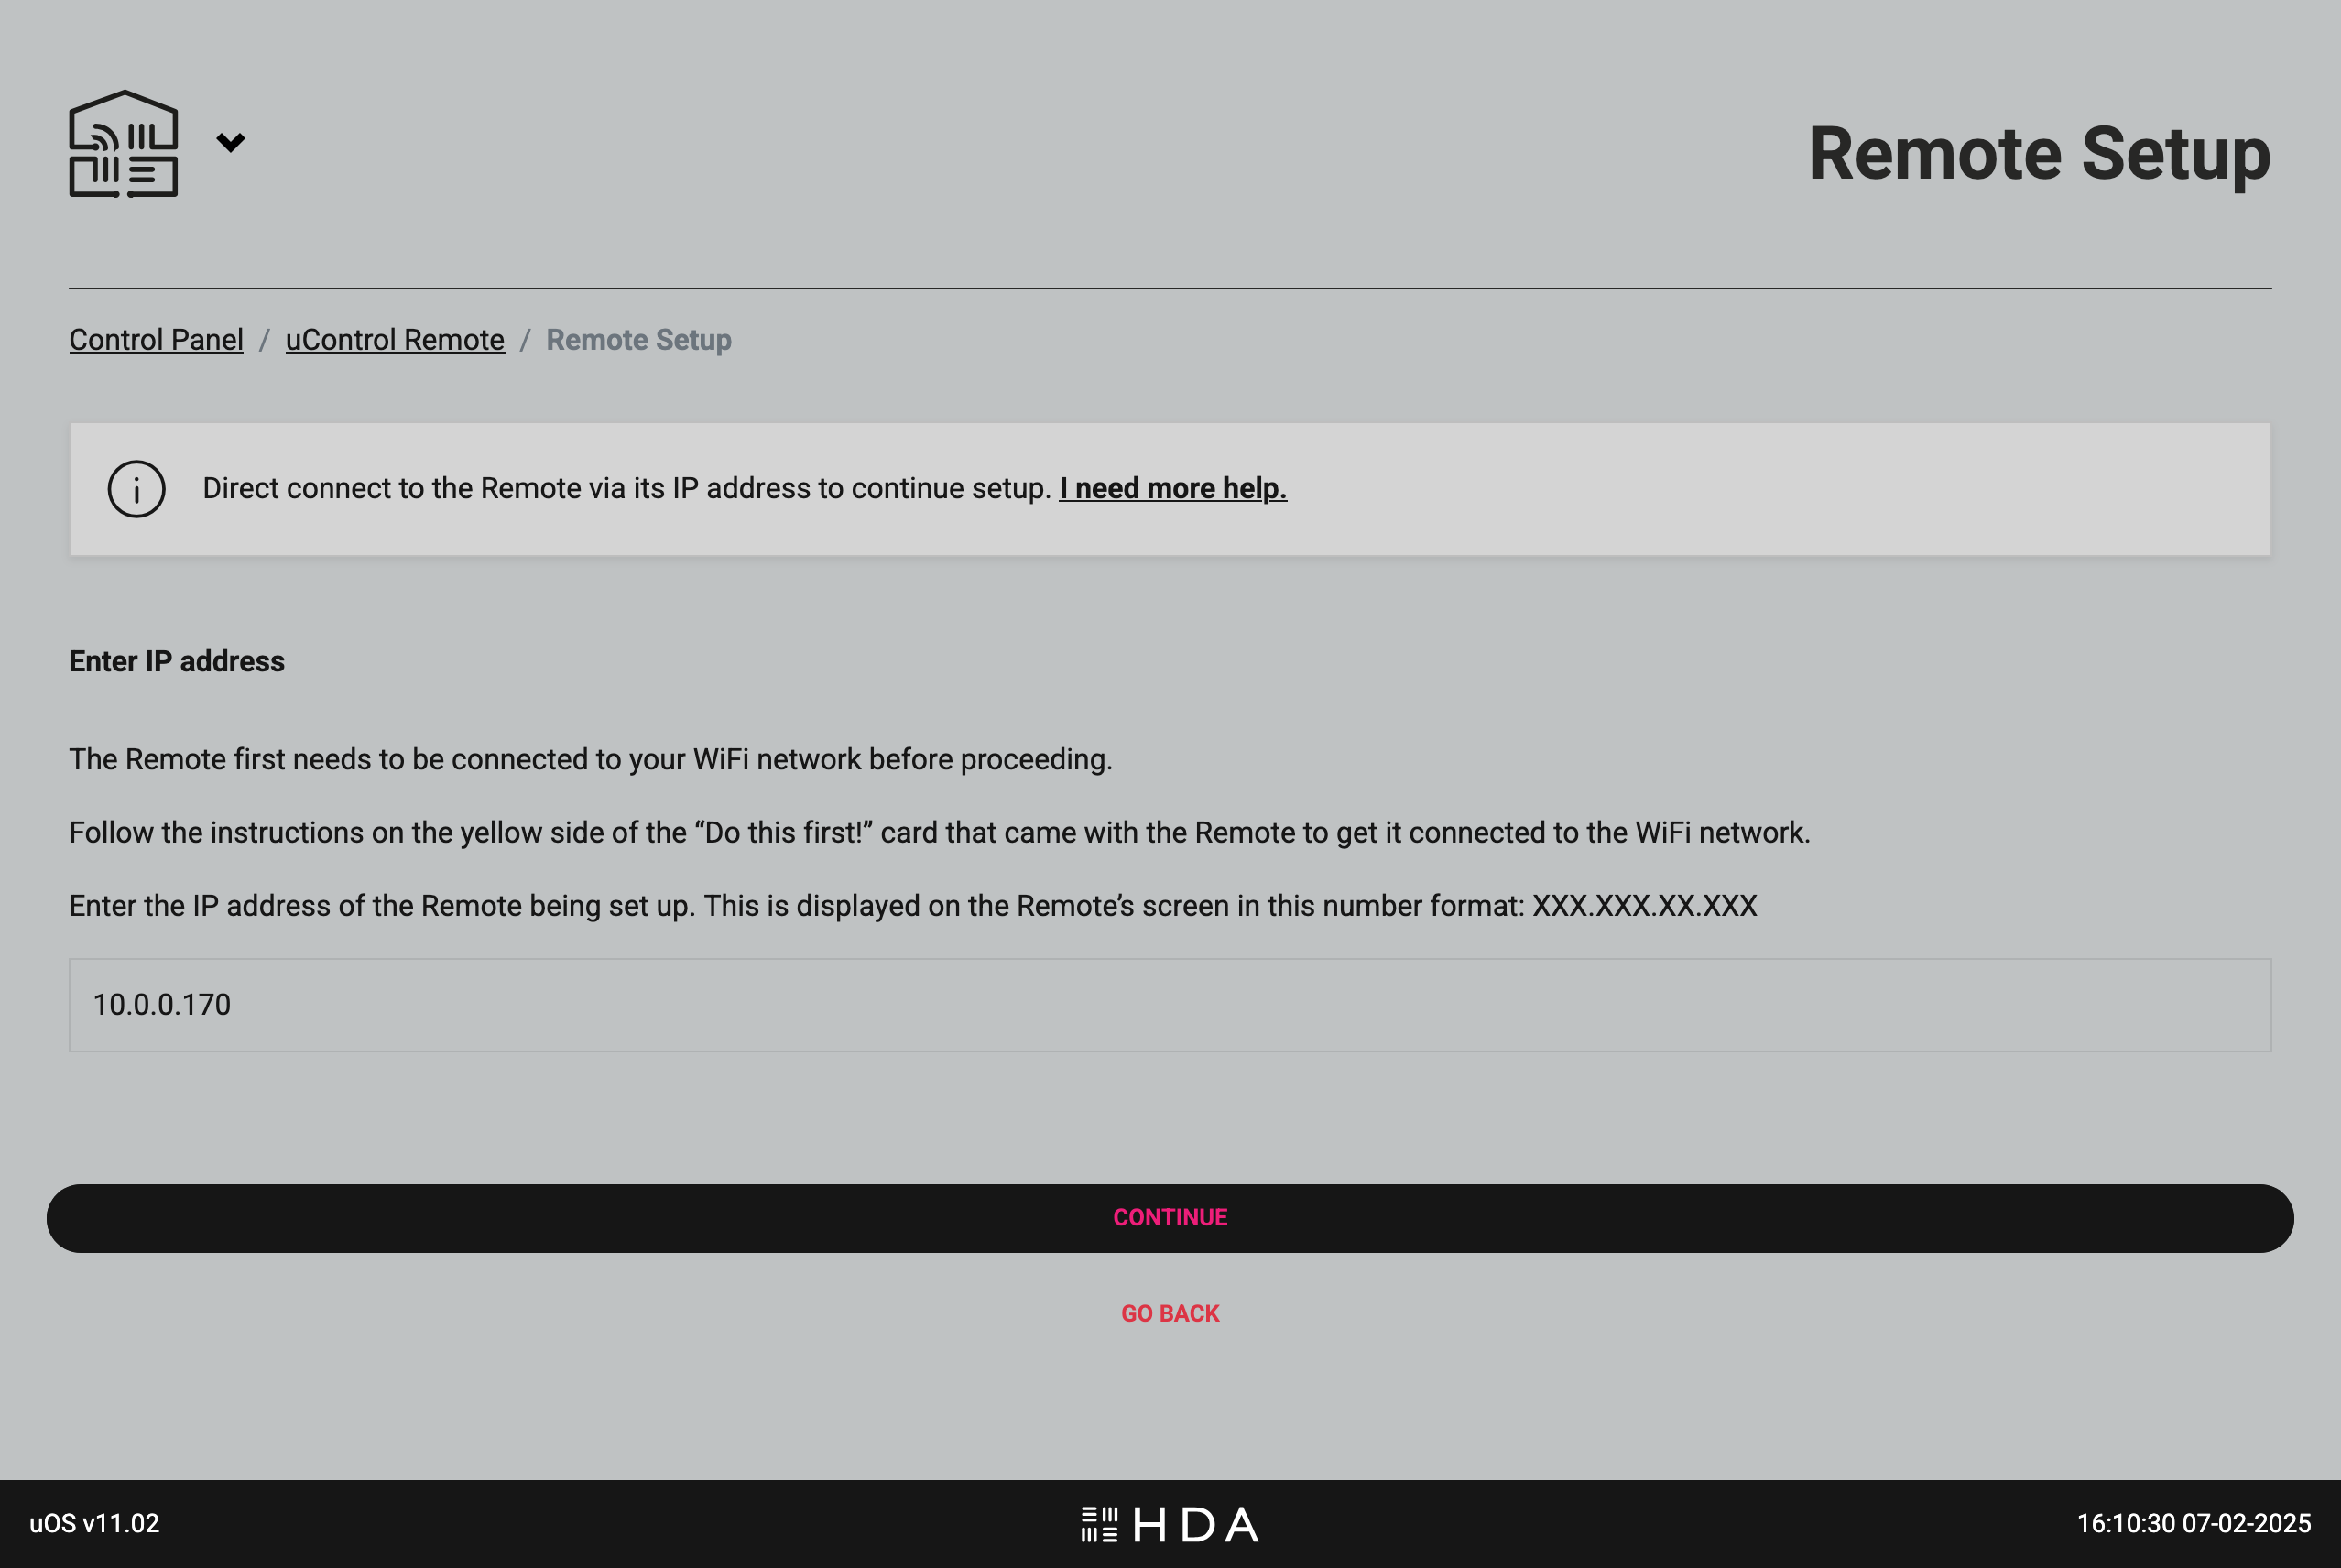
Getting uControl Remote on your WiFi network (full description)
1. Ensure that the uControl Remote is charging before you start
2. Turn the uControl Remote ON
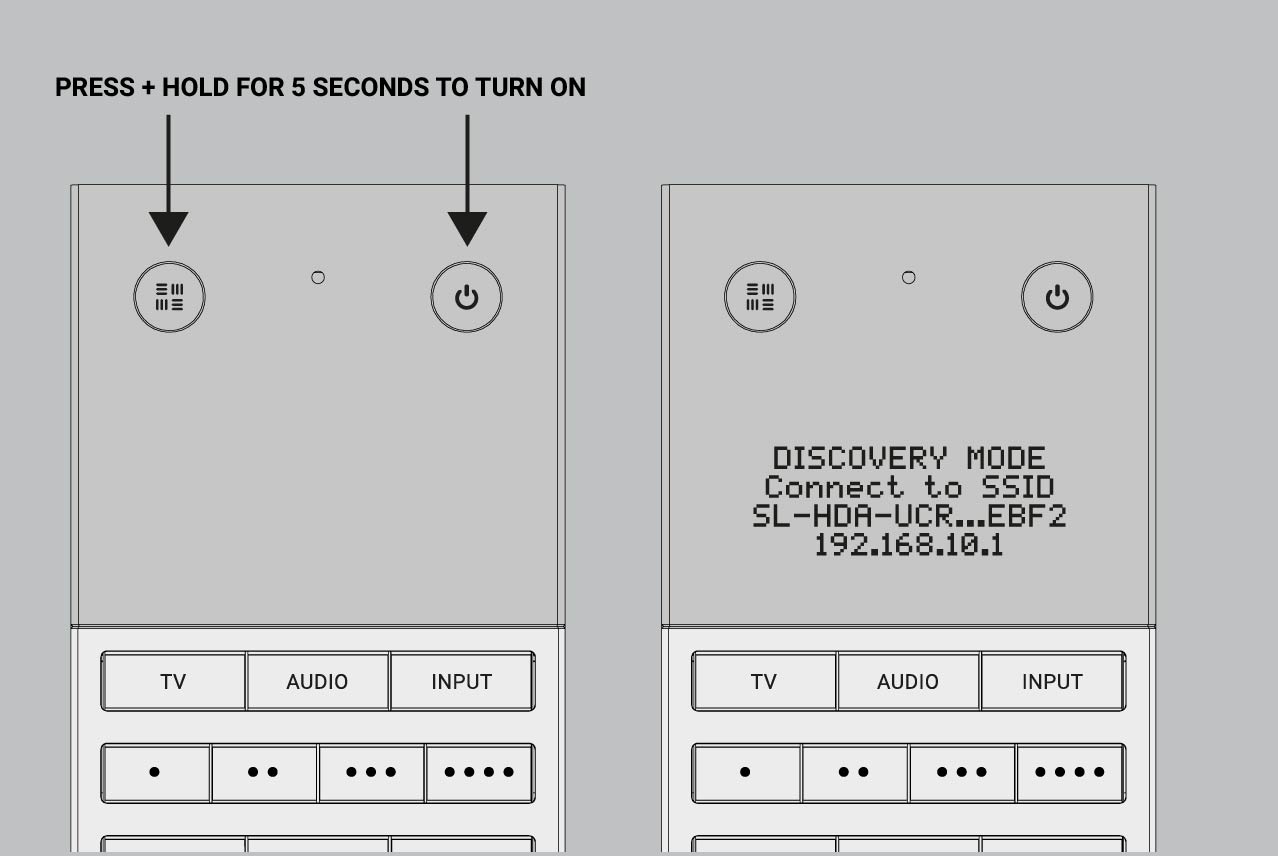
3.Connect directly to uControl Remote’s WiFi
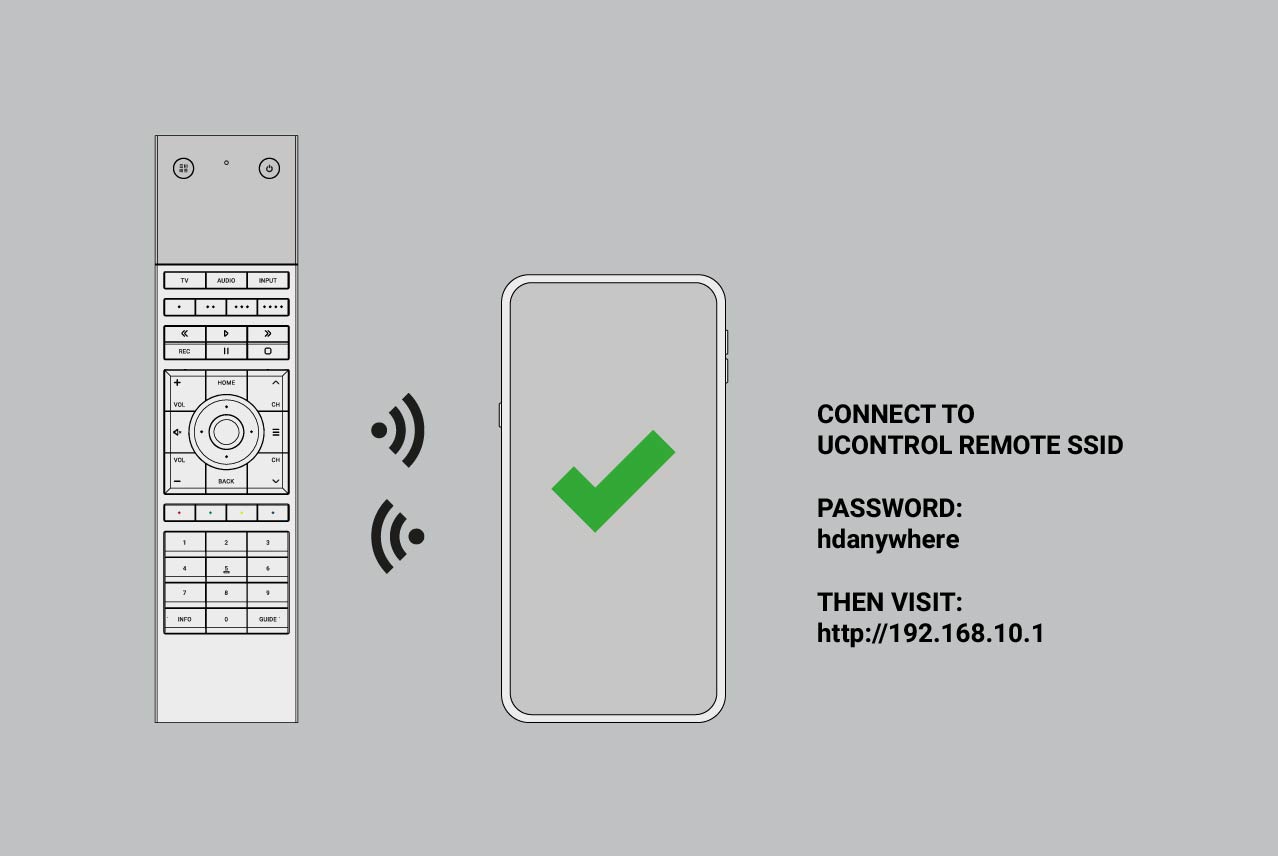
To connect to uControl Remote’s WiFi use password hdanywhere.
4. Access the uControl Remote’s Network Page.

At this stage, uControl Remote will scan all available WiFi networks within range. uControl Remote only supports 2.4GHz WiFi and WPA/WPA2/WEP security standards.
5. Wait for connection
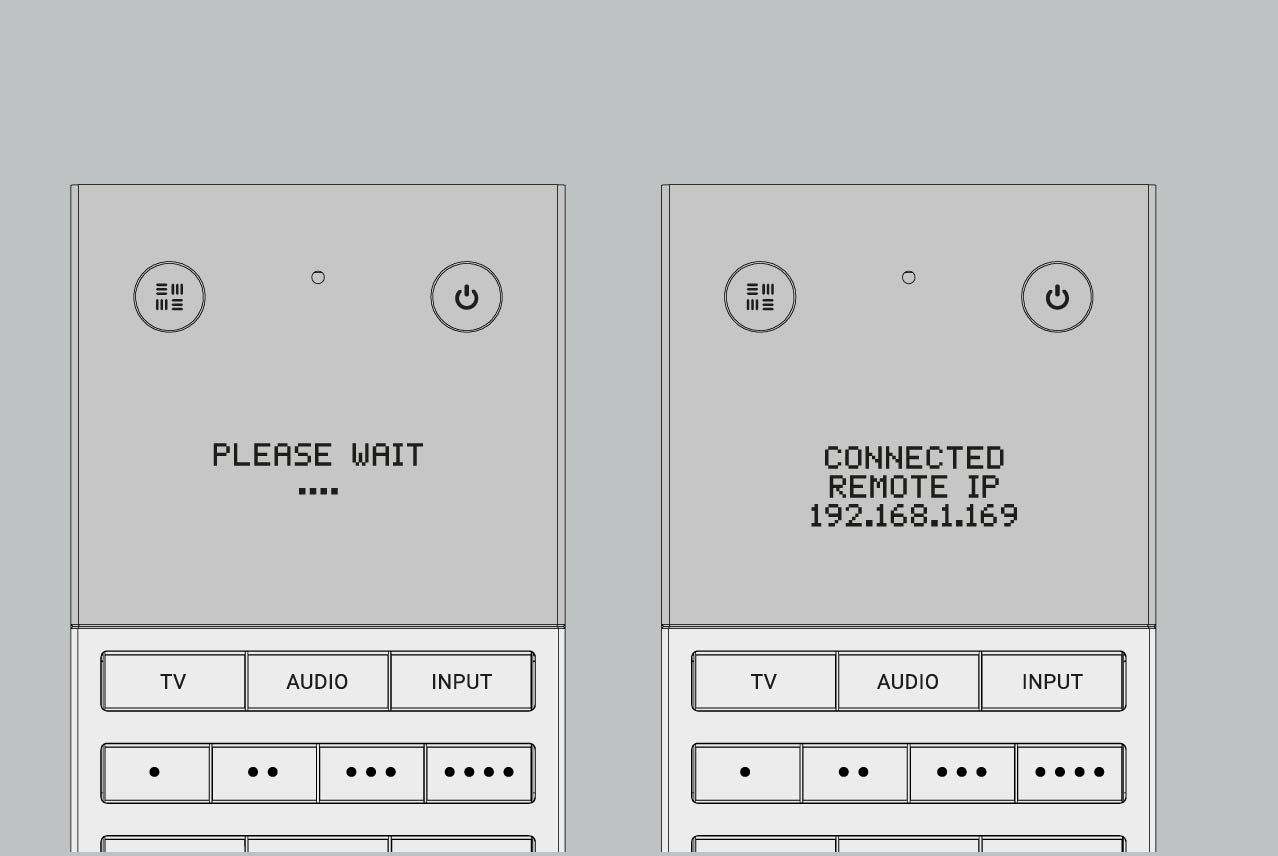
Once the uControl Remote has joined your WiFi network, it will be given a new IP address, take a note of this IP address as you will need it when you configure your uControl Remote for use.
Starting uControl Remote basic configuration.
Make sure your uControl Remote is on the same network as you controller and that the Remote is charging.
Visit uOS and navigate to the “Remote” page.
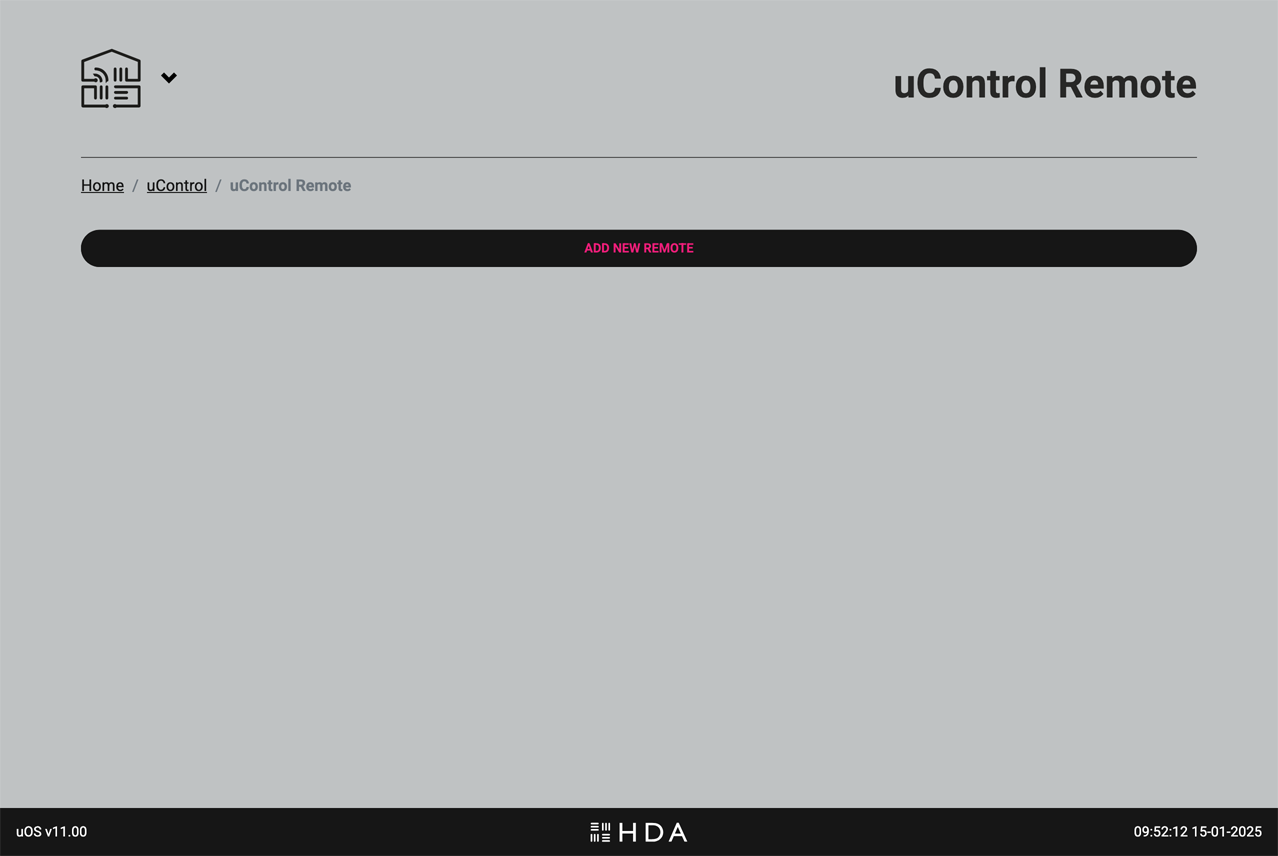
Make sure that all uControl Packs, Smart Automations & Zone Settings have been completed before proceeding.
Enter your uControl Remote’s IP address.
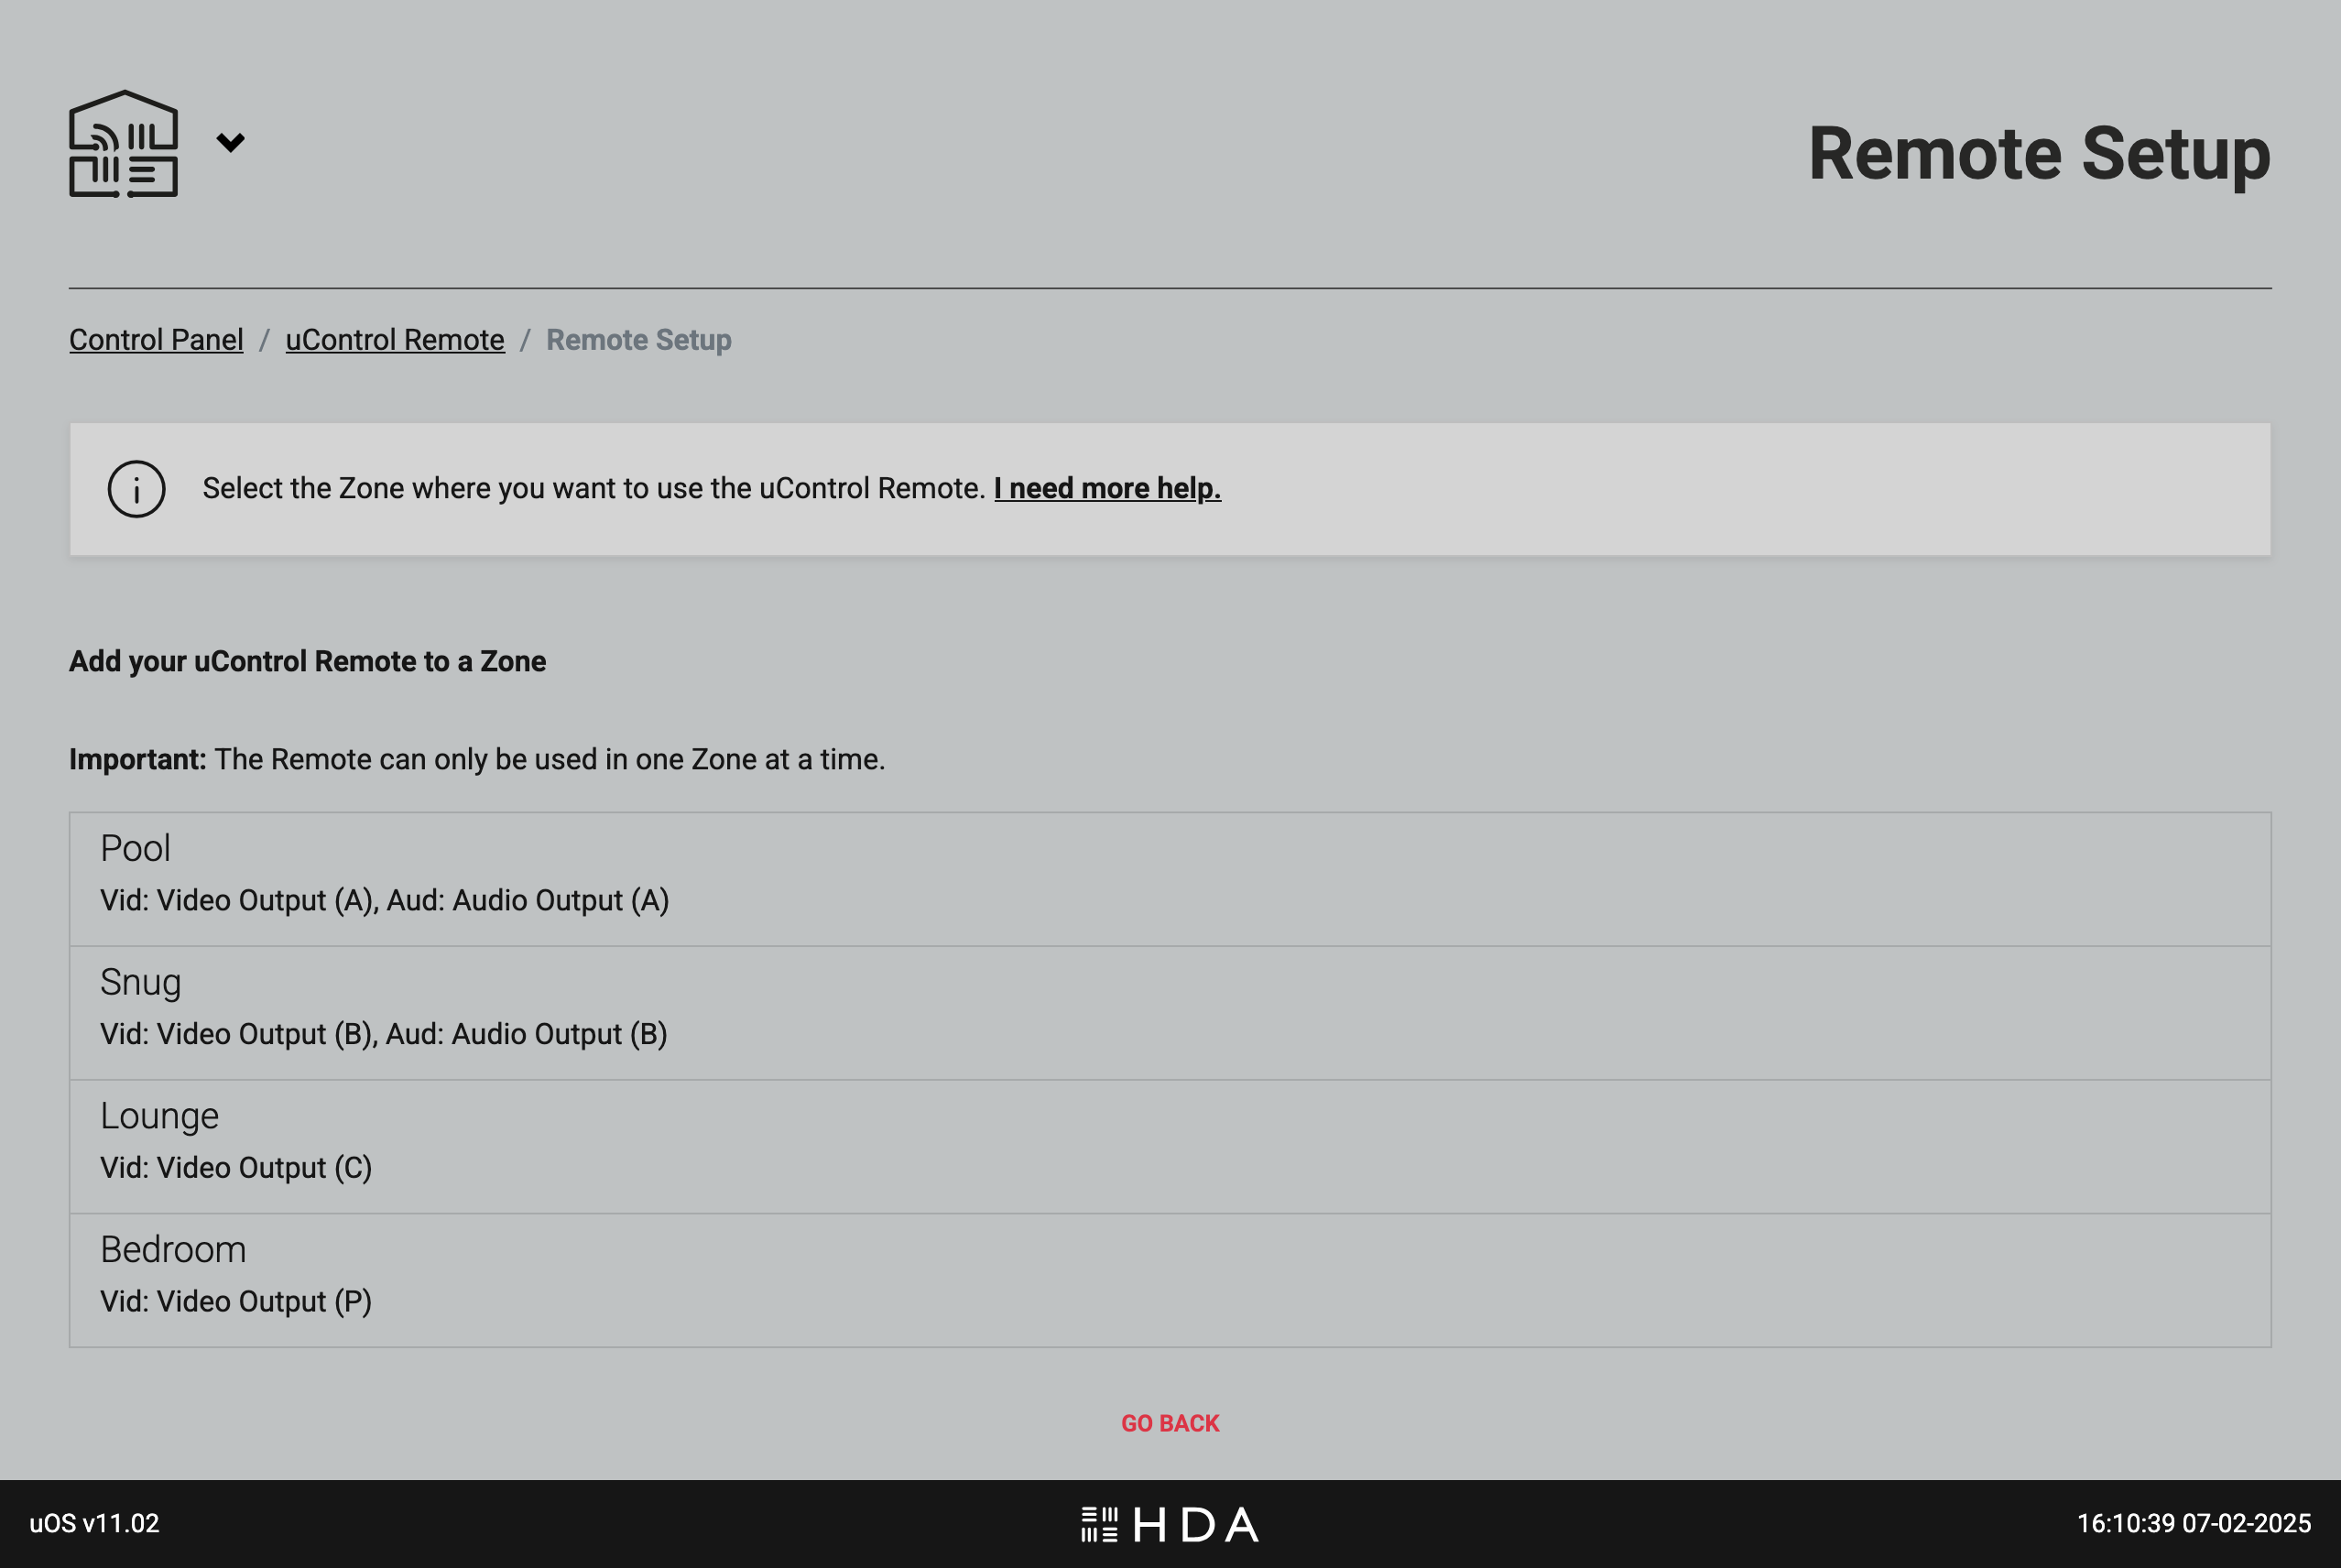
Add your uControl Remote to your Zone or Room.
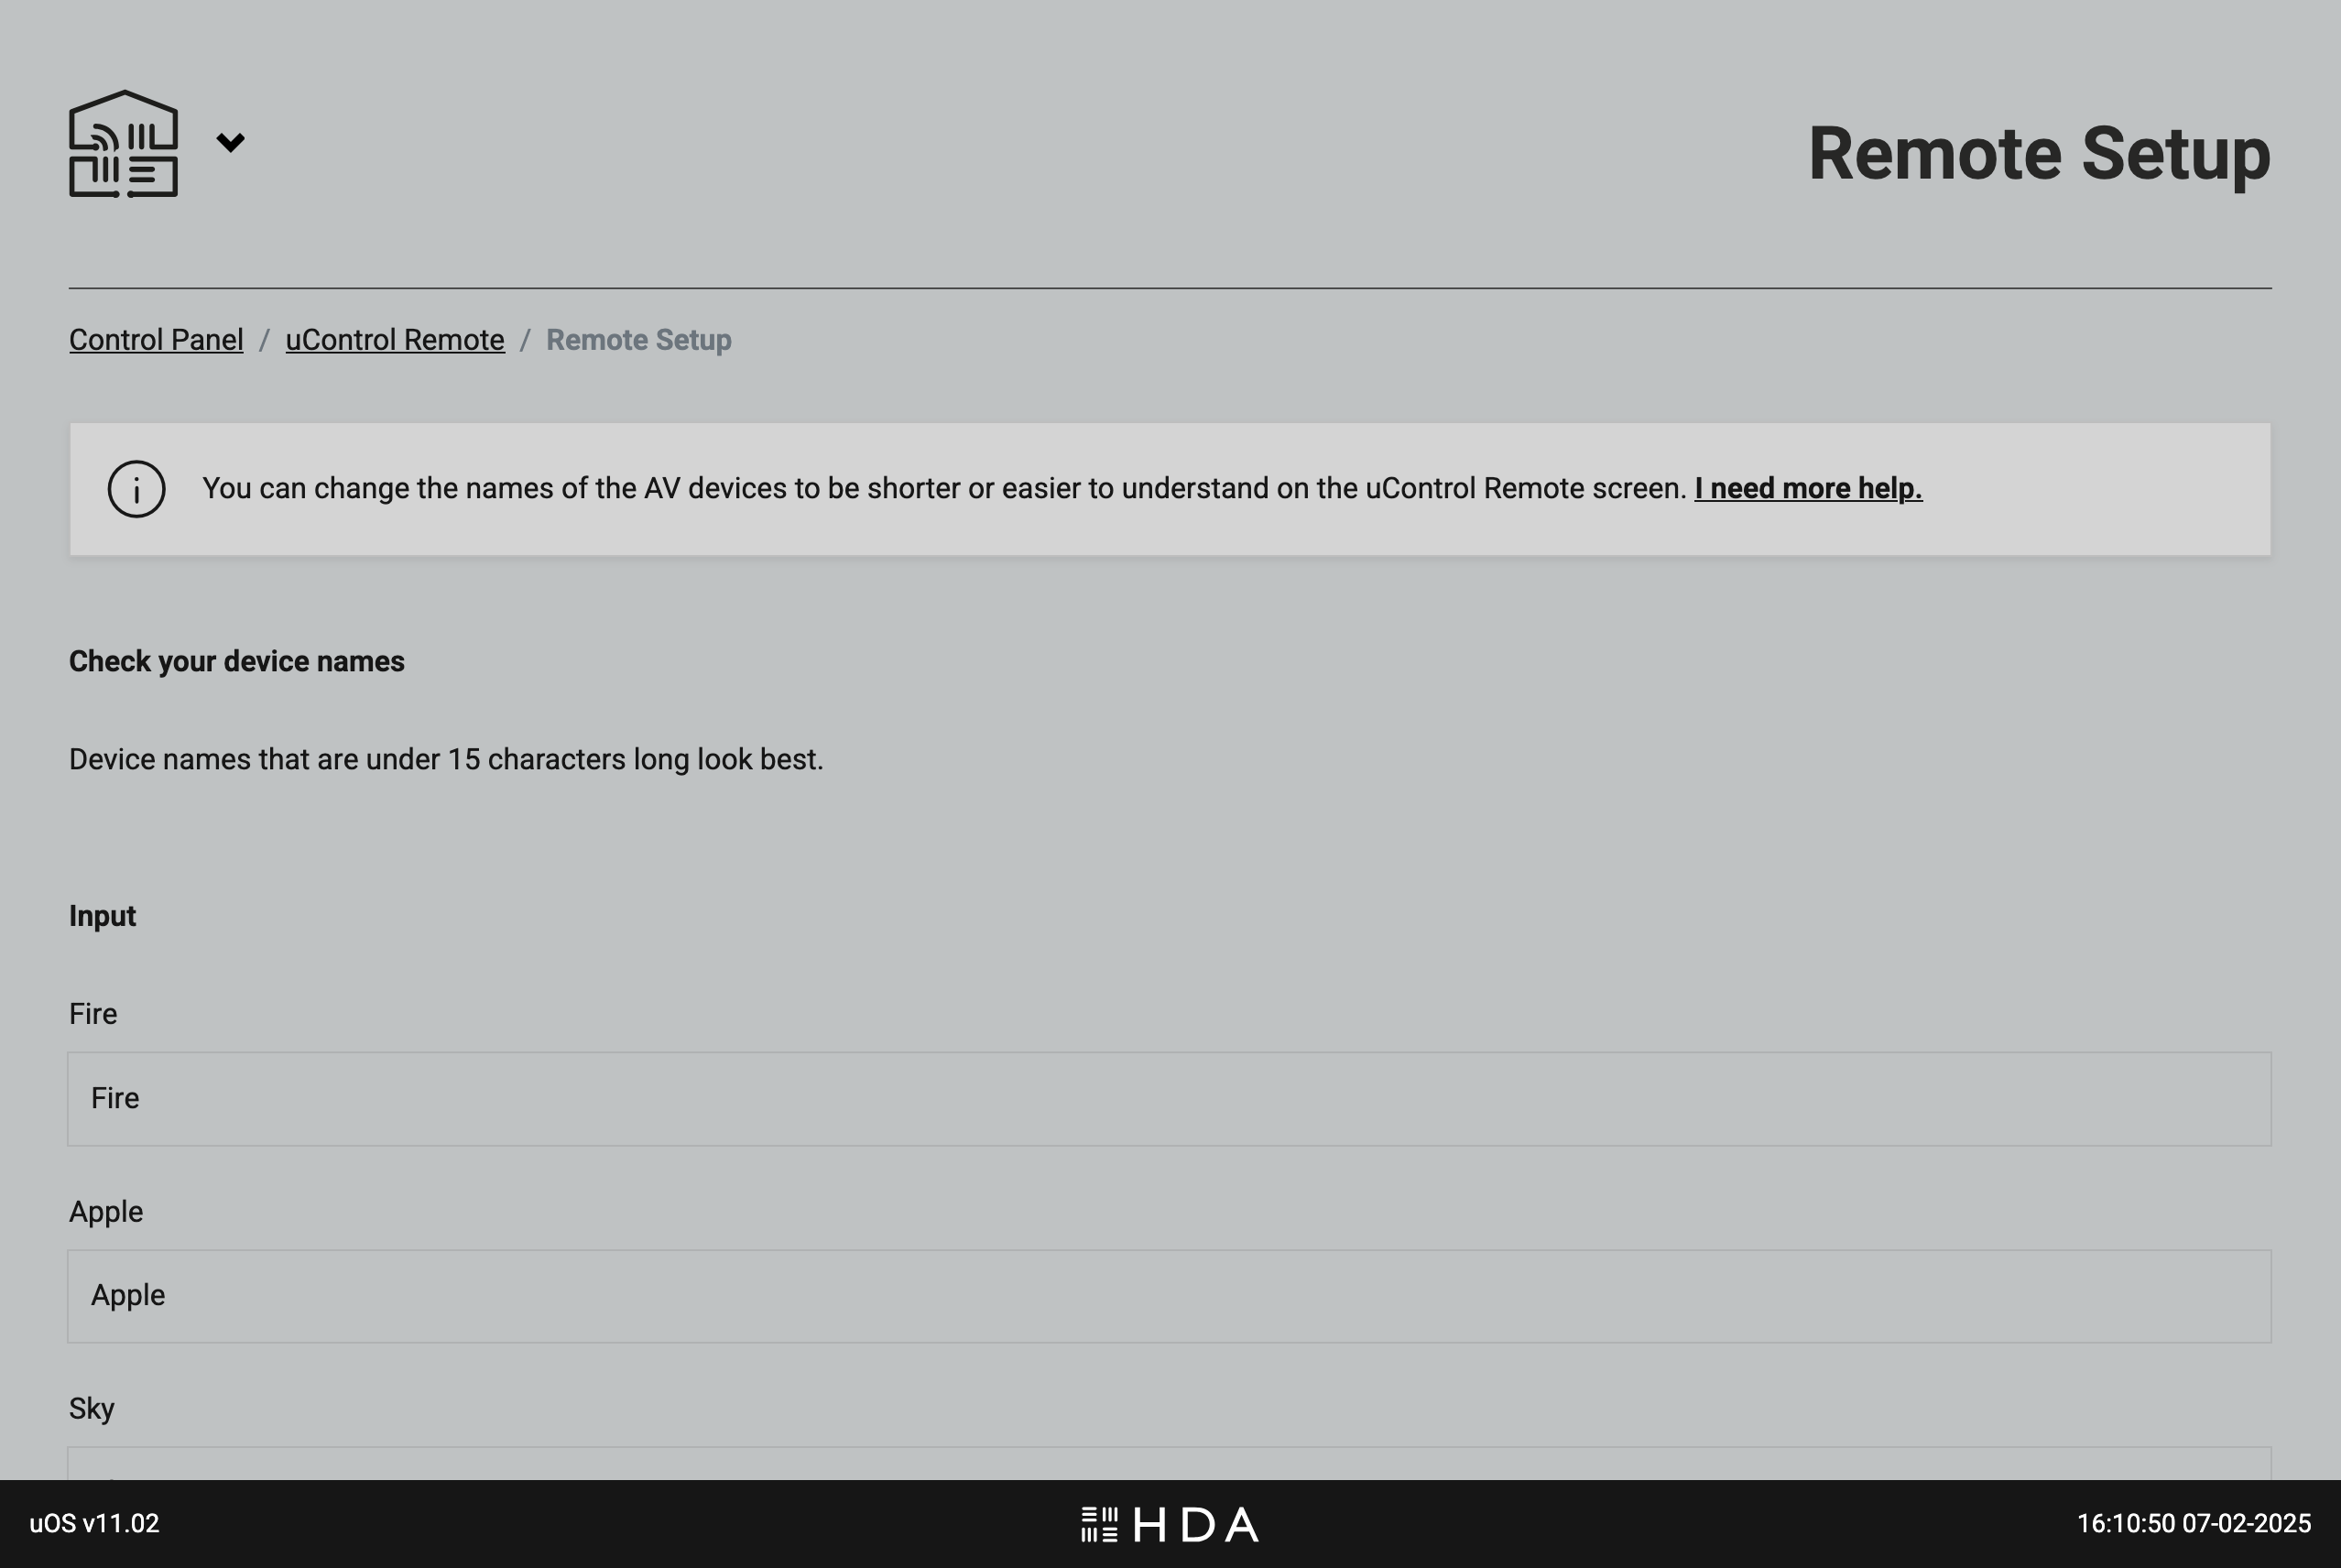
Optional step: rename your devices so they are easier to read on uControl Remote’s screen.
Select what will be doing the volume control in your Zone or Room.
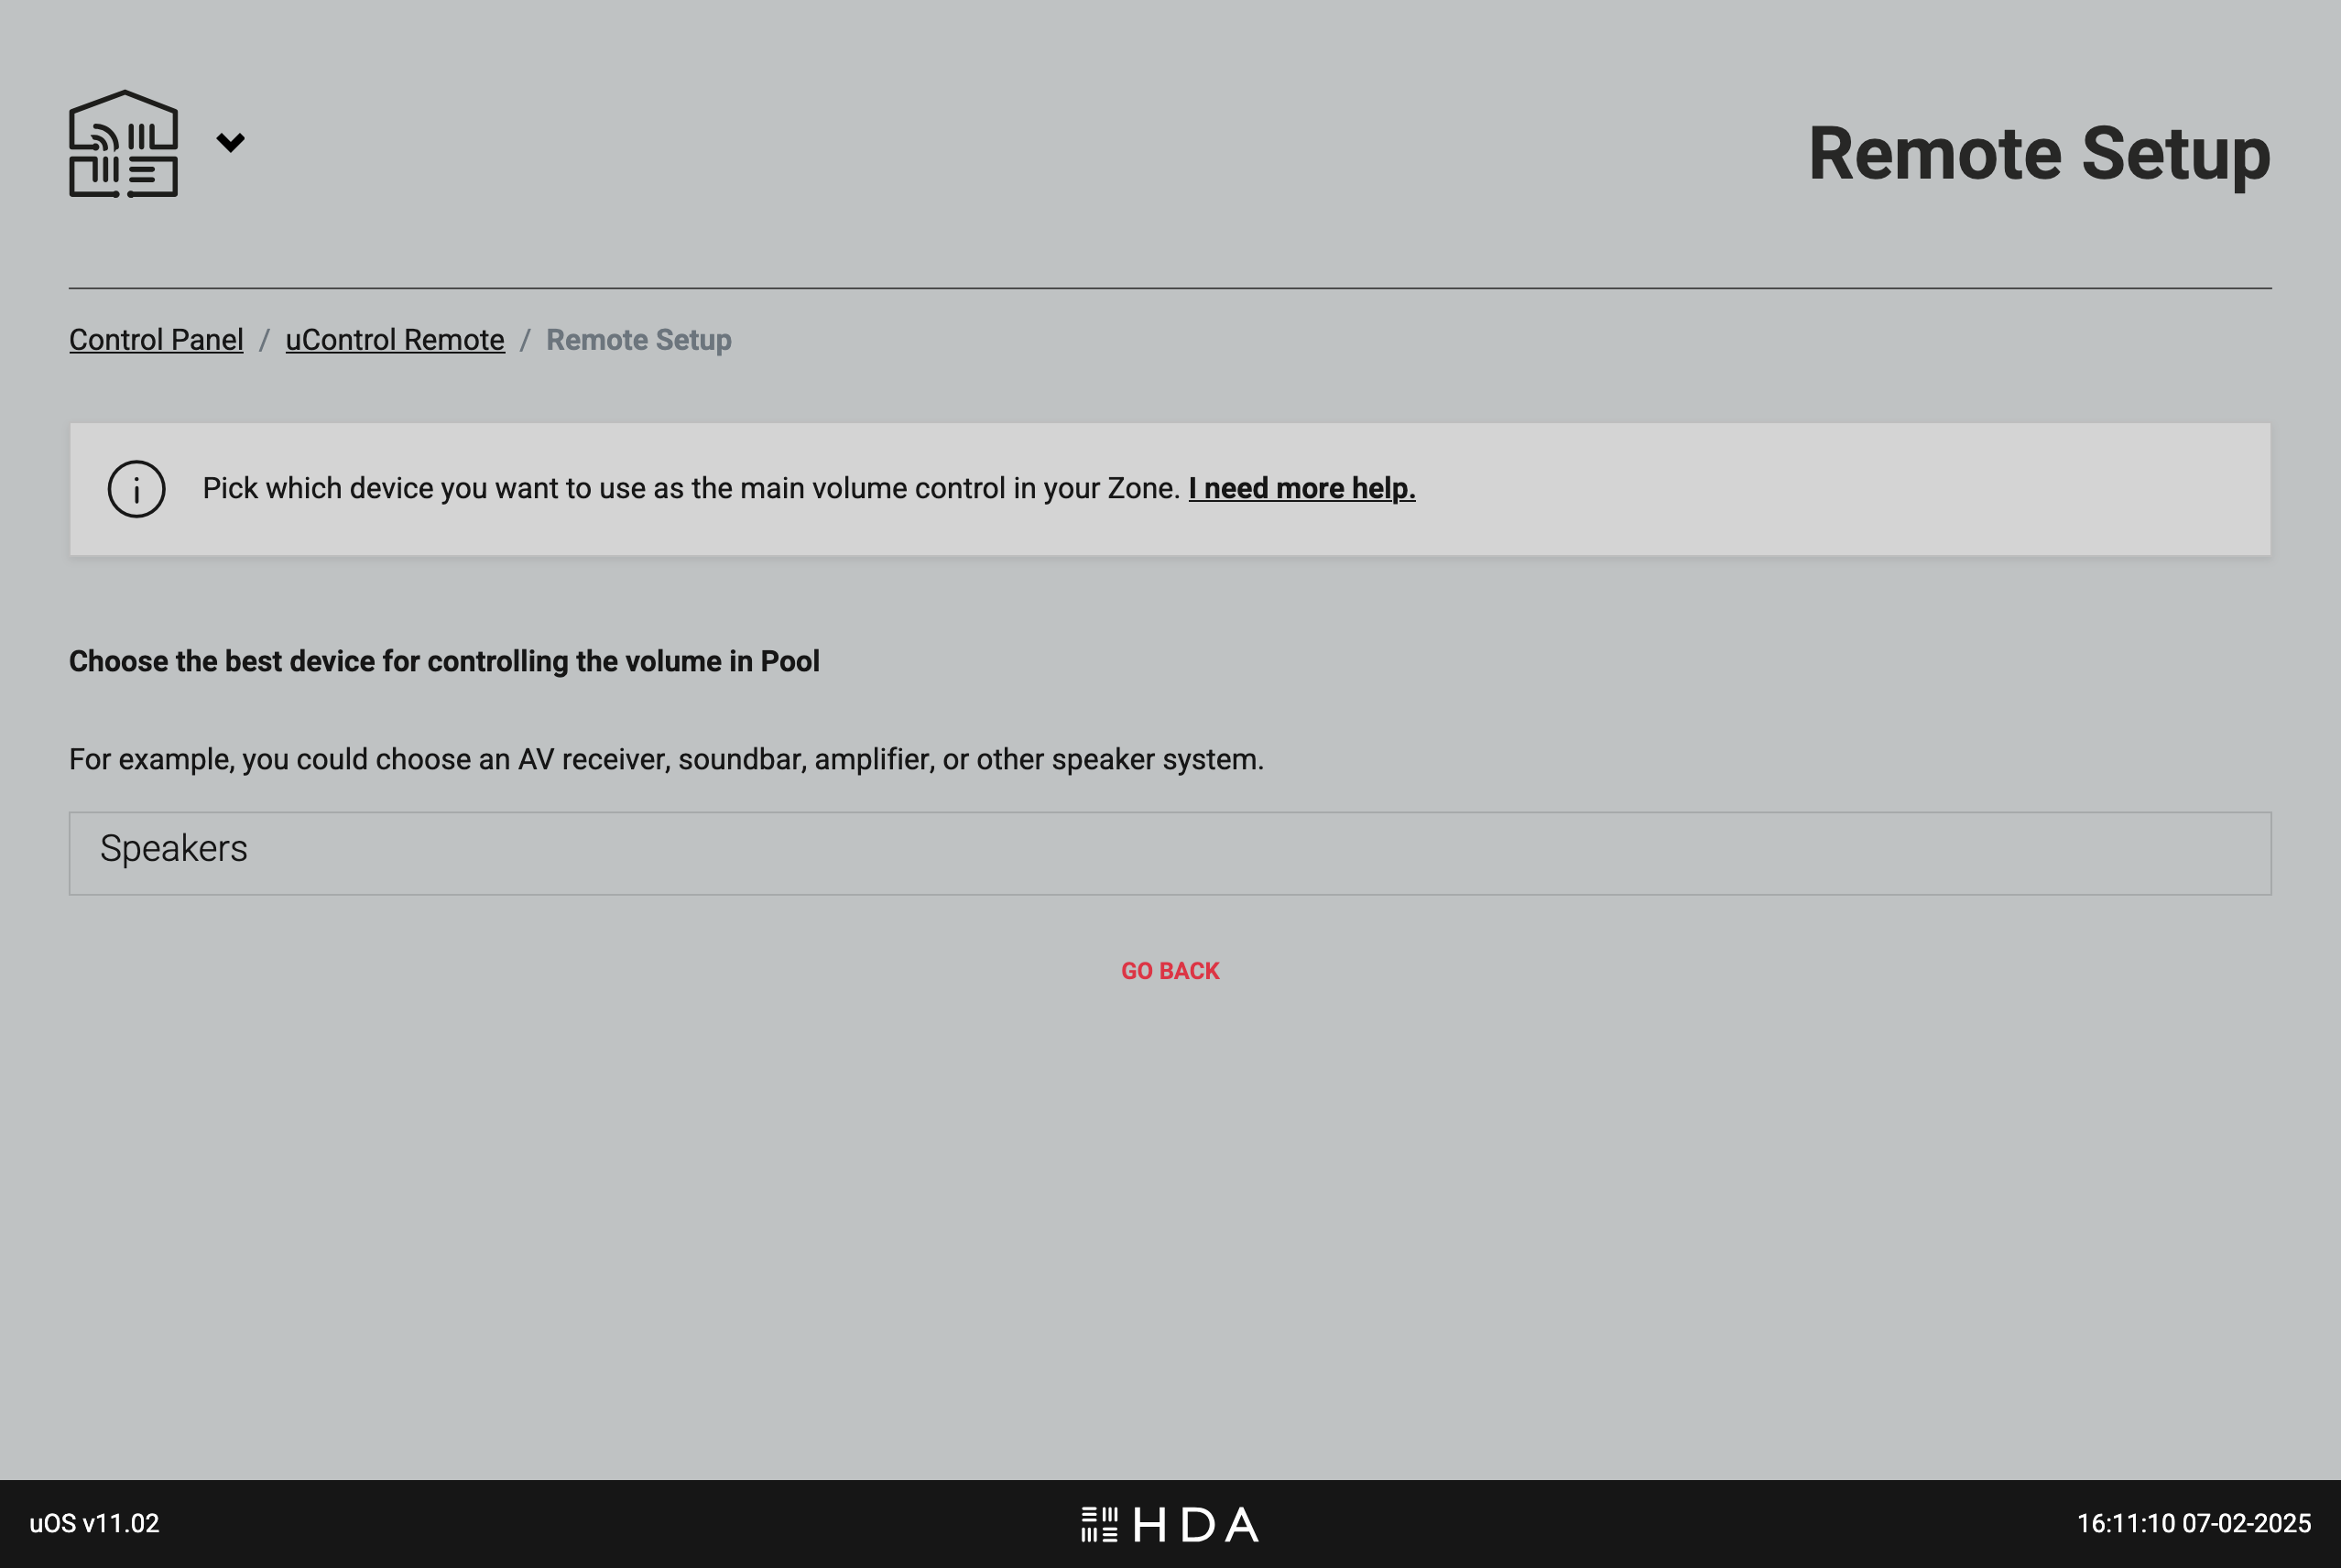
More about volume: uOS will automatically select devices you’ve installed that offer volume control and will present them in this list based on how they are categorised by HDA. This includes TVs, Projectors, audio streamers/amplifiers (Wiim, Sonos), AVRs and HDA hardware like MHUB or MZMA.
If you have multiple devices that are all volume controllable (eg TV + AVR) then you will still need to nominate which device is default but uOS will transfer all options to the remote. This means you can switch away from the default option by pressing and holding the “AUDIO” key on the Remote. If you power down the remote or it is restarted, uControl Remote will revert to it’s default setting.
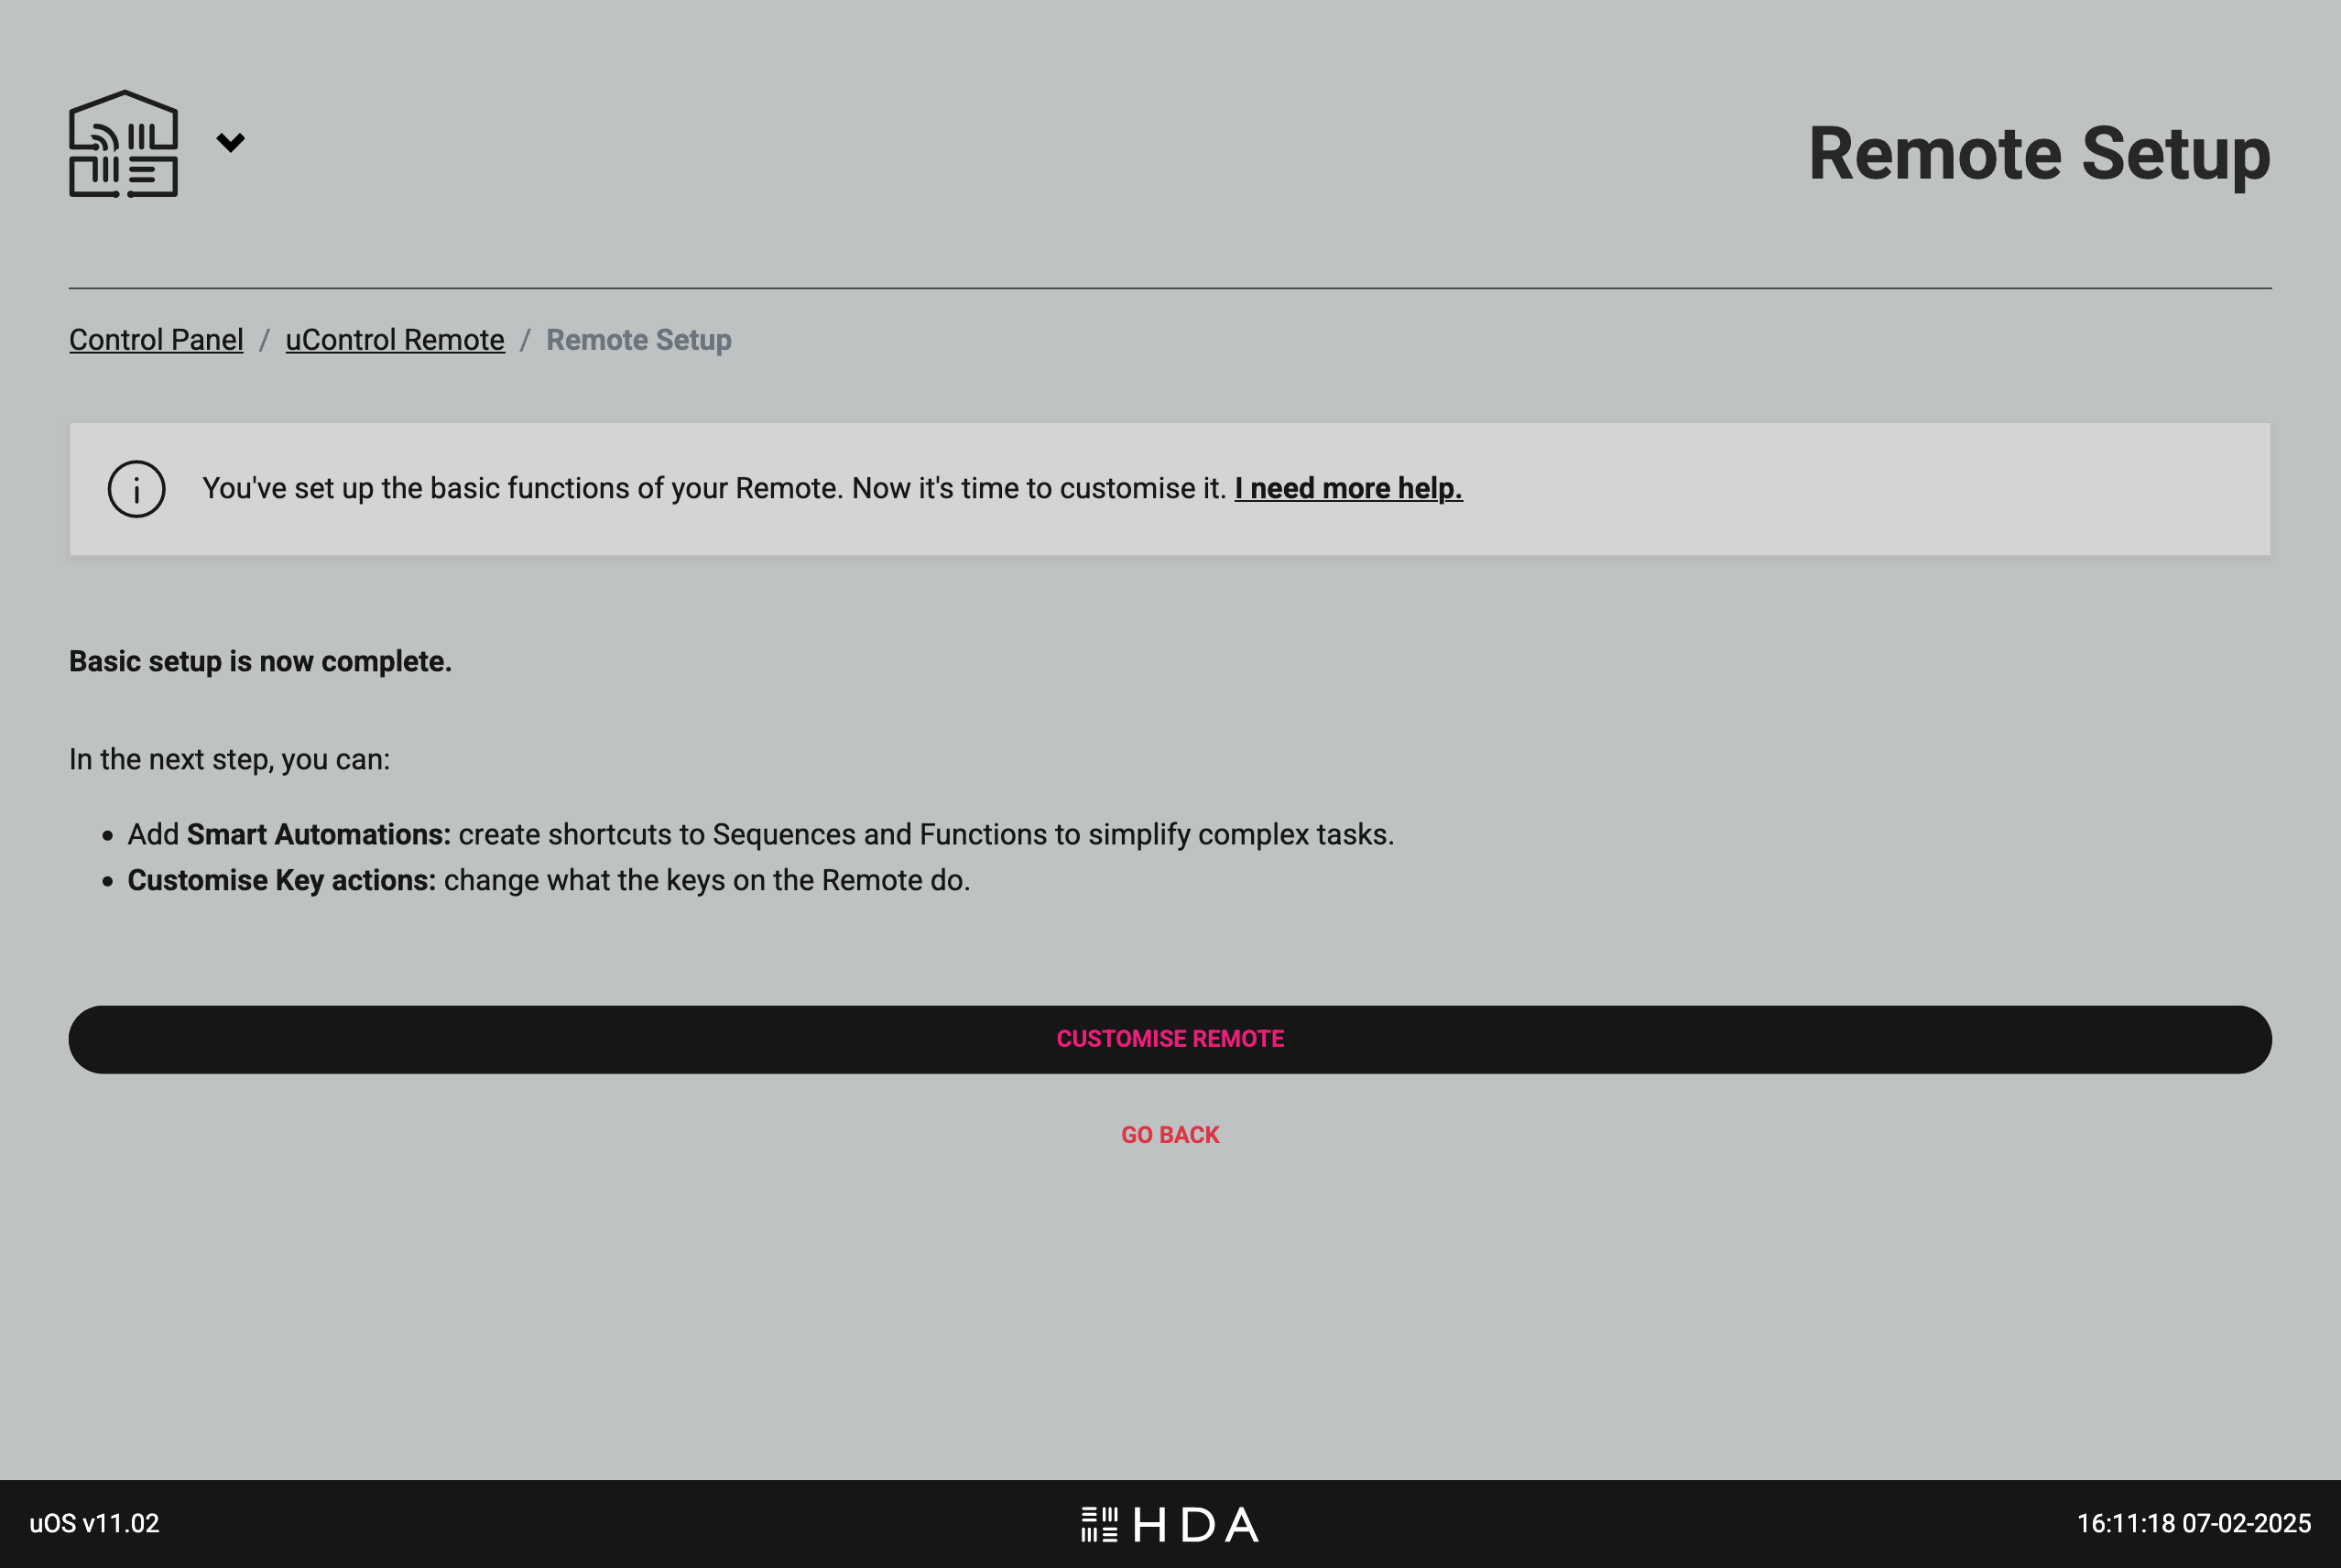
Basic setup is complete.
This guide explains how to pull data from the Gude API so you can control it directly from uOS, uControl App and uControl Remote.
Before you begin, you will need:
- A HTTP test program such as Postman, available here
- The Gude IP address on the same network as the HDA system
- A fully-commissioned HDA or uControl system with the latest version of uOS (MHUB-OS does not support IP integrations) on the same network as the Gude
- A tablet or laptop using any of the most popular browsers (or an iPhone with the uControl app, at the very least) on the same network as the HDA system.
Step 1:Get data from the Gude system
There are a few ways you can get the IP address of your Gude device:
- Using a network scanner application like Fing on your mobile phone to scan your network.
- Log into your wireless router and look up Gude in the DHCP table.
Step 2: Build Function
Example Commands
This guide explains how to pull data from Rako’s API so you can control it directly from uOS, uControl App and uControl Remote.
What this guide will cover:
- How to find room, channel, scene and level IDs in Rako’s API.
- How to create a Rako API so that you can control any light or scene in the property.
- How to add that API into uOS.
Important: you must setup Rako first
For the purposes of this guide we are going to assume that your Rako controller is on IP address 192.168.1.15 and your uOS device (MHUB, MZMA or Zone Processor) is on 192.168.1.196. We will use this to illustrate all examples moving forward.
Important: To get an overview of your project, which for this example is on IP address 192.168.1.15, type 192.168.1.15/rako.xml into a web browsers search engine and enter.
What a typical Rako API looks like
192.168.1.15/rako.cgi?room=5&ch=4&sc=0
In most cases you will either want to turn a light on/off or change the scene in any particular room. To do this you will need to send an API which looks like the example above.
In the example above we are going to send a command to the Rako controller (at 192.168.1.15) to execute a Scene 0 in Room 5 on Light 4.
Understanding what those numbers in the API above mean:
room=5
This is the ID of the room which your Rako devices are installed in.
ch=4
This is the channel which is how Rako refers to individual lights or RGB values.
sc=3
This is the scene ID.
“&”
This is a separator which is used to separate room, channel and scene values or IDs.
- Scene 0 = Off.
- Scene 1-16 = Custom Scenes which you have made in Rako (lights at 10%, RGB value etc).
Testing your APIs
We recommend that you test every API before you enter them into uOS. All IP based APIs all have different requirements when it comes to testing but the Rako API is great because it is super simple.
To test your API, open a web browser and enter the full API in the URL window and hit enter.

Testing your Rako API is as easy as entering it into your favourite browser and hitting enter. If the Rako device does what you expected it to then you’re good to enter it into uOS.
If the Rako device responds as you expected then your API is working and you can proceed adding it into uOS.
If it doesn’t work then try the following:
- Make sure the IP address is correct.
- Make sure that you do not have any typos.
- Ensure that your IDs are correct and that you’re observing a light in the correct room and location.
- Make sure that the structure of the API matches our example (no spaces, no special characters, data is in the correct case (often lowercase).
How to add your APIs into uControl
Need more help with the API? Get in touch.
All HDA staff are able to help with any API questions you might have including any advanced features. Get in touch for help or assistance.
DO NOT RESET YOUR SYSTEM IF YOU DO NOT KNOW WHAT YOUR HDA DEVICE DOES:
Your HDA hardware is an integrated system and very similar to a central heating boiler.
It maybe controlling your AV sources, displays, speakers, lights etc. If you reset your system and you do not know how to restore it yourself then it could render your AV unusable.
Is your system managed by a HDA Pro Installer?
If your system has been built and serviced by a HDA Pro Installer then please contact them first before resetting your device. This is especially important if they are servicing your system. If you proceed with a system reset then your HDA Pro can reserve the right to charge a call out fee to restore your system to a working state.
Resetting your system
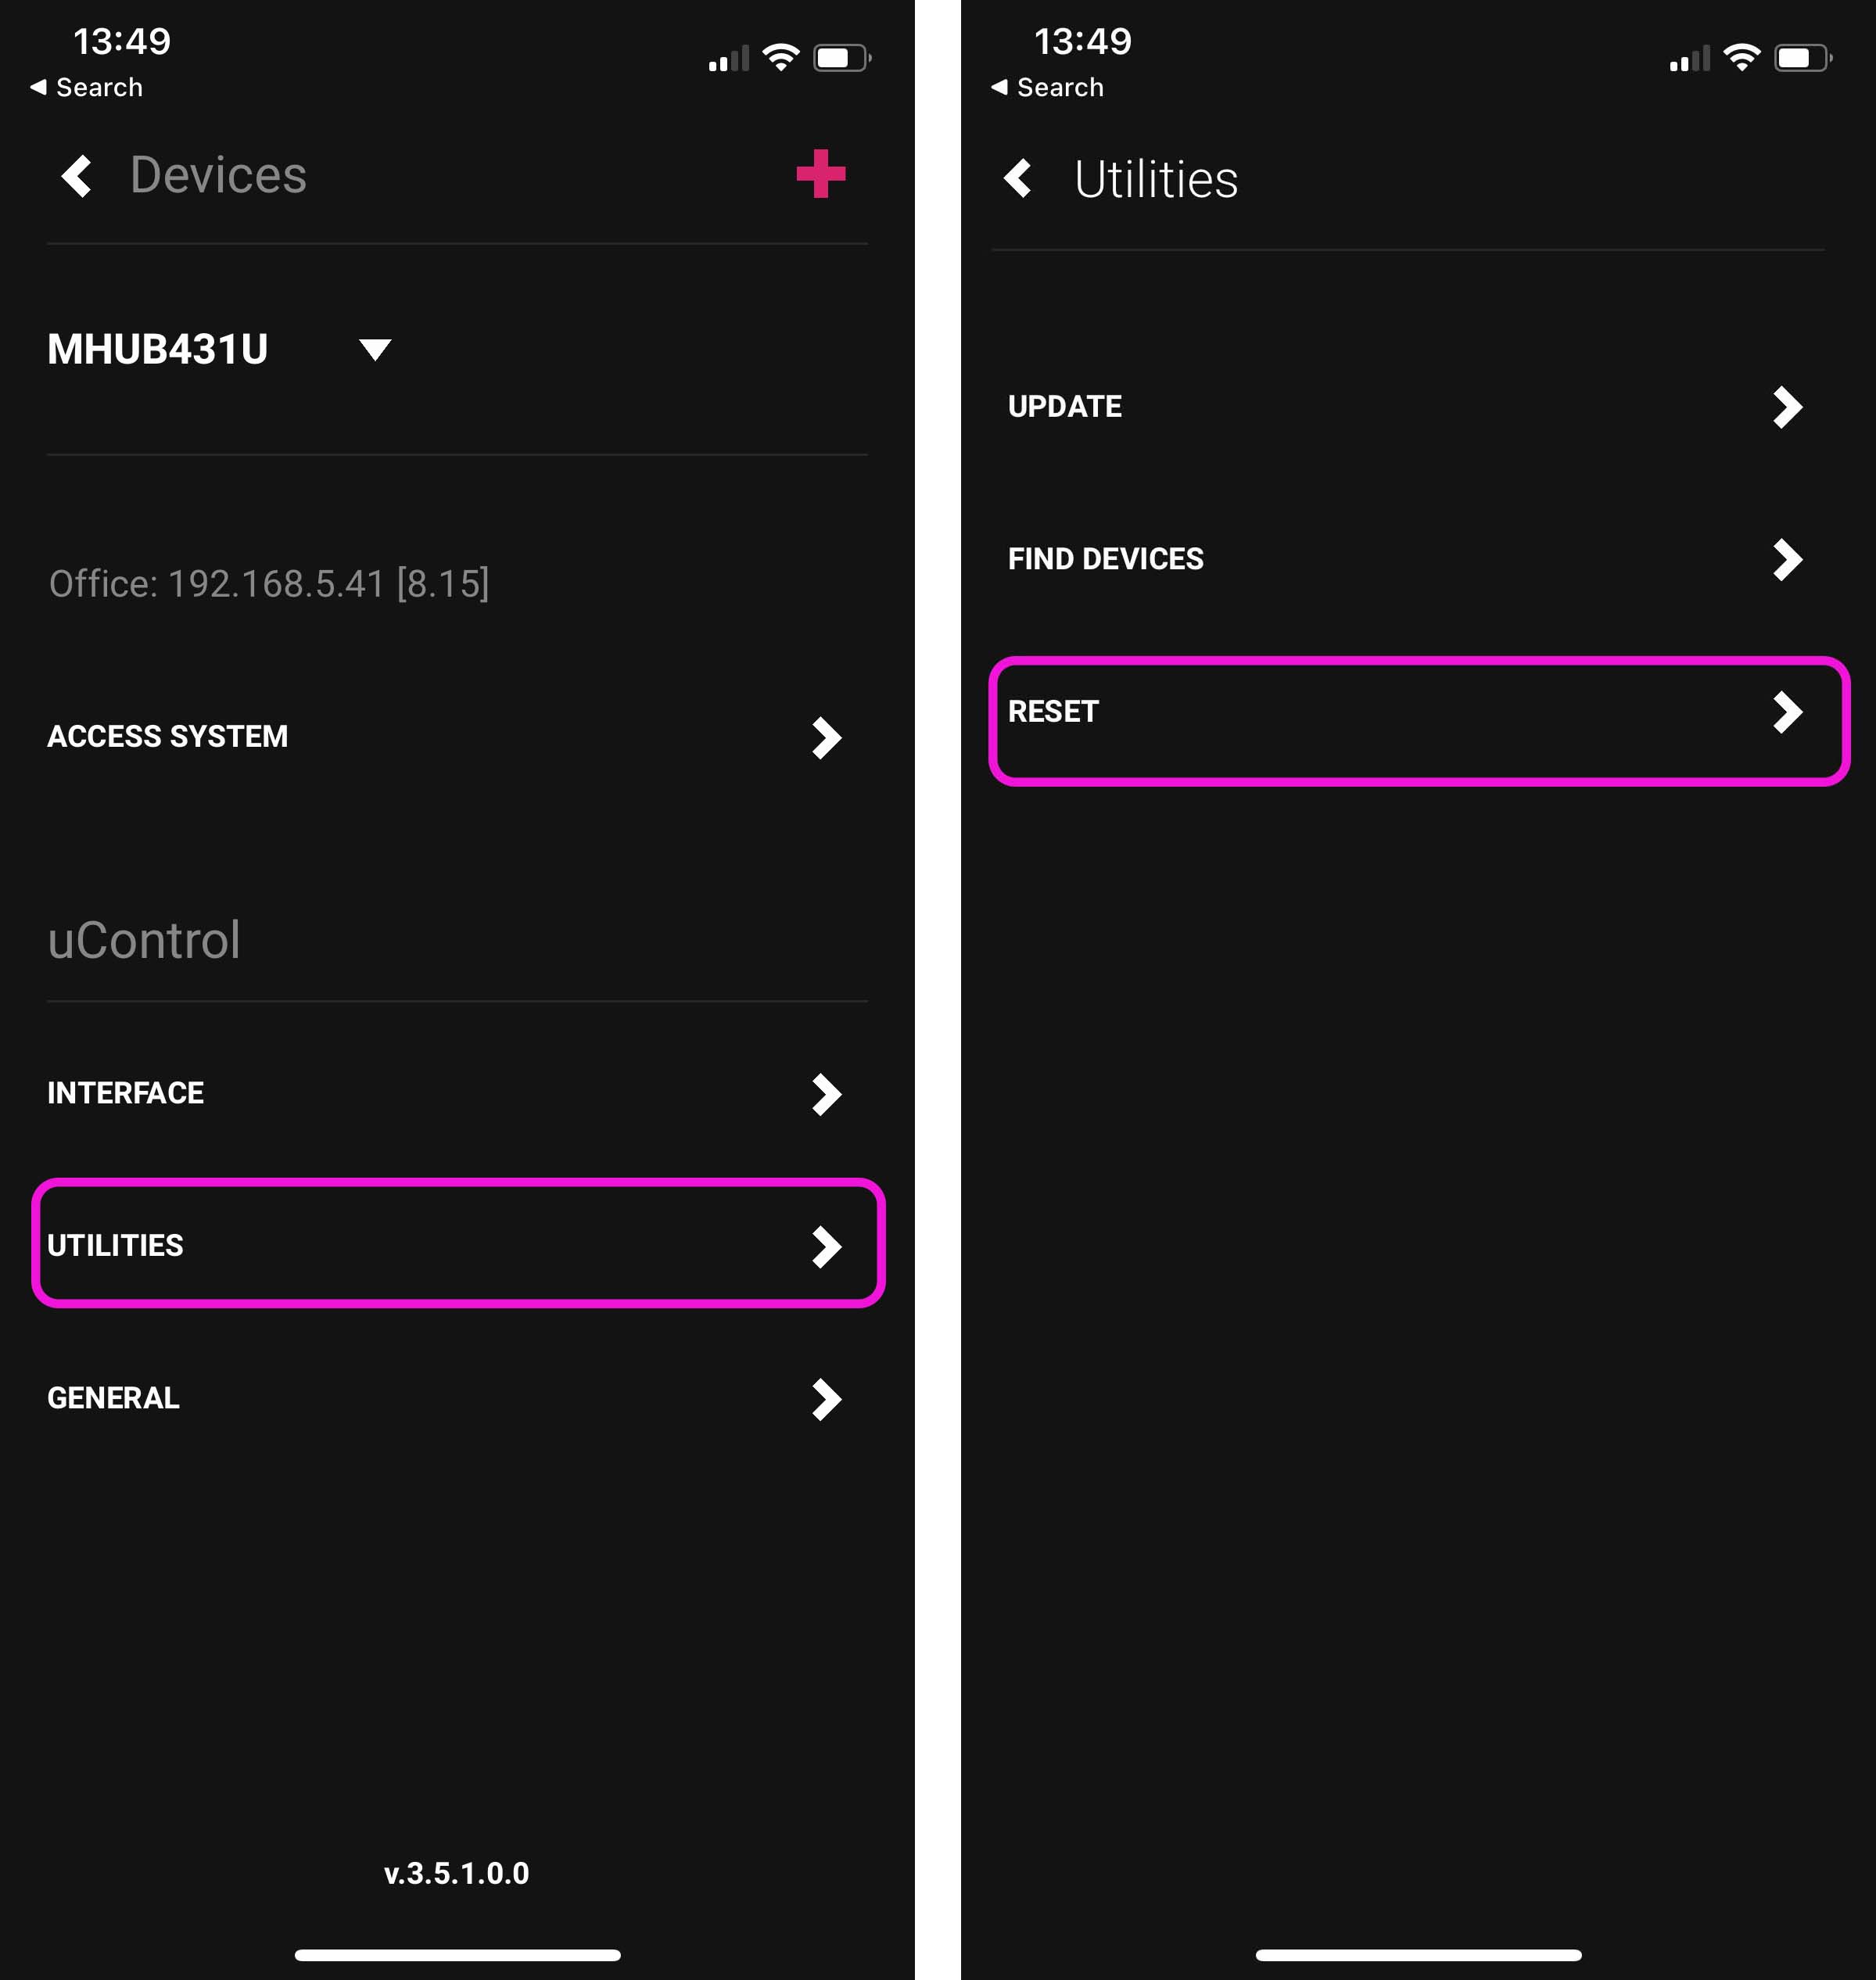
If you are already connected to a HDA system:
uControl menu (top left menu icon) > Settings Cog (bottom left) > Utilities > Reset
If you are not connected to any system:
uControl Splash Screen > Advanced > Utilities > Reset
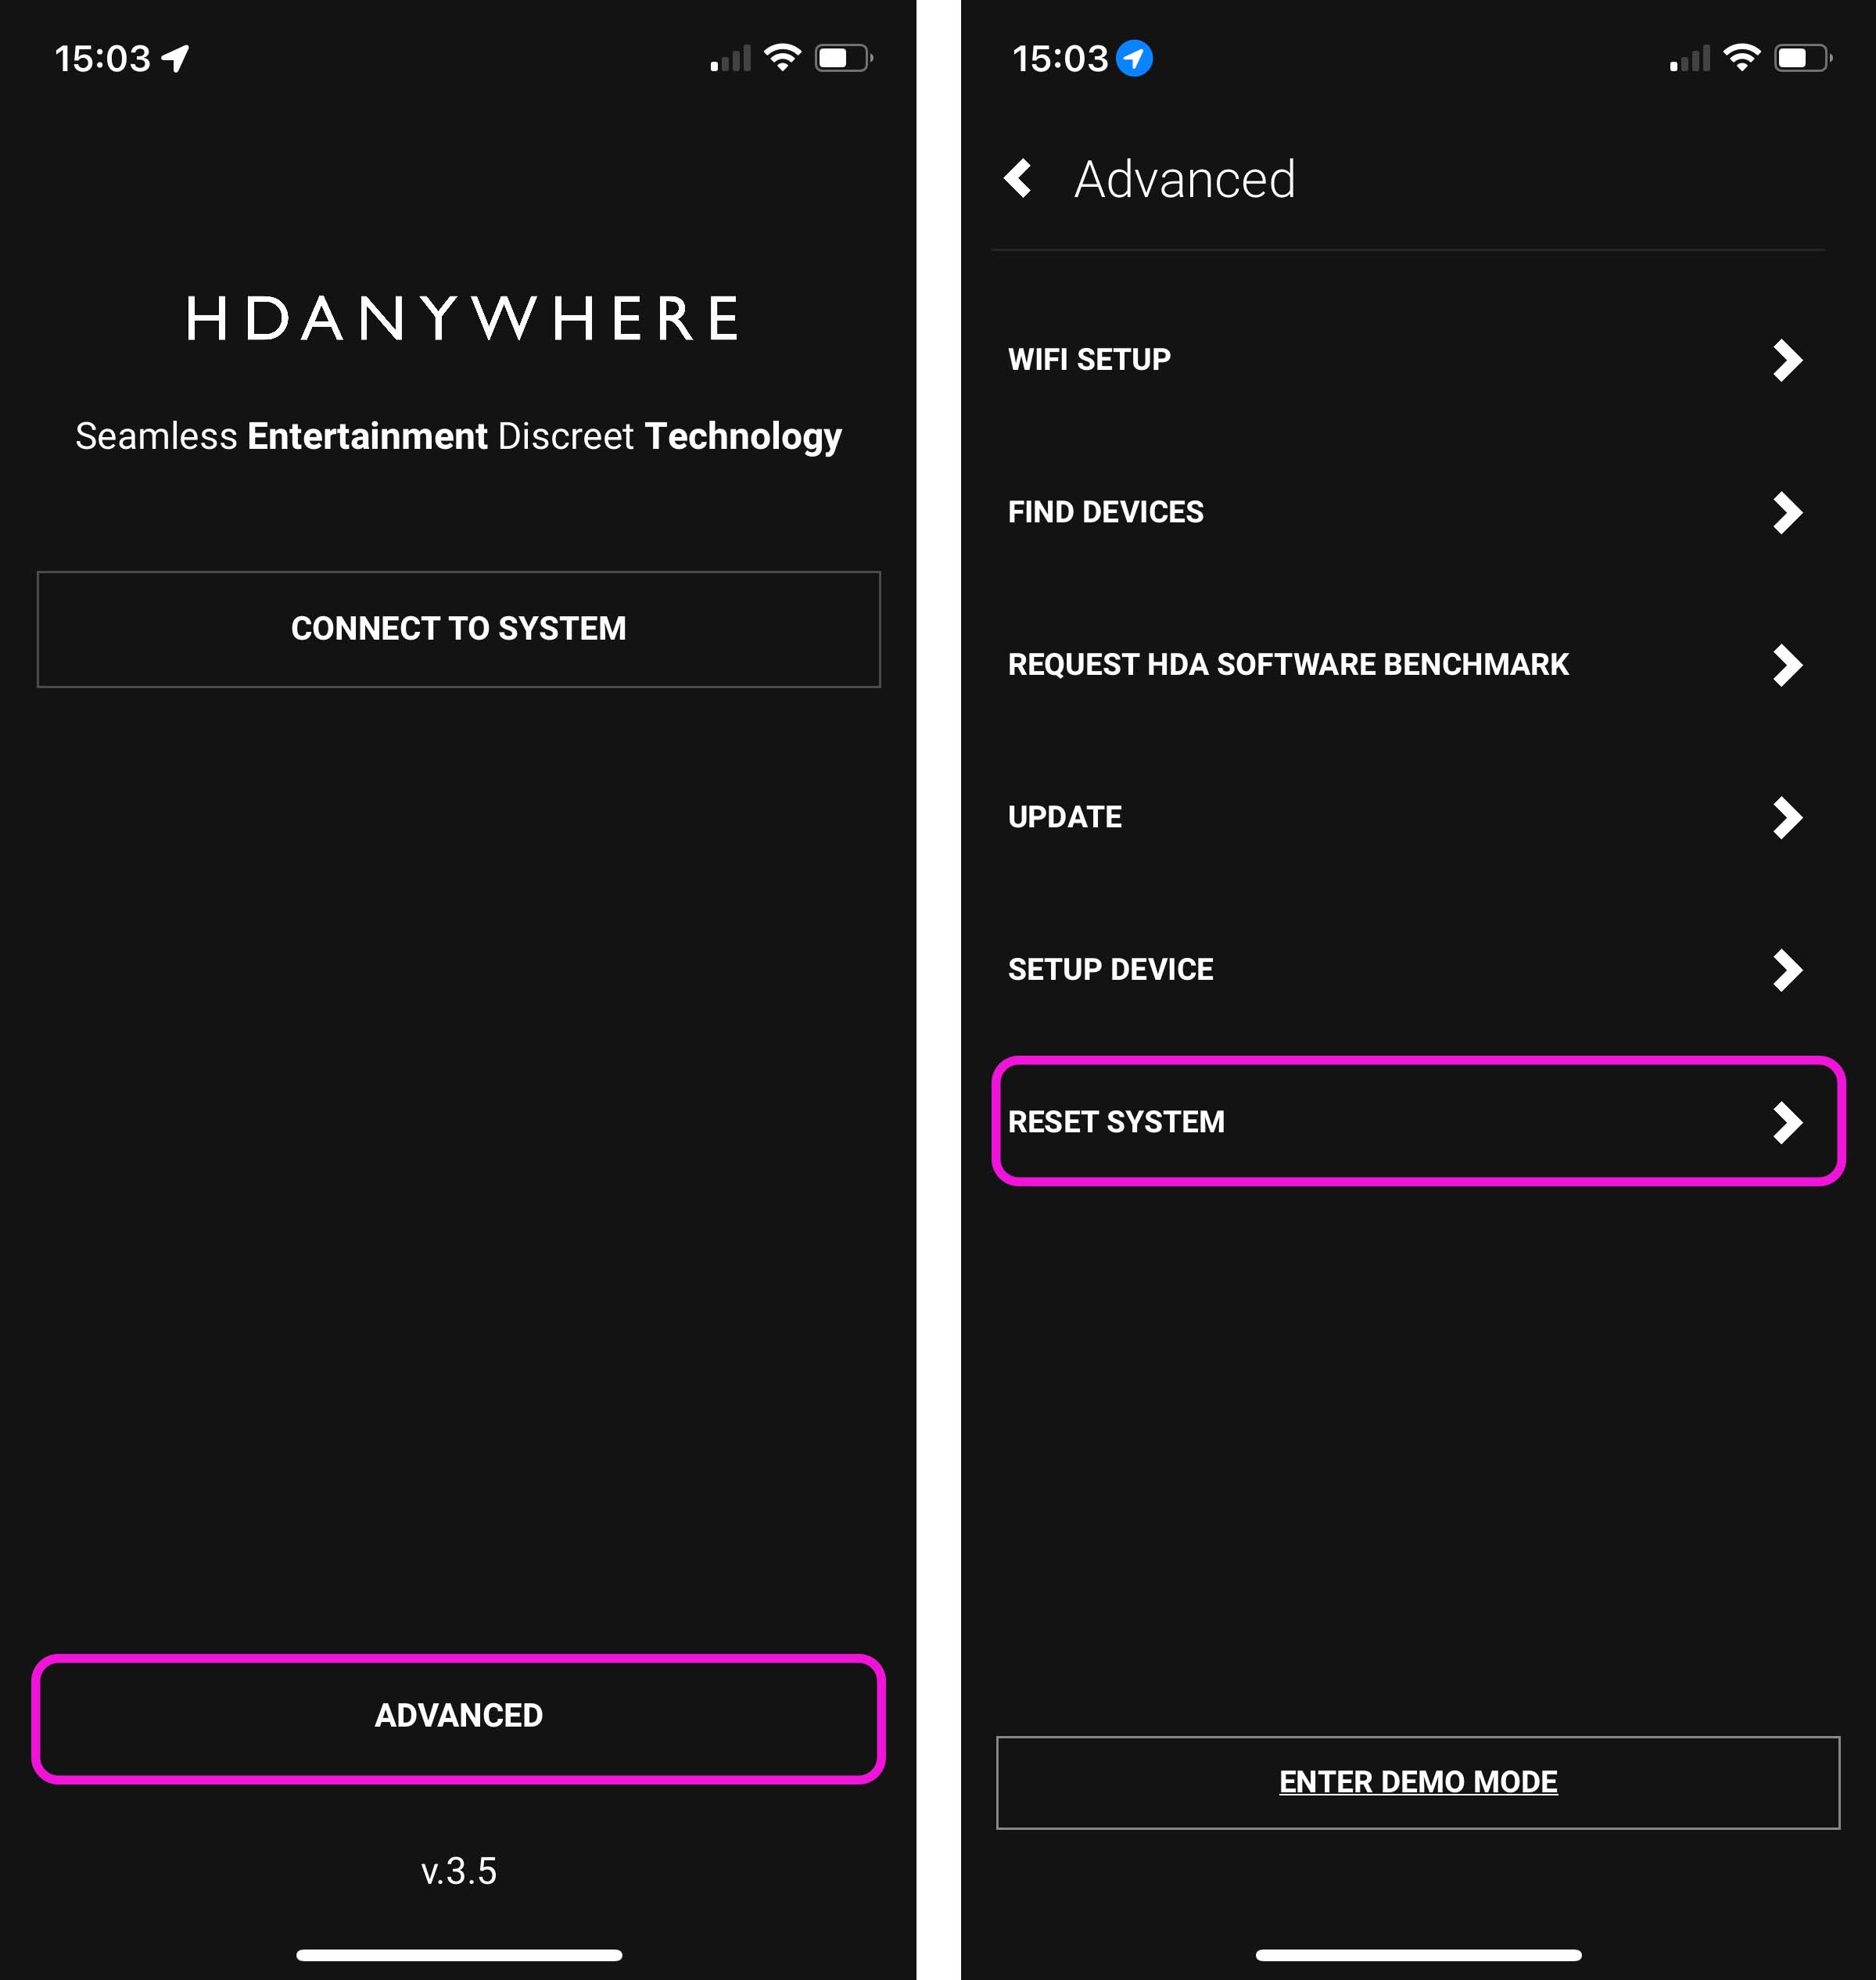
Tapping on reset will not work. You will need to tap the reset button 10 times in order to unlock the reset process. Follow instructions inside the app to continue with the system reset.
How to setup Siri Shortcuts
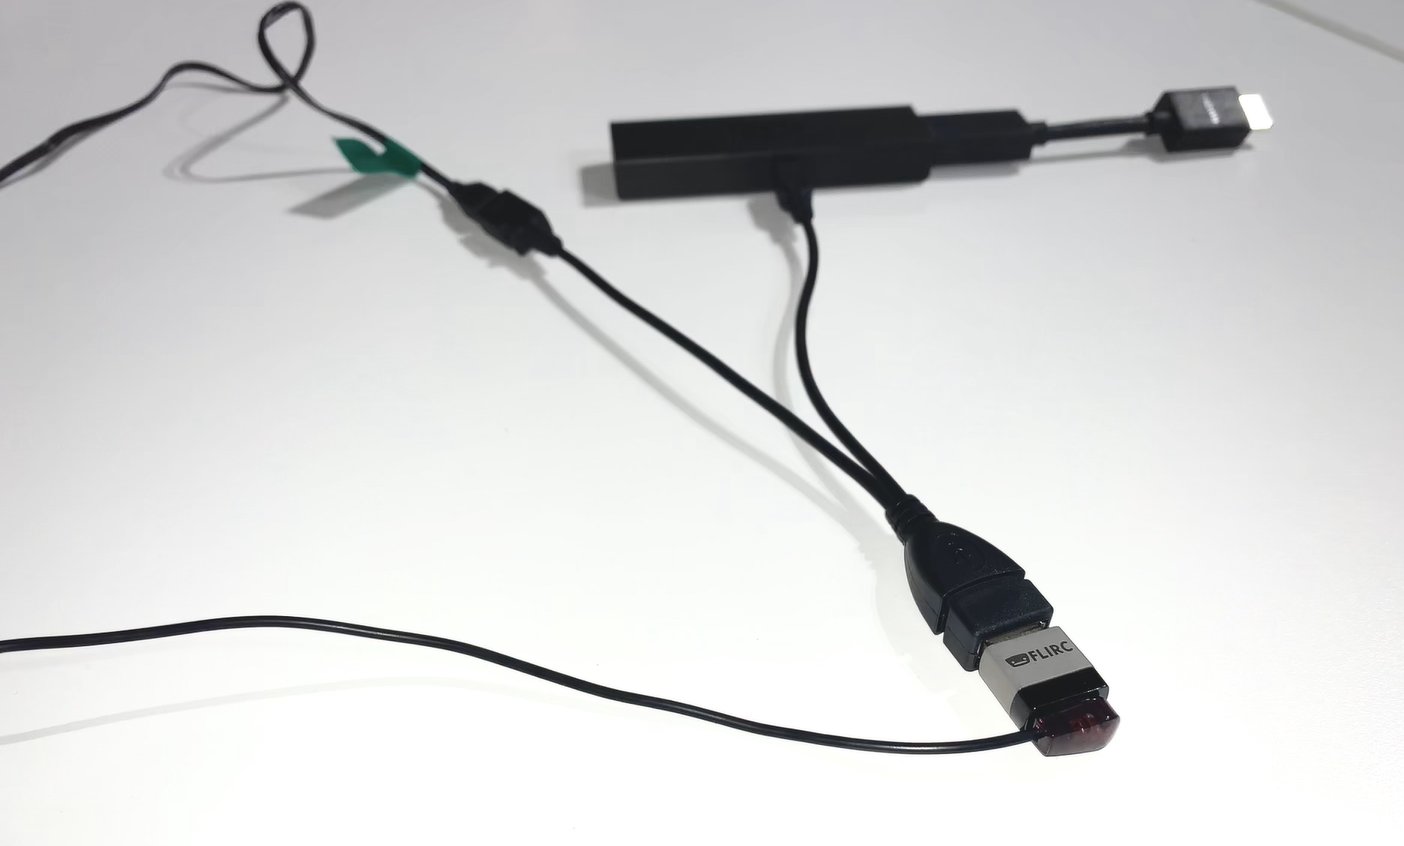
Some devices no longer have built in IR receivers. To enable them to be used with the uControl app you can add a third party device called FLIRC. This connects to a source device via USB and turns IR codes into control commands the source device recognises.
There are two Flirc devices that we are compatible with, the first part of this guide is for the older model which can be found here. The second part of this guide is for the Flirc device that is specifically for the Amazon Fire TV and can be found here.
Regular Flirc
If you are using the older model of Flirc you will need an OTG cable like this -

Install the Flirc software on your computer and install this profile onto your laptop/PC – Fire TV
Load up the Flirc software and in the top left click File, and then Load Configuration and choose the Fire TV profile you have just downloaded.
Remove your Flirc from the laptop/PC and connect it to the female USB port on the OTG cable. Then taking the male micro USB section of the cable plug it into the Firestick. Lastly plug your power into the female micro USB port.
Next place the IR transmitter from you HDANYWHERE device on or near to the Flirc. You may need to move it around to test which positioning works best, but we recommend taping it to the top of the Flirc.
Once this is done you can install the FireTV(FLIRC) IR pack and control your Amazon device with uControl.
Amazon Fire TV Flirc
If you are using the Fire TV specific Flirc you will not need the OTG cable, but will need to install the Flirc software on your computer and install this profile onto your laptop/PC – Fire TV
Load up the Flirc software and in the top left click File, and then Load Configuration and choose the Fire TV profile you have just downloaded.
Remove the Flirc from your laptop/PC and connect the power lead to the micro female USB port on the Flirc. Plug the other side of the Flirc (male USB) into the side of the Firestick, and then plug the Firestick into your desired input.
Lastly place the IR transmitter from you HDANYWHERE device on or near to the Flirc. You may need to move it around to test which positioning works best, but we recommend taping it to the side, adjacent to the Flirc.
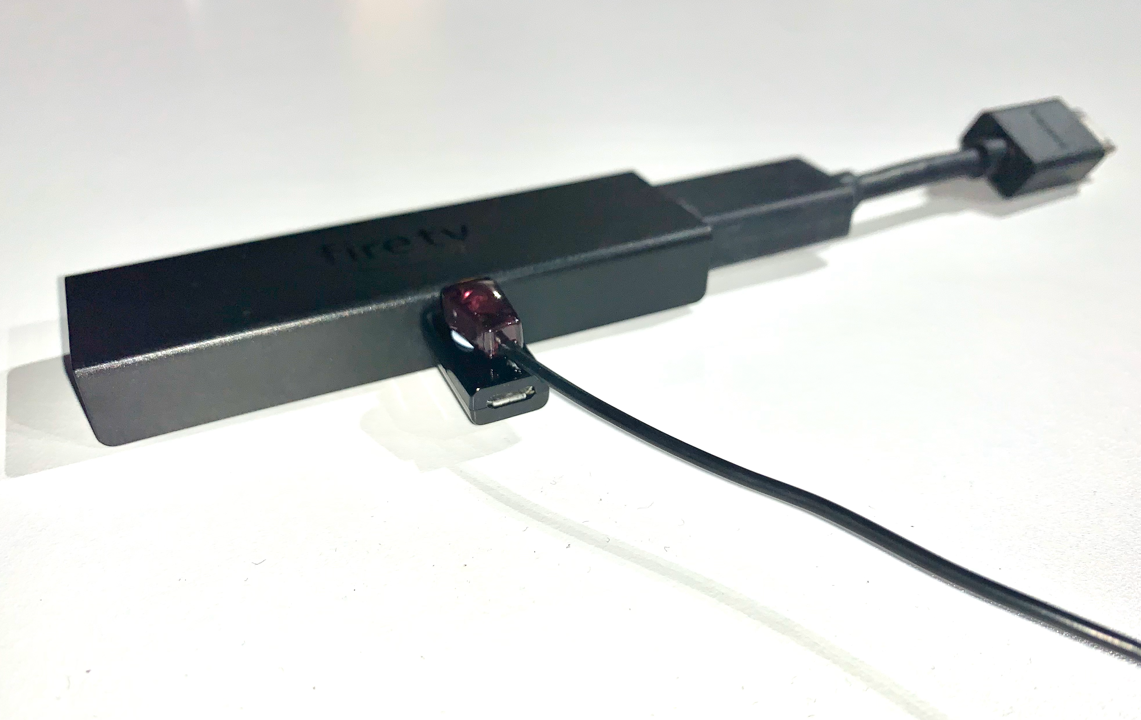
Once this is done you can install the FireTV(FLIRC) IR pack and control your Amazon device with uControl.
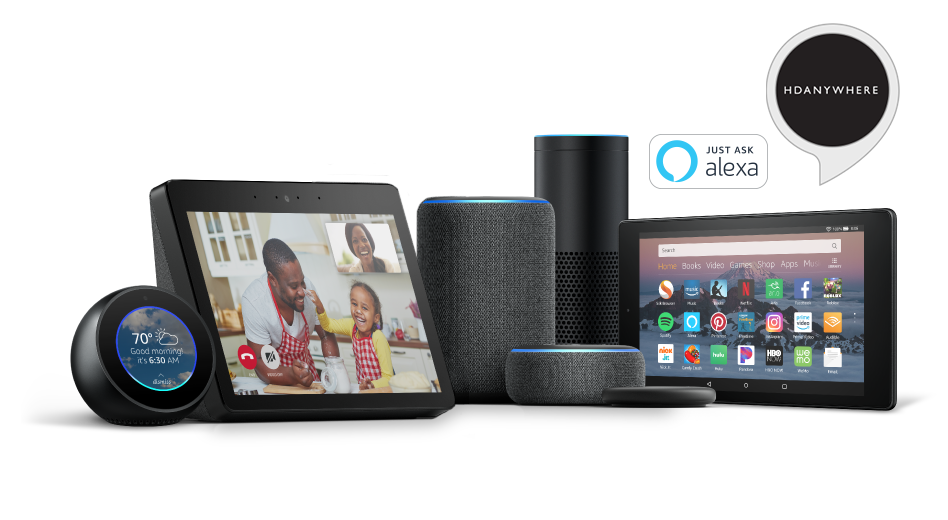
*Before you activate the Alexa Voice Service with your MHUB, make sure Amazon support your territory and version. We cannot guarantee voice services or offer support to those territories not officially supported by Amazon. Check here: https://www.amazon.co.uk/gp/help/customer/display.html?nodeId=202207000
What you need to get your MHUB to respond to voice commands:
- You have completed the first-boot procedure within MHUB-OS
- You have MHUB-OS version 8.10 or higher installed on your MHUB
- You have an active HDA Cloud account
- You have downloaded uControl packs for all displays and source devices you want to control
- You have completed input mapping in MHUB-OS
- You have an active Amazon account
- You have an Amazon Alexa enabled device, such as Amazon Dot/Echo/Show
Setting up AV Skill
Configure voice commands to do exactly what you want
Let’s take the command “Alexa, Turn on football” as an example.
It might appear like a very simple command but there are a number of things that need to happen in order to watch football! First the TV might need to turn on, but in which room? The volume might need to be set to a desired limit. The correct source input might need to be selected on MHUB and finally that source will need to navigate to the channel hosting the football.
You can configure all those actions in what we call a “Sequence”.
Taking the example above:
Alexa (this wakes up your Amazon Dot/Echo/Show)
Turn on… (this invokes the smarthome skill)
football (this is your custom name for the Sequence, it can be anything you want)
Inside MHUB-OS we can configure exactly what “football” does.
- You can select if you want MHUB to turn your TV on and adjust the volume
- You can tell MHUB to switch to the source device with has the football on it
- You can instruct MHUB to change the channel on that source device
Read more about Sequences and Scheduling.
Troubleshooting
- When searching for devices, nothing is found
- Check you cloud account details were entered correctly
- Ensure only 1 system is linked with the cloud account being used
- Ensure you have backed up the system to cloud after configuring the Alexa Skill on MHUB-OS
- When you try to control a zone Alexa says the command isnt supported
- Ensure there are no other devices linked to the Alexa that have the same name as the zone.
Here’s a table of all the commands you can tell your MHUB to do…
Now you’re ready to go. Take a look at a full list of commands that you can say to your Echo.

1. HDA Cloud
The HDA Cloud acts as our global data storage and service delivery platform offering an interface for MHUB owners, HDA Pro’s and 3rd party devices to talk to one another.
There are two types of cloud account that can be associated with an MHUB system.

2. HDA Cloud Account
The HDANYWHERE (HDA) Cloud account is the account that belongs to the Homeowner and/or End-User. The owner of the MHUB has to have a verified HDA Cloud account before any communication between MHUB systems and the HDA Cloud can take place.
Registering the MHUB system provides numerous benefits including:
- Extending the warranty period on the system by 1 year (must be registered within 30 days of purchase, Warranty is non-transferable)
- Enables advanced functions for things like voice control, uControl, integration with other IoT devices and Sequences
- Provide advanced troubleshooting information to your HDA Pro installer and HDA
- Provide your HDA Pro installer permission to remotely manage your system, they can then modify your system for you without physically being there
3. HDA Pro Account
The HDA Pro account can not be added to a unit unless a HDA Cloud account (outlined above) is present first. This account authorises the installer to monitor the MHUB on their customer’s (the homeowner) behalf. This account sits alongside the Cloud account and gives a 3rd party access to the MHUB’s data and the ability to control it. HDA Pro’s can register Here
The following Settings can be managed remotely:
- Source Routing (and switching)
- Edid management
- uControl sequence configuration
- uControl IR pack configuration
- Power management
- IP configuration
- Temperature
- Firmware (MHUB-OS, and MHUB)
You can also monitor the following:
IMPORTANT: a HDA Pro Account has to be created first Here and authorised by HDA staff before the installer can use their account details to enable monitoring on the MHUB.
4. MHUB-OS
MHUB’s operating system which acts as the bridge between using MHUB and managing it. From MHUB-OS it is possible to connect to HDA Cloud, integrate devices like Amazon Alexa, manage network settings and update software to add new features.
5. uControl
uControl is our remote control app for MHUB 4K PRO systems. It pulls all the information it needs to work directly from MHUB-OS and requires no setup or configuration. Just download it and let it find your MHUB and you’re ready to go.