Search by Support Category: Miscellaneous
Soundbars
As TVs have become thinner, the space required for housing speakers within them have diminished, often leaving TV audio weak, lacking in depth and richness. Soundbars are an effective solution to that problem and HDANYWHERE works with them absolutely fine.
Picking the right soundbar.
There are generally three types of soundbar available.
- Stereo soundbars
- Multichannel 5.1 soundbars
- Multichannel (Spacial) soundbars that support Dolby Atmos and DTS-HD
1. Stereo soundbars
If you have #1 (stereo soundbars) then you’re good to go. This will work all over your property as the speaker arrangement and capability is just a better version of what your TV already supports.
2. Multichannel soundbars
If you intend on fitting #2 then you will need to consider what capability your other rooms/zones can handle around your property. If your soundbar supports 5.1, then we suggest reading the guidance here.
What the guidance above says (briefly).
If you want your soundbar to output 5.1 then you will need to make sure your source is also set to output 5.1. When you do this all displays connected to MHUB will receive a 5.1 audio signal and if that display can’t decode 5.1 audio and downmix it into stereo then you will have an audio problem.
3. Multichannel (Immersive) soundbars
If you intend on installing a soundbar with this capability and require the source to be distributed then you will need additional hardware to manage the signal. We would recommend that you read Using MHUB and providing Dolby Audio (Atmos) and DTS (DTS-HD) audio.
Confused? Help is available, drop us an email for a fast response.
Using an AVR and MHUB for multichannel audio in 1 room/zone.
Adding a cinema or media room to MHUB is a relatively easy task for the MHUB to do but if you are planning to have a room with equipment inside it that is of a higher specification to the rest of the property then you need to do a little pre-planning beforehand.
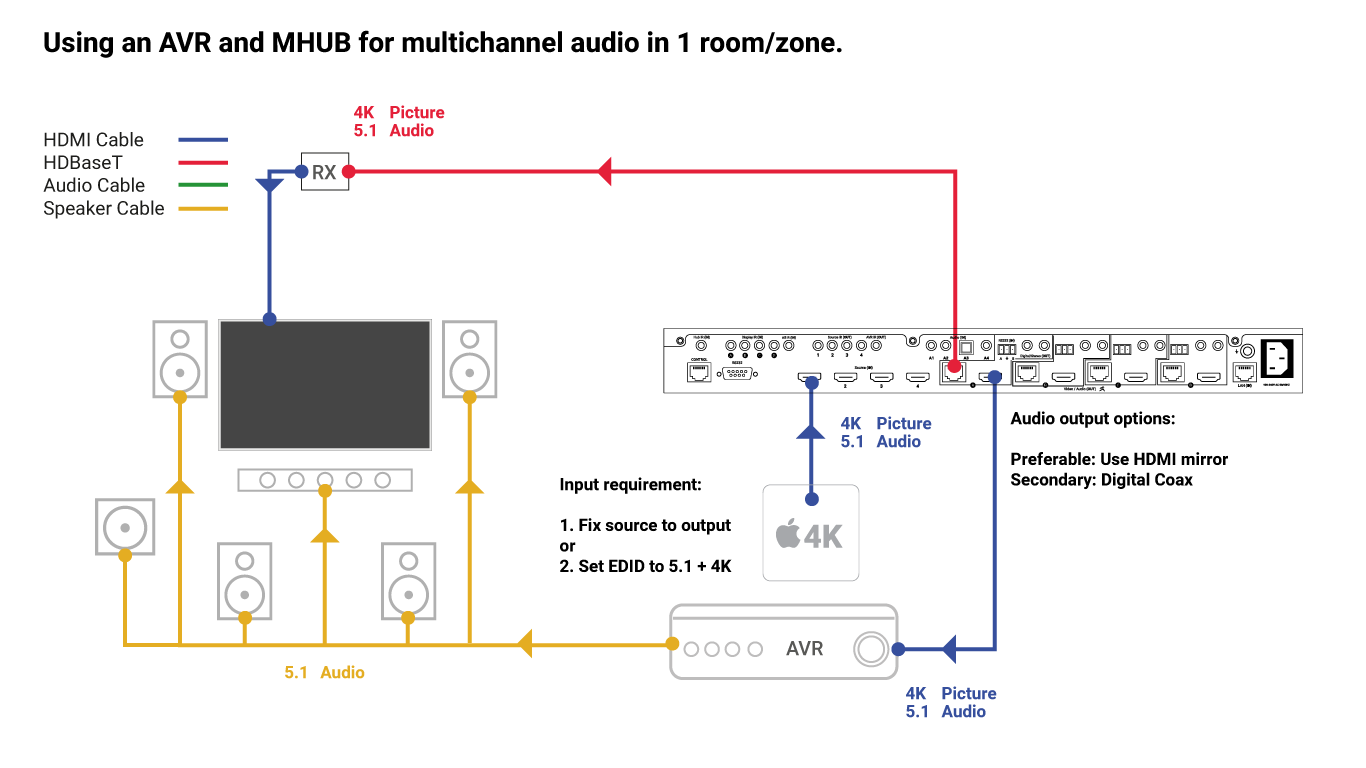
For best results the source(s) that will be watched in that room should be fixed to serve just that room.
The chances are that this room will have the best display capability and the best audio capability. Because all HDMI sources (bluray, AppleTV, Amazon Fire etc) can only output one format of video and one format of audio at any given time you should ideally serve this room with sources dedicated to it. This way the source can be set to output the correct video resolution and audio format without having to readjust when the stereo 1080p TV accidentally tries to request a picture from the source.
If you have MHUB PRO then we recommend using the HDMI cable direct to your AVR and then the digital coax after.
… Then tell MHUB to only request what that room can handle
Other displays in your property (like that 1080p display in the kitchen) are able to contact your source device to downgrade it’s audio and video capability. You can block this from happening by selecting an appropriate EDID profile for your source from within MHUB-OS.
You don’t need to do this if you fix the output from the source device to your room but we recommend it to make sure your system doesn’t suffer from strange behaviour.
I would like that source available throughout my property? What happens if I fix the source and set EDID above?
If the source is fixed to output 5.1 then MHUB will deliver 5.1 audio to all HDBaseT outputs connected to MHUB. If your TV or display can decode and downmix multichannel audio into stereo (many now do) then you will hear the content correctly in stereo. If the TV is unable to decode the 5.1 audio then you are likely to have audio problems or hear nothing at all.
Listening to content on all displays.
Are there any ways around this problem?
Yes. Many modern TVs can accept a 5.1 audio signal so that they can work with 5.1 compatible soundbars over HDMI ARC or Optical connections. Depending on the TV specification, it can work in two ways:
- MHUB outputs 5.1 audio to the TV and it passes the audio directly to a compatible soundbar (additional soundbars required).
- MHUB outputs 5.1 audio to the TV and the TV downmixes the audio back into stereo.
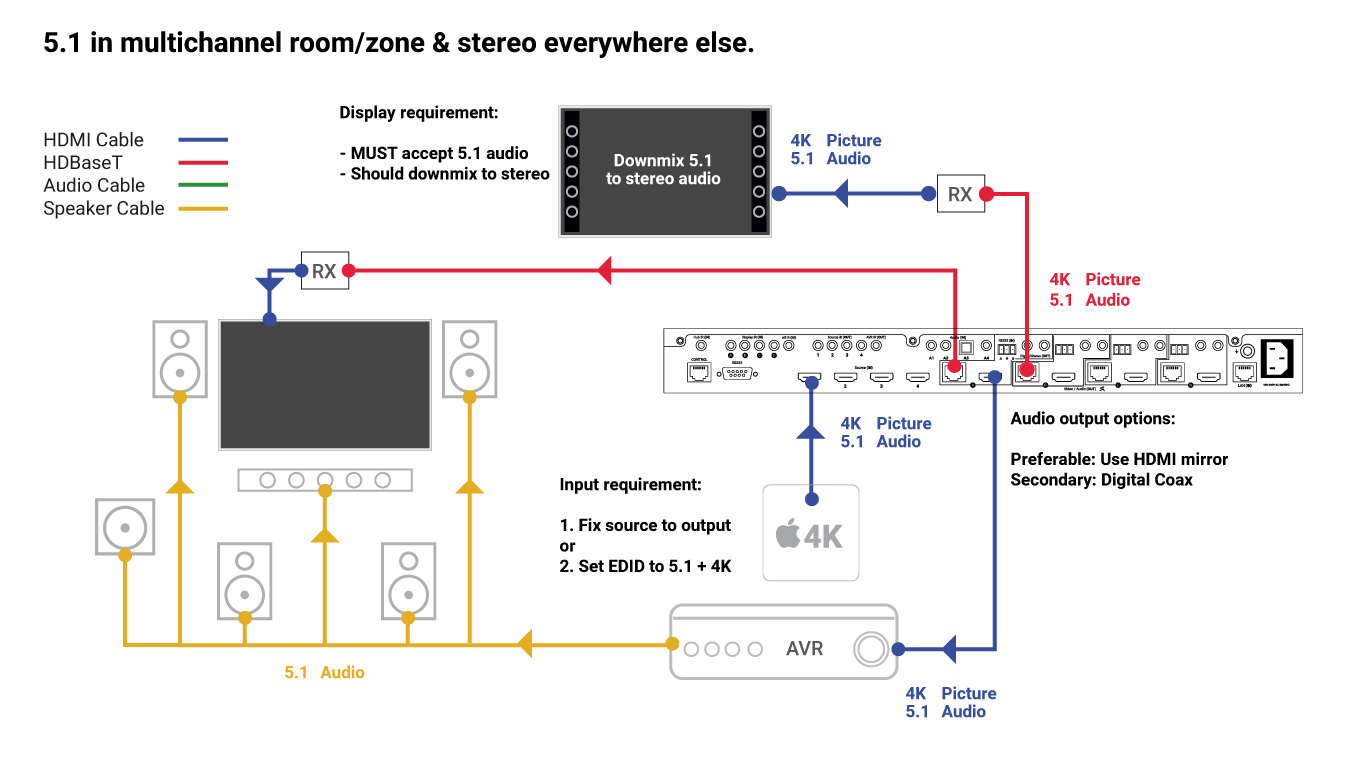
This will mean that you get 5.1 audio in rooms where you need it and stereo everywhere else. It is important that you check the specification of your displays carefully before considering this option. Older TVs are not likely to handle multichannel audio at all ruling out this option entirely.
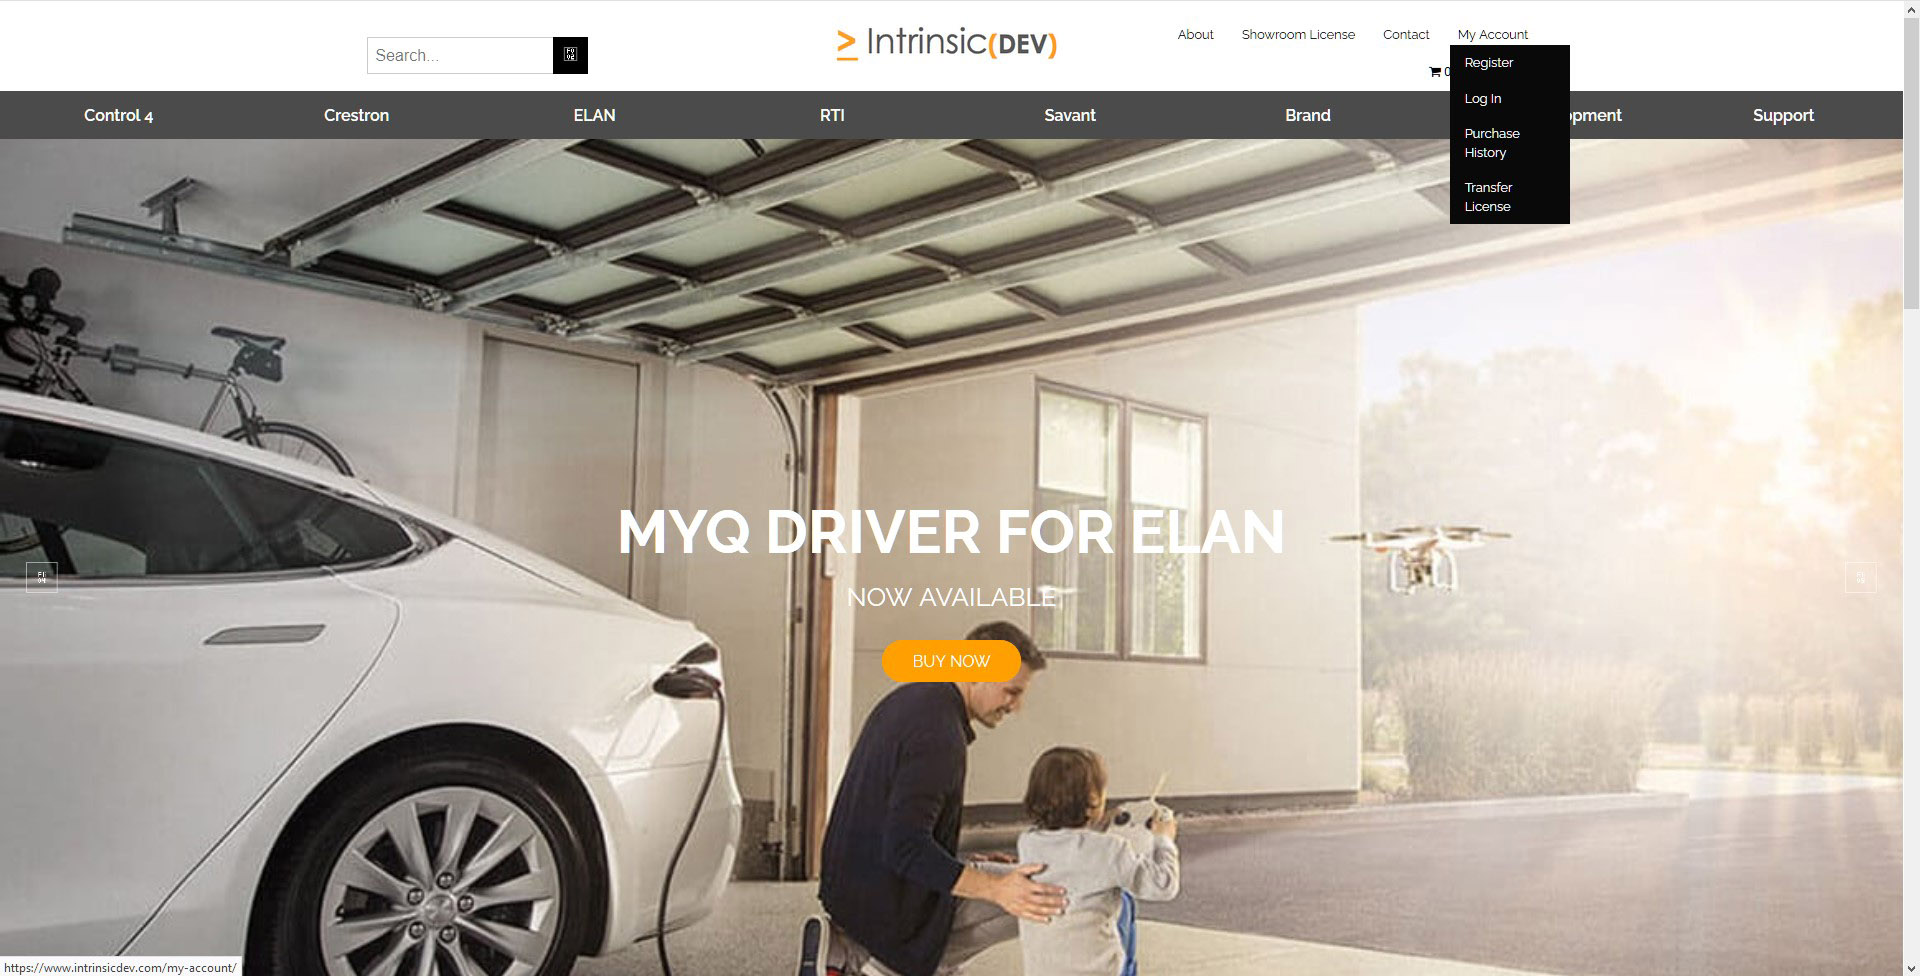
HDANYWHERE are now working with Intrinsic Dev for control driver integration.
If you see the label “DRIVER REQUIRES LICENSE ACTIVATION FROM VENDOR” then this means you need to create an account and generate a license key before the driver will work. As always, the driver remains FREE OF CHARGE. The process takes under 5 minutes to complete and offers HDA Pros the following benefits:
1. Track and find your drivers for every install you commission.
2. Be kept updated if the driver gets patched or improvements are added.
3. Check to see if the driver is operating correctly.
4. The ability to improve your HDA Pro listing
2. Ensure that you are logged in.
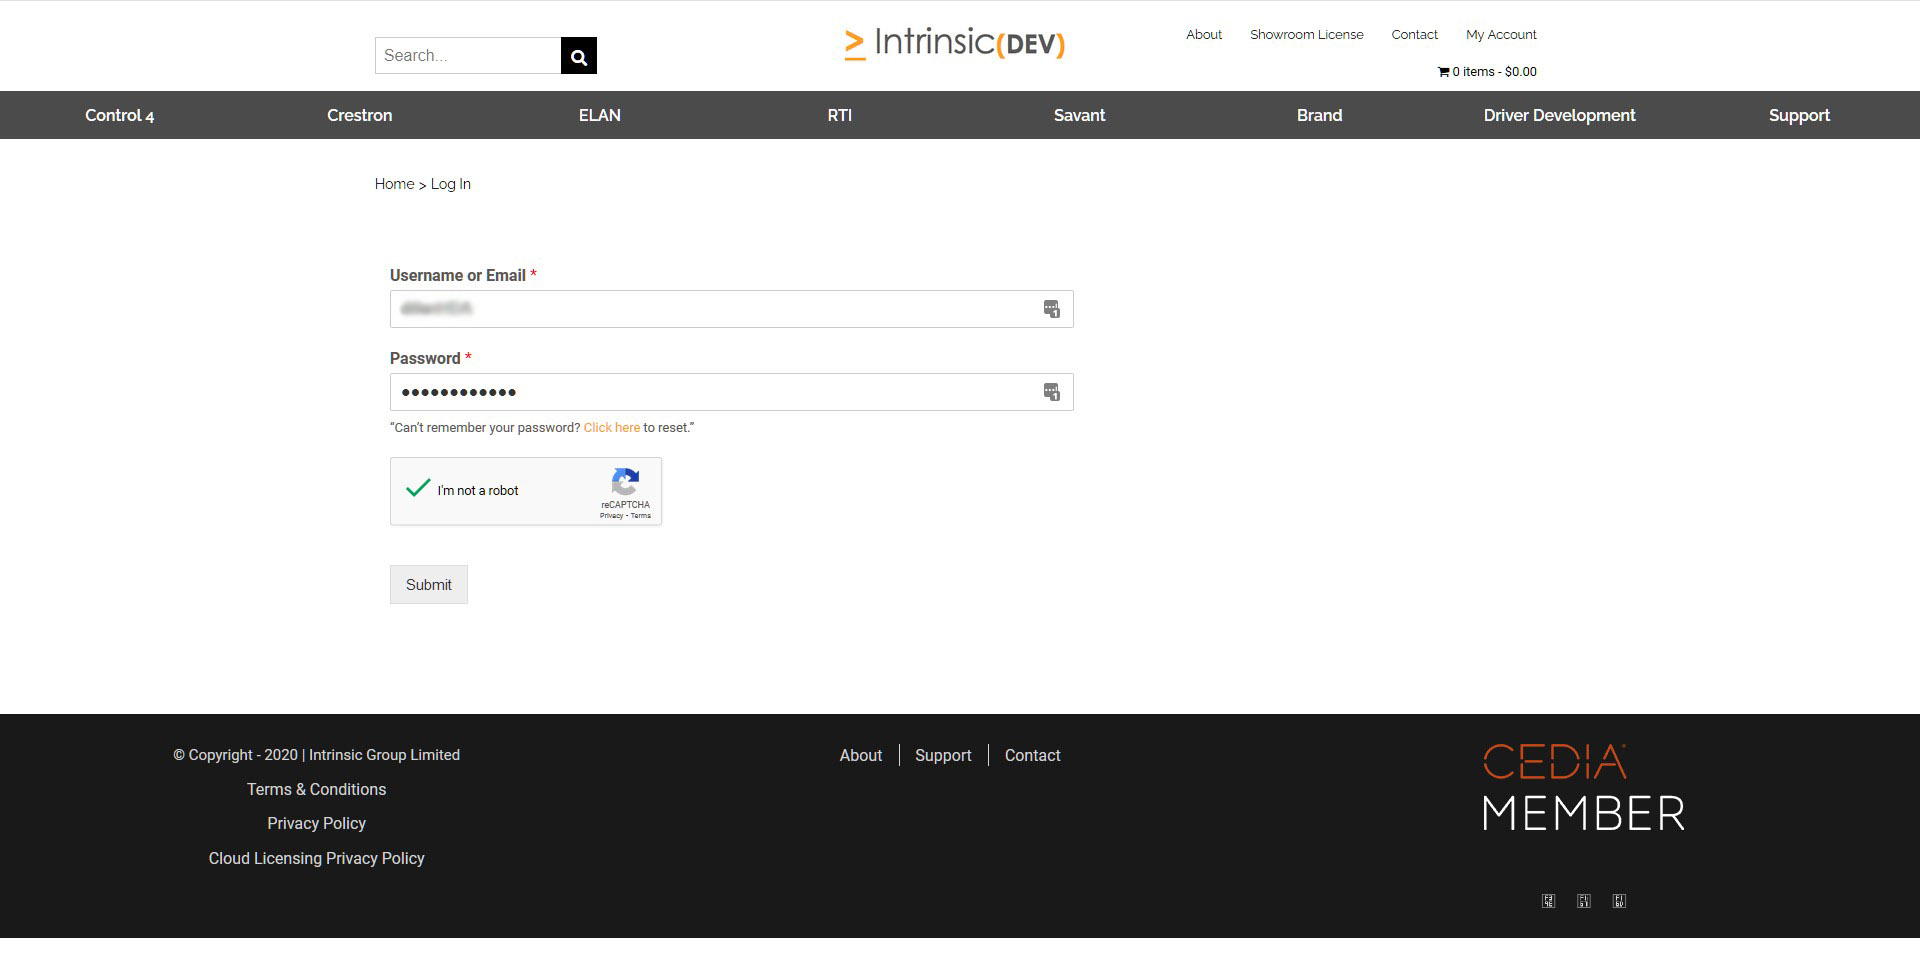
3. Find the HDA driver you want to download https://www.intrinsicdev.com/brands/hdanywhere
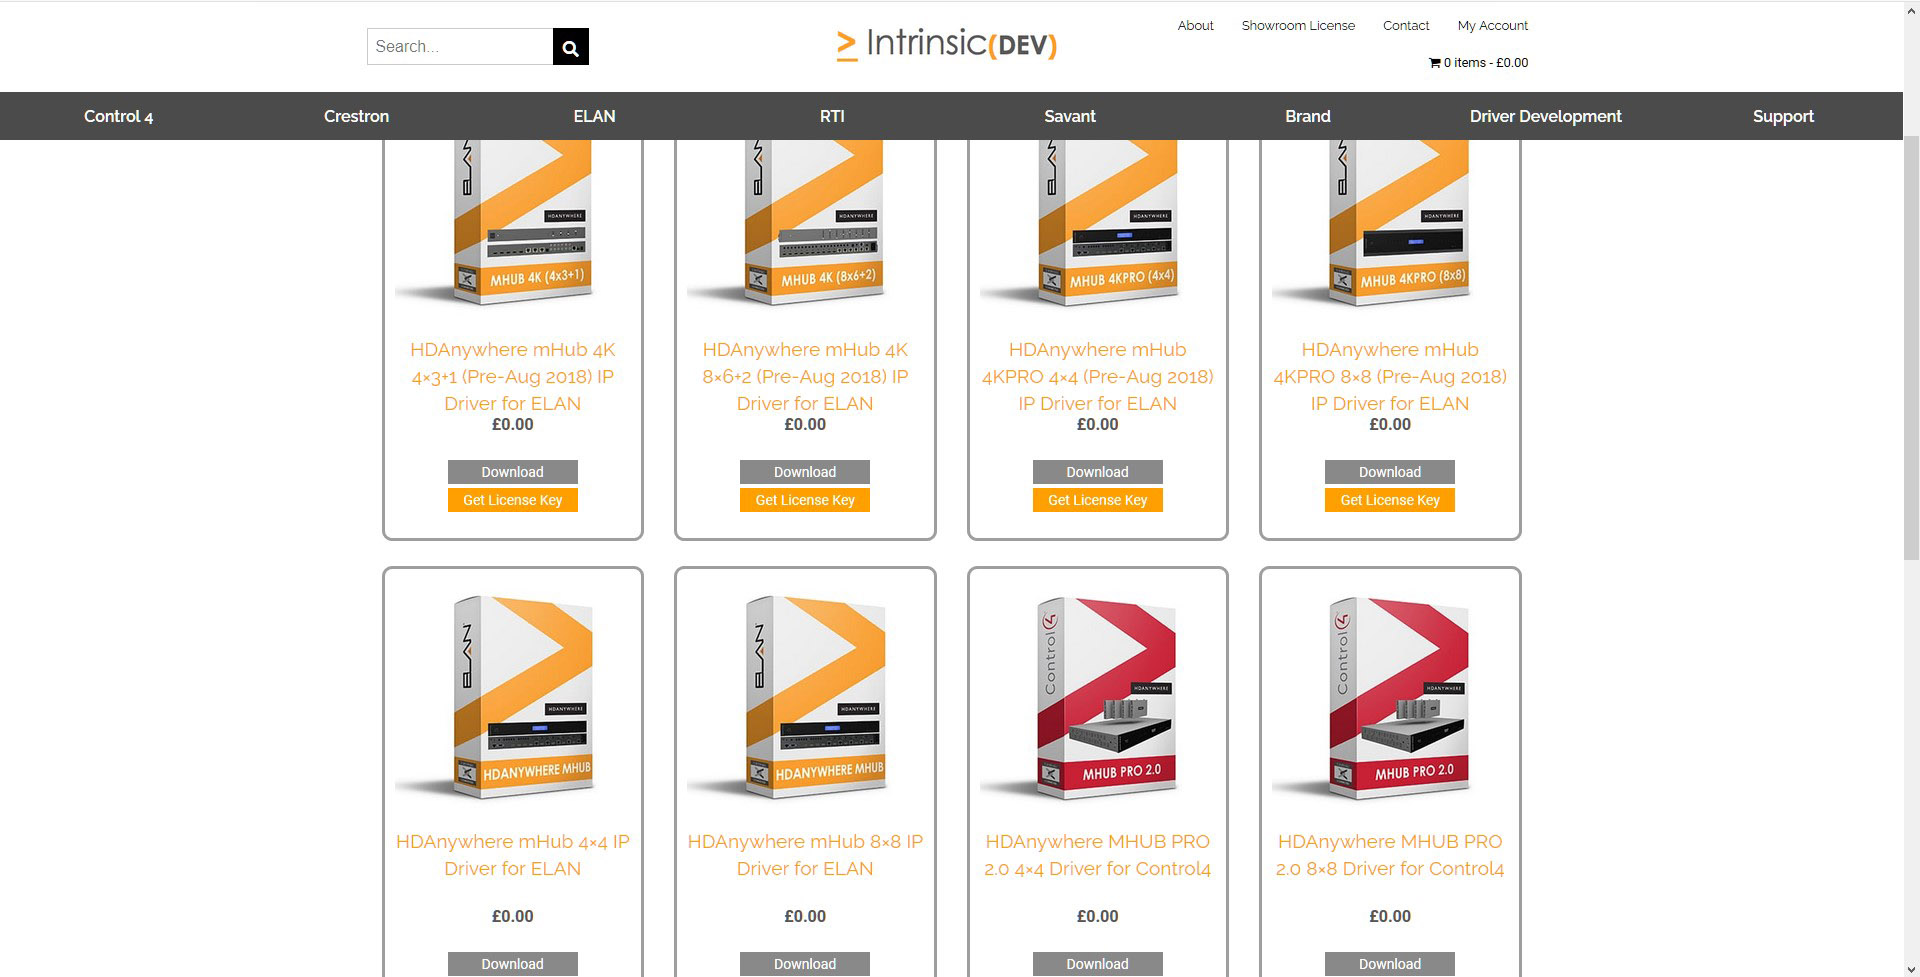
4. Click on “Get License Key”
5. You will need to provide the MAC address of your controller and some site details. Scroll to the bottom of the page and a button will appear to proceed/download. If you have not completed this step correctly then the button to download will not appear.

6. Download the driver and make a note of the activation code.

The table below details the PSU DC rating, the system power draw in watts and BTU(British thermal unit) heat output of each device.
| Product Code | Release | PSU Rating (DC) | Power Draw (watts) | BTU | |||||
|---|---|---|---|---|---|---|---|---|---|
XTND |
|||||||||
| XTND2K30 | 2017 | 5V 1A | 2.5 | 9 | |||||
| XTND4K40ARC | 2018 | 24V 1A | 20 | 68 | |||||
| XTND4K100TPC | 2018 | 24V 1A | 12 | 41 | |||||
MHUB |
|||||||||
| MHUBAUDIO64 | 2018 | 24V 13.4A | 520 | 1774 | |||||
| MHUBMAX44 | 2018 | 24V 2.71A | 19.2 | 66 | |||||
| MHUB431U | 2018 | 24V 2.71A | 36 | 123 | |||||
| MHUB862U | 2018 | 24V 2.71A | 28 | 198 | |||||
| MHUBPRO4440 | 2018 | 24V 2.71A | 40 | 136 | |||||
| MHUBPRO8870 | 2018 | 24V 6.3A | 98 | 334 | |||||
| MHUB4K44PRO | 2016 | 24V 2.71A | 42.72 | 146 | |||||
| MHUB4K88PRO | 2016 | 24V 6.3A | 100 | 341 | |||||
| MHUBPRO24440 | 2019 | 24V 5A | 68 | 232 | |||||
| MHUBPRO288100 | 2019 | 24V 6.3A | 130 | 444 | |||||
SPLITTERS AND SCALERS |
|||||||||
| SPLITTERMAX12 | 2019 | 5V 1A | 2 | 7 | |||||
| SPLITTERMAX14 | 2019 | 5V 1A | 2 | 7 | |||||
| SIGNALMANAGER | 2018 | 5V 1A | 1.65 | 6 | |||||
Below is a list of three issues which have been reported to HDANYWHERE (HDA) after updating older systems to MHUB-OS 8 (MOS 8). If you have encountered any of these problems then you will find a solution below. If your issue is not shown below then contact the HDA support team via email on – support@hdanywhere.com.
Jump to issues and solutions:
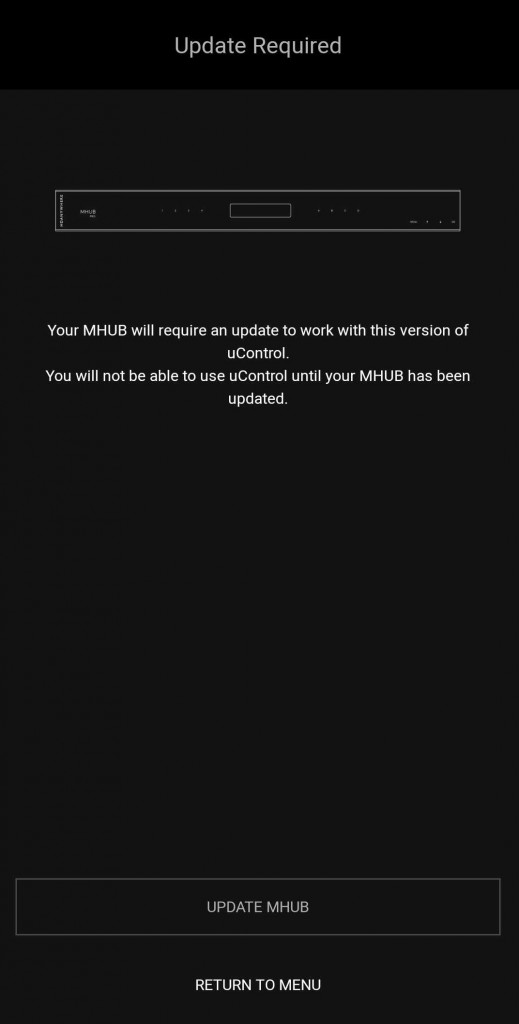
- My MHUB is stuck in a loop and is always prompting me to update again – I can not access any other MHUB-OS page.
- I am having problems connecting with HDA Cloud because there is an error with my serial number.
- I have connected to my MHUB and all my settings are gone.
- I can’t get uControl to connect to MHUB.
- I have an 8×8 system and I can not control my TVs anymore.
1.
I’ve clicked the update from within MHUB-OS and now appear to be stuck on an update page and cannot access any other MHUB-OS page.
This error can occur when MHUB fails to complete the update process completely. This can be caused by a power outage, multiple sessions of MHUB-OS being open at the same time (browser tabs, app) or network issues as the update is applied to MHUB. This has been patched in version 8.02 of MHUB-OS. However, if you find yourself with a problem like this, you will need to contact HDANYWHERE technical support services by emailing support@hdanywhere.com with the subject line: “Update error code:728″ and we will treat this with the highest priority.
2.
I’ve updated to MHUB-OS 8 and when linking to HDA cloud it says there is an error with my serial number.
This error can occur when the MHUB cannot connect with HDA cloud. This can be caused by network issues or power outage. This has been patched in MHUB-OS version 8.02. However, should you find yourself in this situation you can recover the serial number following these steps
- Step 1 – Load a web browser on a pc or mac(such as Chrome), and enter the following in to the URL bar [MHUB IP ADDRESS]/diagnostics.php. Then click on “GET SERIAL NUMBER”
- Step 2 – Confirm that you want to change the serial number
- Step 3 – You will get a notifcation saying that the serial number has been updated, and should notice the serial number is showing in the system information section near the top of the page.
If after using the serial number recovery method above, it still does not appear, you will need to contact HDANYWHERE technical support services by emailing support@hdanywhere.com with the subject line: “Update error code:628″
3.
uControl has updated, when I reconnected to my MHUB all my settings were gone.
This can occur when reconnecting to your MHUB after uControl has updated to version 2 or greater and selecting the incorrect option. When uControl loads you are shown 2 options:
- “SETUP A NEW MHUB SYSTEM” – This is used when you are connecting to a brand new or unconfigured MHUB system. If you select this option and have a previously configured system, all user data will be removed requiring the MHUB to be fully reconfigured like a new system.
- “CONNECT TO AN EXISTING MHUB SYSTEM” – This is used when you are connecting to a previously configured MHUB system. Existing data will remain untouched, and uControl will sync the data stored. If you were connected with a previous version of uControl this option should be used.
4.
After the update, uControl can not connect to MHUB
HDANYWHERE released an update to uControl and all MHUB systems on Wednesday 10th October 2018. To ensure that your MHUB works correctly both your MHUB and uControl must be on the correct software version.
MHUB / MHUB-OS = version 8 or above
uControl (iOS / Android) = version 2 or above
If you find that one version of uControl can connect to MHUB and the other can not then it is very likely that you did not complete the update to MHUB-OS. As soon as you have run this process then uControl should work on all devices with no issue. For this solution HDANYWHERE are assuming that your system is already in a pre-configured state and that you are wanting to CONNECT TO AN EXISTING SYSTEM.
Steps to resolve this issue:
- Ensure that you have the latest version of uControl installed on your iOS or Android device. Download uControl for iOS or download uControl for Android
- Once you have the app installed, please load it up and follow the instructions here:
5.
I have a 8×8 or 8×6+2 system and after the update, I lost the ability to control my TVs
If you are able to control your source devices with uControl but can not control your displays then a quick update to your MHUB will resolve this problem. Instructions detailing how to update your MHUB can be found here. Ensure that you use uControl to update your MHUB and do not try to update your system via MHUB-OS.
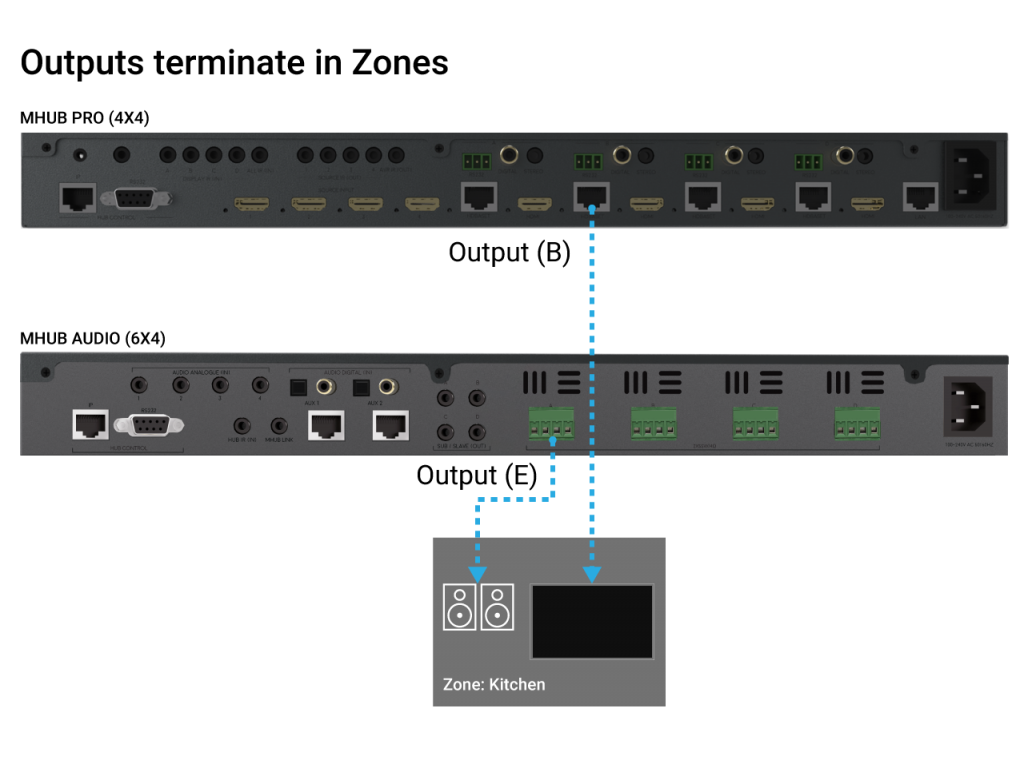
Zones define a physical space in a property where outputs from MHUB terminate.
A Zone can include a maximum of 1 video output and a maximum of 4 audio outputs. For example, you can create a zone called “Kitchen” and assign 1 video and 1 audio output to it to provide you with viewable TV and sound. A Zone must contain at least 1 output from an MHUB for it to be addressable for control. Note: outputs can not be shared or split to more than 1 Zone.
The first boot process for MHUB-OS has remained largely unchanged with the exception of zones.
The slideshow below walks you through the steps within MHUB’s first boot process and how to setup zones to refect the different rooms or areas within you property.
If you wish to configure a stacked system please watch this video – Creating a MHUB stacked system.
You should be able to complete the process in under 10 minutes.
MHUB-OS first boot steps are as follows:
- EULA and Privacy policy
- Name your MHUB
- Name your source devices
- Create zones
- Assign outputs to zones
- Confirm zones
- Connect MHUB to HDA Cloud
- Complete setup
HDANYWHERE(HDA) recommends that every MHUB install goes through its first boot process to ensure that the MHUB is setup correctly.
How long does the process take to complete
If you have an update to install then then first boot usually take about 10 minutes. If there is no update you can normally finish the entire process and have an operational MHUB system well within 5-7 minutes.
Yes. You do not need to access MHUB-OS if you don’t want to. But this is only recommended if you intend to control you MHUB via a control system. You will also miss the opportunity to increase your warranty period and open your MHUB to additional features or services.
I don’t want to use MHUB-OS or go through the first boot process, will MHUB work like a normal?
Yes. You do not need to access MHUB-OS if you don’t want to. But this is only recommended if you intend to control you MHUB via a control system. You will also miss the opportunity to increase your warranty period and open your MHUB to additional features or services.
I made a mistake in the first boot process, can I go back or make a change?
Yes. You can go all the way back to the update step and correct any incorrect information you entered. Alternatively, you can also access MHUB-OS (after you have completed first boot) and change anything then.
If you have received a notification in uControl or by email that an update is available for your MHUB-OS then follow these steps to update your system. All updates are now handled by uControl. Please ensure you have installed the latest version.
If you have not connected to your MHUB before, please follow this guide first – Connecting to a MHUB
If you have received a notification in uControl or by email that an update is available for your MHUB then chose the correct option below:
Updating an existing system
The majority of MHUB customers will be on MHUB-OS 7 and their systems will contain user data which needs updating to the latest version. If this is you then follow these steps.
- Click ‘Connect to an exisiting MHUB system’, uControl will scan your network for any MHUB systems
- Select your MHUB device
- Connect to your MHUB
- uControl will show popup message that MHUB-OS requires updating, click ‘update’ and follow on screen prompts
Updating an New system
This is likely to happen if you have recently bought MHUB and it was shipped to you on older software. You will run through the following steps:
- Click ‘CONNECT TO MHUB SYSTEM’, uControl will scan your network for any MHUB systems
- Select your MHUB device
- uControl will check the current version of MHUB-OS, if an update is required, you will be prompted to update it.
- Connect to your MHUB
- Perform first boot process.
Updating to MHUB-OS 8.00 from an earlier version
If your version of uControl updates to version 2.0 or above automatically, any previous connection to your MHUB will be reset. This is normal and part of the update process. Follow the process as described in ‘Updating a New System’ and uControl will update your system as part of the connection process.
Follow the instructions within the app to connect back to your system. During this process uControl will check MHUB(s) to see if they also require updating.
Watch a video of it here:
Having trouble updating your MHUB, check here -Update Troubleshooting
The first part of this update roll-out has now been completed. Any new MHUB’s connected to the internet will automatically upgrade when the unit is powered on, this may extend the boot time by 30 seconds

HDA Cloud is moving to a new & more sophisticated server.
This will automatically start at 8:00am (BST) Monday 30th July.
HDA Cloud is our secure online portal that allows you to remotely access any network-connected MHUB system around the world. It allows you to remotely manage, configure, and troubleshoot installations to help keep your systems running smoothly.
Perhaps most importantly, HDA Cloud is our central data storage server and we take our responsibility to keep all data super safe and secure very seriously. As such, we have provisioned the very latest server technology and security for a faster and more secure connection. Additionally, the platform will enjoy new features and upgrades which will be revealed soon!
The update will come in two stages; first, we will update MHUB systems around the world and after that is complete we will move HDA Cloud to its new home. You will not need to do anything. MHUB systems will update in the following order:
MHUB systems
MHUB MAX (4×4) – Monday 30th July 2018 – Complete
MHUB PRO (4×4) 40 – Wednesday 1st August 2018 – Complete
MHUB (8×6+2) – Wednesday 1st August 2018 - Complete
MHUB (4×3+1) – Thursday 2nd August 2018 - Complete
MHUB PRO (4×4) 70 – Friday 3rd August 2018 – Complete
MHUB PRO (8×8) 70 - Friday 3rd August – Complete
HDA Cloud Migration - Monday 6th August
– Complete
During this migration, HDA cloud will be unavailable. Starting at 10.00am UTC for 4 hours.
In most case’s this is a background update and should not require any user interaction. However, some systems may need a manual hard reboot (full mains power down for 10 seconds, then reconnect) to apply the update. MHUB video operation will function, but if you notice MHUB control (uControl/MHUB-OS/control system) is not responding, perform the above reboot.
To confirm that the unit has been updated either check in MHUB-OS on the MHUB setup page or check on HDA Cloud
What is EDID?
When you connect an HDMI source such as Sky Q directly to a display, the HDMI cable will send a data exchange between the two devices before they both agree to serve and display a picture. This process is called the handshake. One component of that handshake is called EDID and this is where your display tells the Sky Q what its visual and audio capabilities are (resolution, refresh rate, stereo or multi-channel audio, HDR, etc, etc). In return, Sky Q will choose a picture format that best fits that profile and output something specifically for that display only.
A source device can only output a single format, so you could not get it to output a 4K signal and a 1080p signal simultaneously. It has to be one or the other.
EDID in MHUB
If a device sits in between the source and display (like MHUB) then it must broker that handshake. The complexity comes when you have multiple displays of varying specifications connected to your system. For example, you may have 4K, 1080p, and 1080i capable displays, each with varying audio support. These displays send EDID information back to MHUB. If no EDID profile has been configured in the MHUB system the source will output the lowest common denominator, basically the spec of the least capable display.
This is where EDID management within the MHUB comes into play. You can set a fixed profile that is passed to the source device directly from the MHUB, overriding any information coming from connected displays. Doing this allows you to fix the output of the source regardless of display(s).
The benefit of this would be if you wanted your source device to always output a fixed signal, such as 3840×2160(4k) with 5.1 audio, setting this on the MHUB will ensure that will be what the source outputs.
However, if any display is incapable of receiving the fixed video and audio output you could be left with no video output/audio on those displays unless your MHUB supports video downscaling
Make sure MHUB is connected up correctly before starting the first boot process on MHUB-OS
HDANYWHERE(HDA) recommends that every MHUB install goes through its first boot process to ensure that the MHUB is setup correctly. Please follow the quick start guide (inside MHUB packaging) to make sure your MHUB is connected correctly to your source devices, displays and has an active network connection before proceeding.
I don’t want to use MHUB-OS or go through the first boot process, will MHUB work like a normal matrix?
Yes. You do not need to access MHUB-OS if you don’t want to. MHUB will work distributing video as normal and will be controllable using the included remote controls. Please note that you will not be able to access advanced features such as voice control, the uControl app or build Sequences.
Accessing MHUB-OS (MOS)
There are two ways to access MOS:
- Download our app, uControl, from the iOS or Google Play Store and let it find MHUB (and run you through the first boot) for you
- Go to your MHUB and press and hold the “MENU” button for 5 seconds to reveal its IP address. Make a note of it then put that address in to any web browser on the same network. You will be forwarded to the first boot process.
First boot process
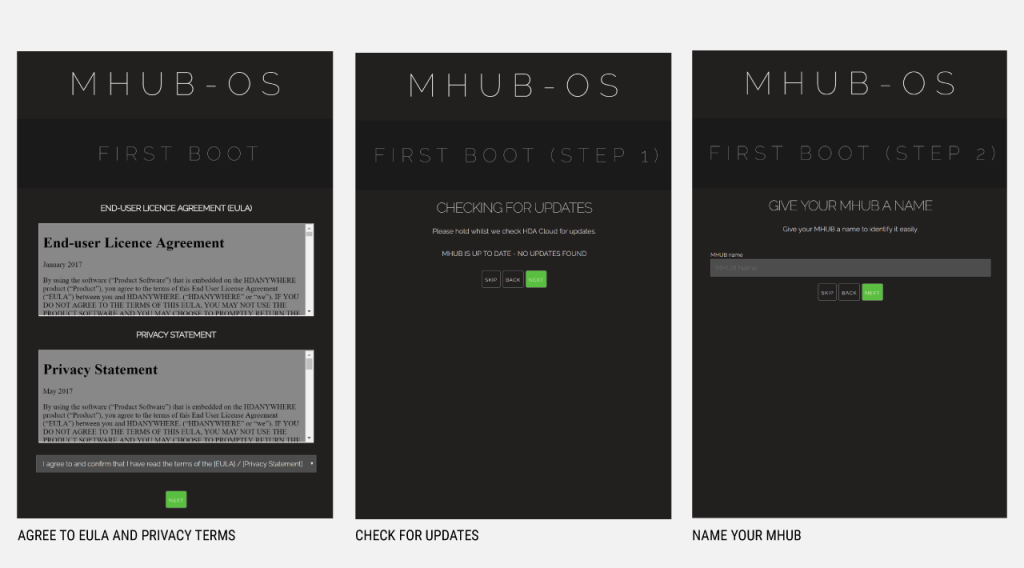
- BEFORE STARTING:Read and agree to the End User Licence Agreement (EULA) and Privacy Statement
- First Boot Step 1 – Check for MOS updates
This is where your MHUB requests available updates from HDA cloud so your unit will update to the latest version. This is done before proceeding.
- First Boot Step 2 – Name your MHUB
Here you can give your MHUB a personal name, this can also be used to differentiate multiple installations by HDA Pro’s - First Boot Step 3 – Name your sources/inputs
On this page you can label your input devices, such as Sky, Apple or Tivo. These labels are used in the uControl app and with voice control. Please go here for best practices when adding names. [Best Practices]
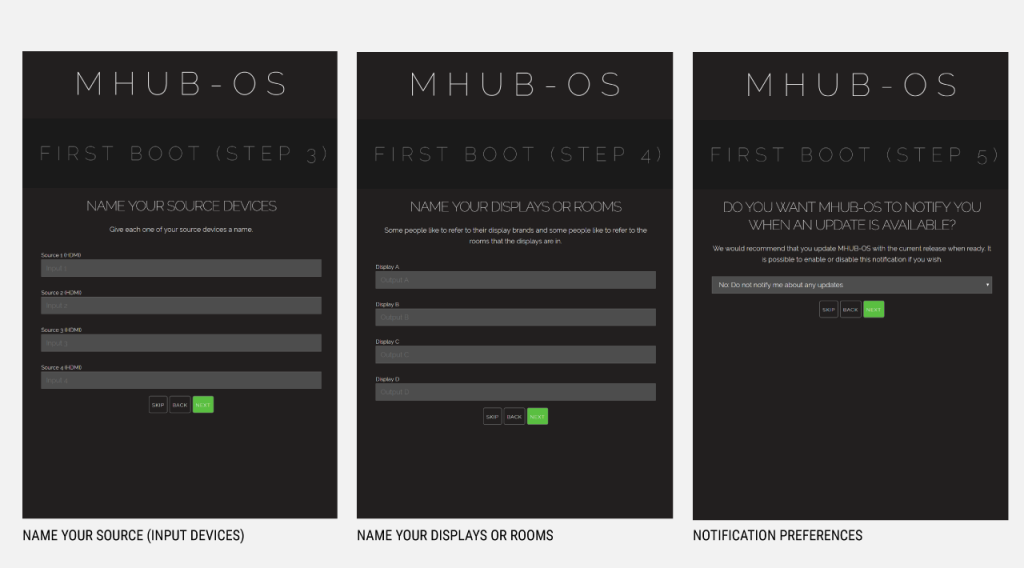
- First Boot Step 4 – Name your Displays/Rooms/outputs
This page is similar to the previous step. You can choose to label them as display manufacturers or room names. Again please follow best practice guidelines available here – [Best Practices] - First Boot Step 5 – Turn update notifications On/Off
MOS updates are released periodically, here you can choose to be notified when an update is available

- First Boot Step 6 – Create or link your MHUB to a HDA cloud account, read and agree to our Terms and Conditions
MHUB4K(3rd gen) and MHUB4KPRO units can be linked to a cloud based account. When registering as a homeowner this enables a couple of things. Firstly when you register, your warranty period is extended by 1 year, in addition to that cloud access is required when using the uControl IRengine feature allowing you to control source and display devices. Cloud access is also required for voice integration. For a HDA PRO the cloud account allows you to manage your MHUB installations remotely, getting system information as well as a host of other features. - First Boot Step 7 – Secure MHUB with a PIN number
If you wish you can lock local access to MOS stopping any unwanted configuration changes from being made. - First Boot Step 8 – Complete First Boot Setup
Once you have completed the first boot process you can either ‘COMPLETE SETUP’ and go to the MOS DASHBOARD pag, . or goto the uControl page to start adding device/source control. For more information on uControl go here uControl
uControl is HDANYWHERE’s free remote control app and is available for iOS and Android mobile platforms. Below is a guide to configuring and then using uControl.
Checklist:
- Your MHUB is powered on and connected as per the quick start guide (inside MHUB packaging) to make sure your MHUB is connected correctly to your source devices, displays and has an active network connection before proceeding.
- Your Android or iOS device is connected to the same network as your MHUB
- You have downloaded the latest version of uControl from the relevant app store
Connecting to your MHUB with uControl
Before using uControl, it needs to be linked to your MHUB. Please follow the instructions below on how to do this.
- Open uControl and press the ‘SETUP A NEW MHUB SYSTEM’ button. uControl will now search your network for any MHUB devices.
- uControl will show relevant options. Press ‘CONNECT TO’ MHUB4K44PRO/MHUB4K88PRO/MHUB4K431/MHUB4K682/MHUBPRO4440/MHUBAUDIO64
- The app will now check the status of the unit, This can take upto 10 seconds, then it will show the screen ‘CONTINUE SETUP ON MHUB DEVICE’
- This will take you to the First Boot process on MHUB-OS where you will setup your system – First Boot Process
- After the first boot process is completed you will be shown the following screen. Click ‘ACCESS UCONTROL’ and you will be taken to the main uControl interface.

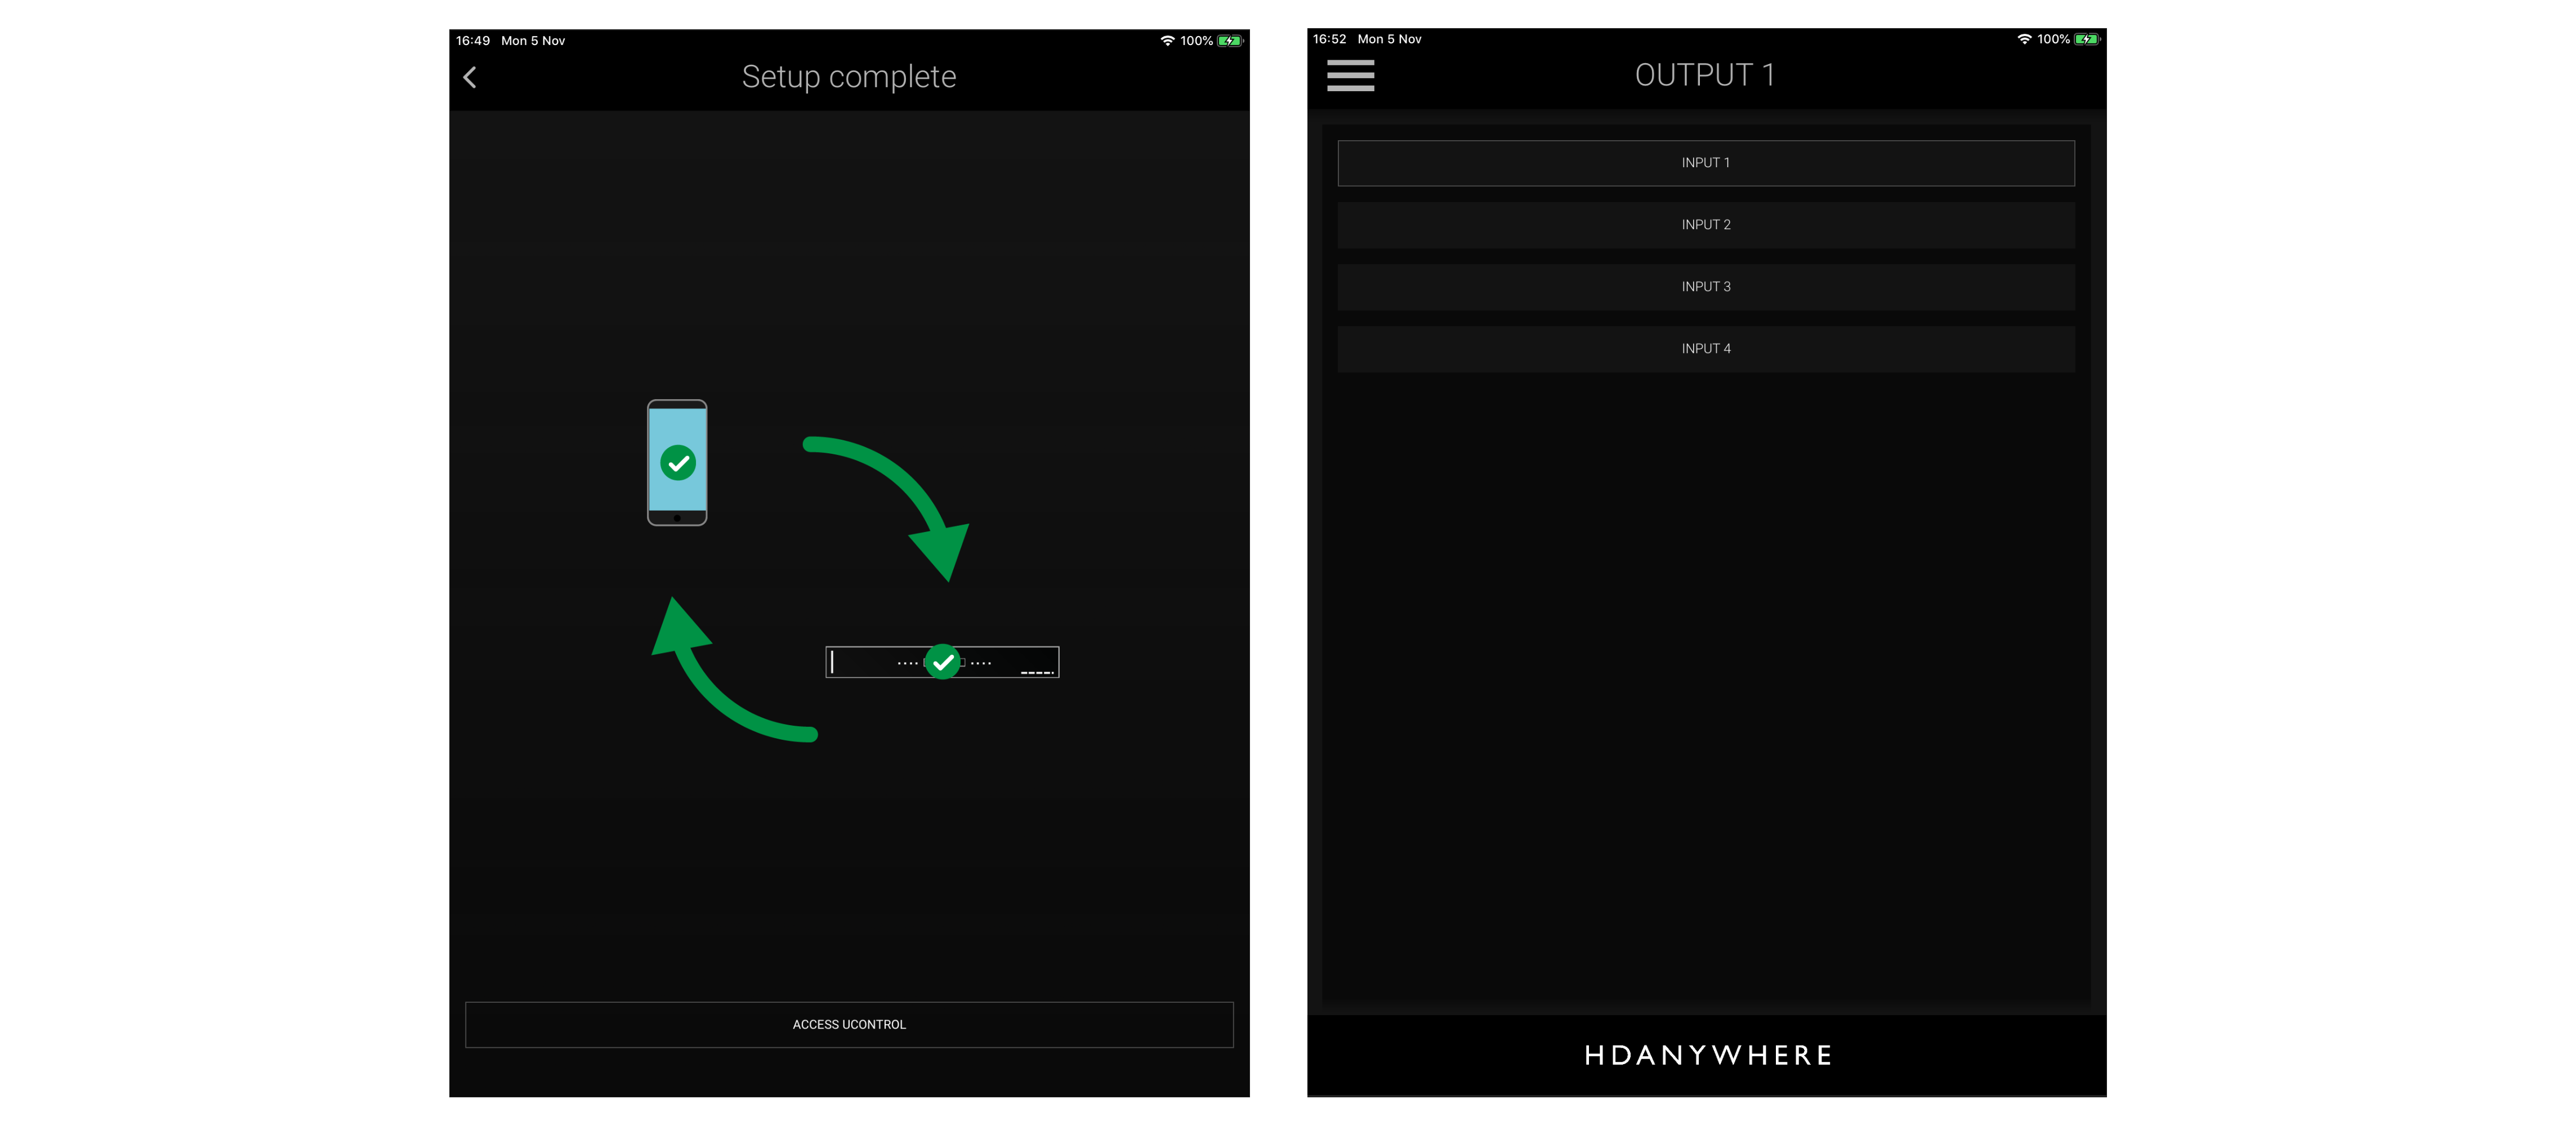
Using uControl
After uControl is paired with your MHUB you can start to use it to control your device
Source switching on uControl
Source switching is performed by swiping left or right on the input bar and tapping on the required input. When input names are configured on MOS\MHUB SETUP page they will be reflected here.
To change to a different output, tap on the menu icon, and select the desired output from the popout menu, once again any output names configured on the MOS\MHUB SETUP page will be reflected here.
Using uControl to control source and display devices
To enable uControl to control your source or display devices, an IR pack is required and must be installed on your MHUB. This IR pack contains all the relevant information including a screen layout for uControl.

To install an IR pack navigate to the settings menu by pressing on the MENU icon, and tapping on SETTINGS located at the bottom off the pop-out menu. This will bring up the setting page, tap on DOWNLOAD UCONTROL PACKS. this will take you to the UCONTROL page on MHUB-OS.
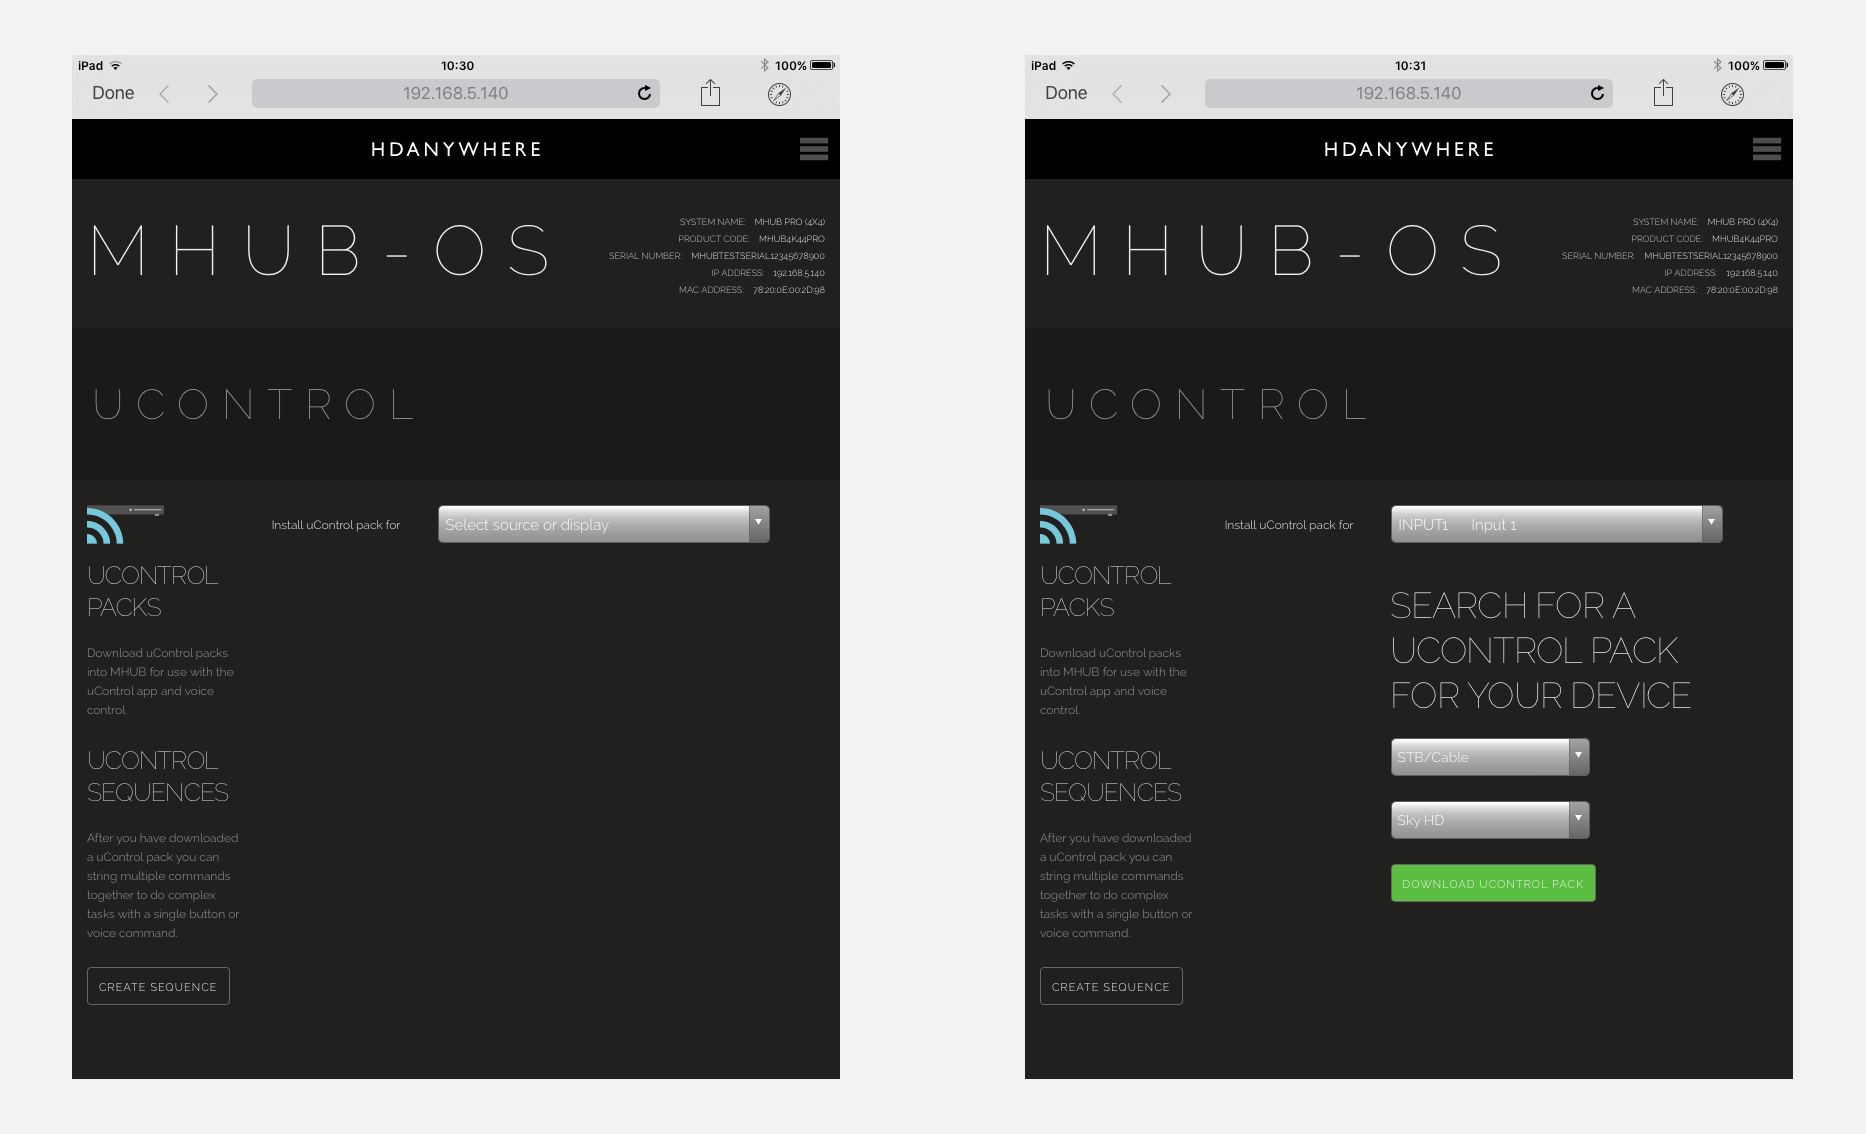
- Using the drop-down menu, select which source or display you wish to install the IR pack for, This will bring up an expanded menu
- Click DEVICE TYPE to select the type of device that will be connected to the chosen port.
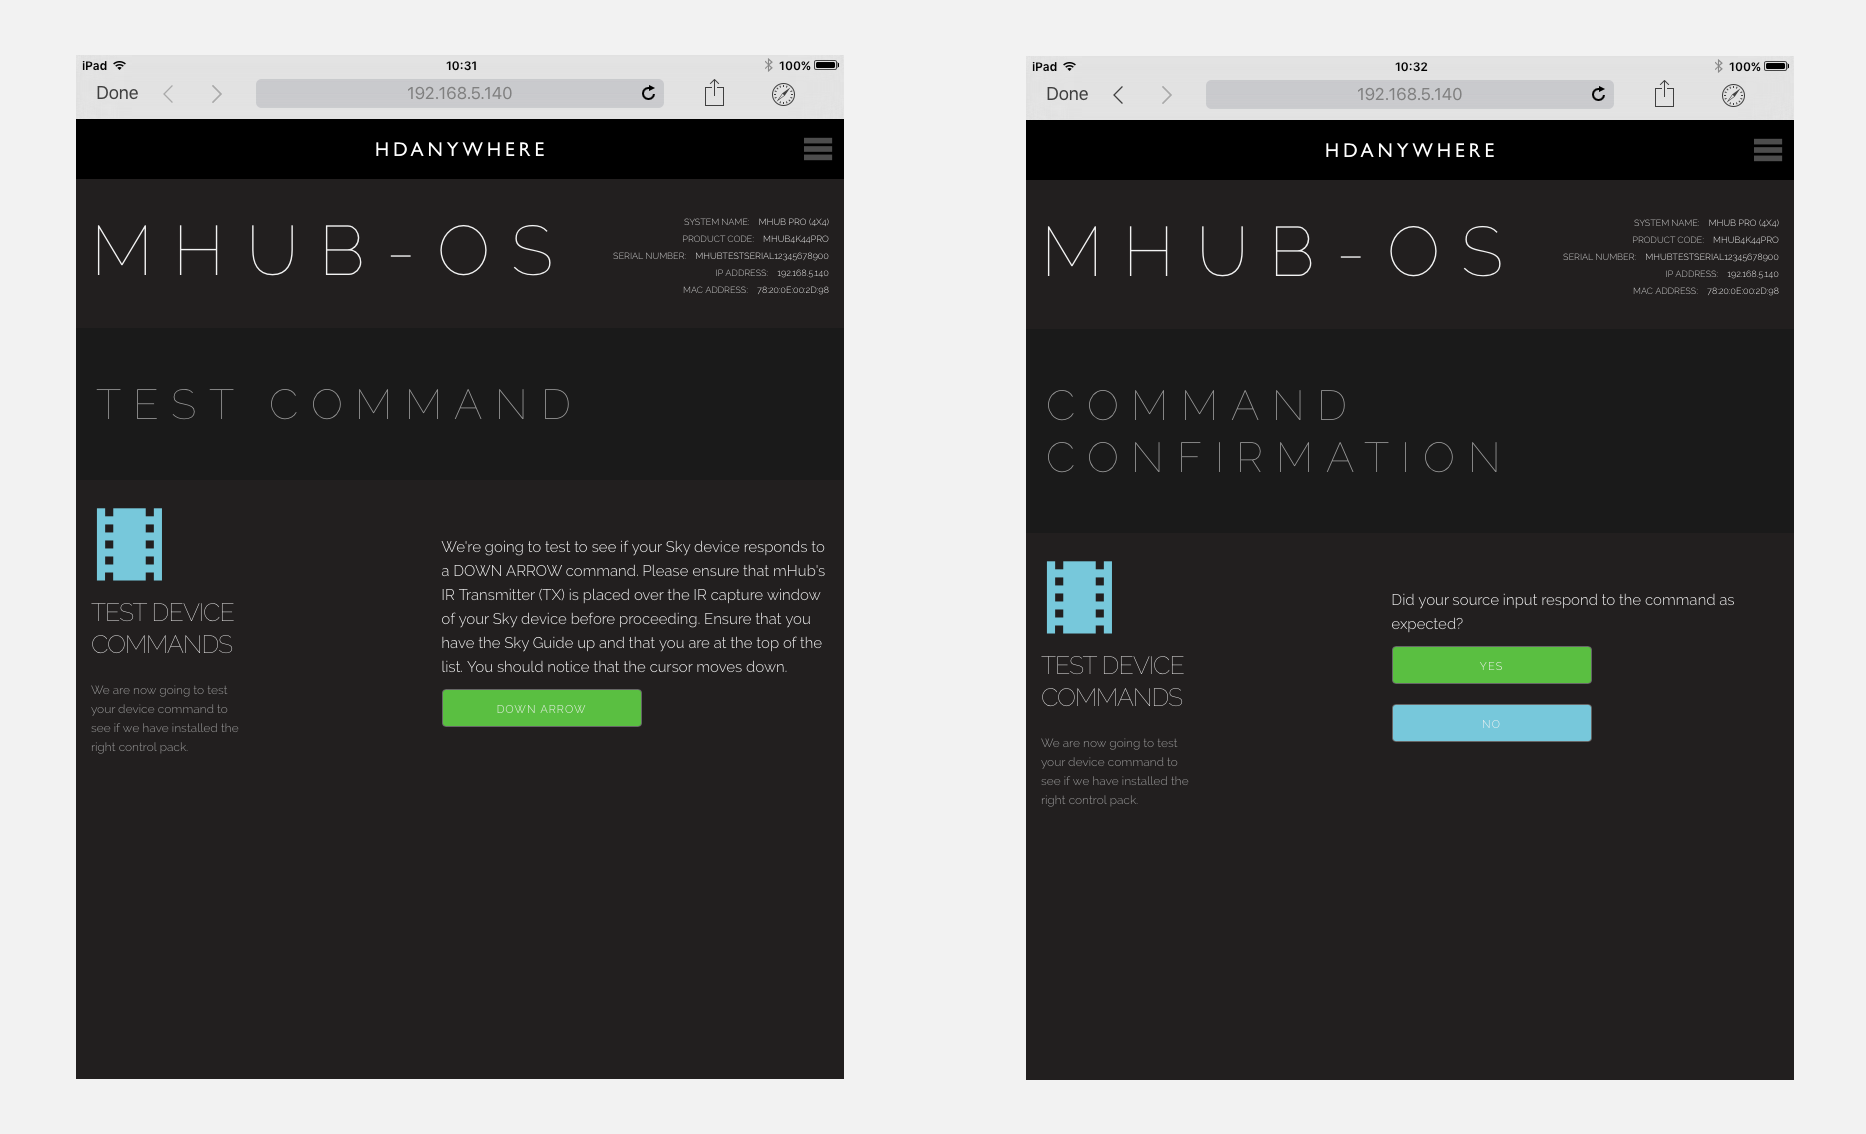
- Next click DEVICE MANUFACTURER and select the make of your device from the list and click on DOWNLOAD UCONTROL PACK – This will load two test commands from the downloaded IR Pack to confirm the commands are working as expected.
- Follow the onscreen instructions to test the two commands
- If the commands work as expected click YES to complete the process. If they do not, click NO and repeat step 4 until you find commands that work
Repeat the above steps until all required IR packs are installed. Once complete, click DONE on iOS or the back button on your android device
When an IR pack has been installed the uControl area of the screen is populated with the source device interface. These are device specific. Some control packs have multiple interface screens which can be navigated to by swiping left or right.

- Gesture Control – This is where you navigate your devices menu or guide using one or two finger gestures or motions on your mobile device, the majority of the screen is filled with the ‘Gesture control area’
- Navigation Control – This mirrors a conventional remote control, with individual buttons for navigation.
- Playhead Control – This screen contains common functions used when viewing a recorded source or watching a bluray. Such as Play, pause, fast forward and rewind.
- Numeric Keypad – This screen shows a 0 to 9 keypad for entering channel numbers etc.
- External App – This allows uControl to open external applications such as Sonos.
When using gesture controls the following gestures are supported

- Navigation – single finger swipe up, down, left or right
- Enter – single finger tap
- Play/Pause – two finger swipe up to play, two finger swipe down to pause.
Daisy chaining IR can allow you to connect the IR systems of 2 devices. This allows IR to pass from one device to another
This does not work for HDMI Mirrored ports.
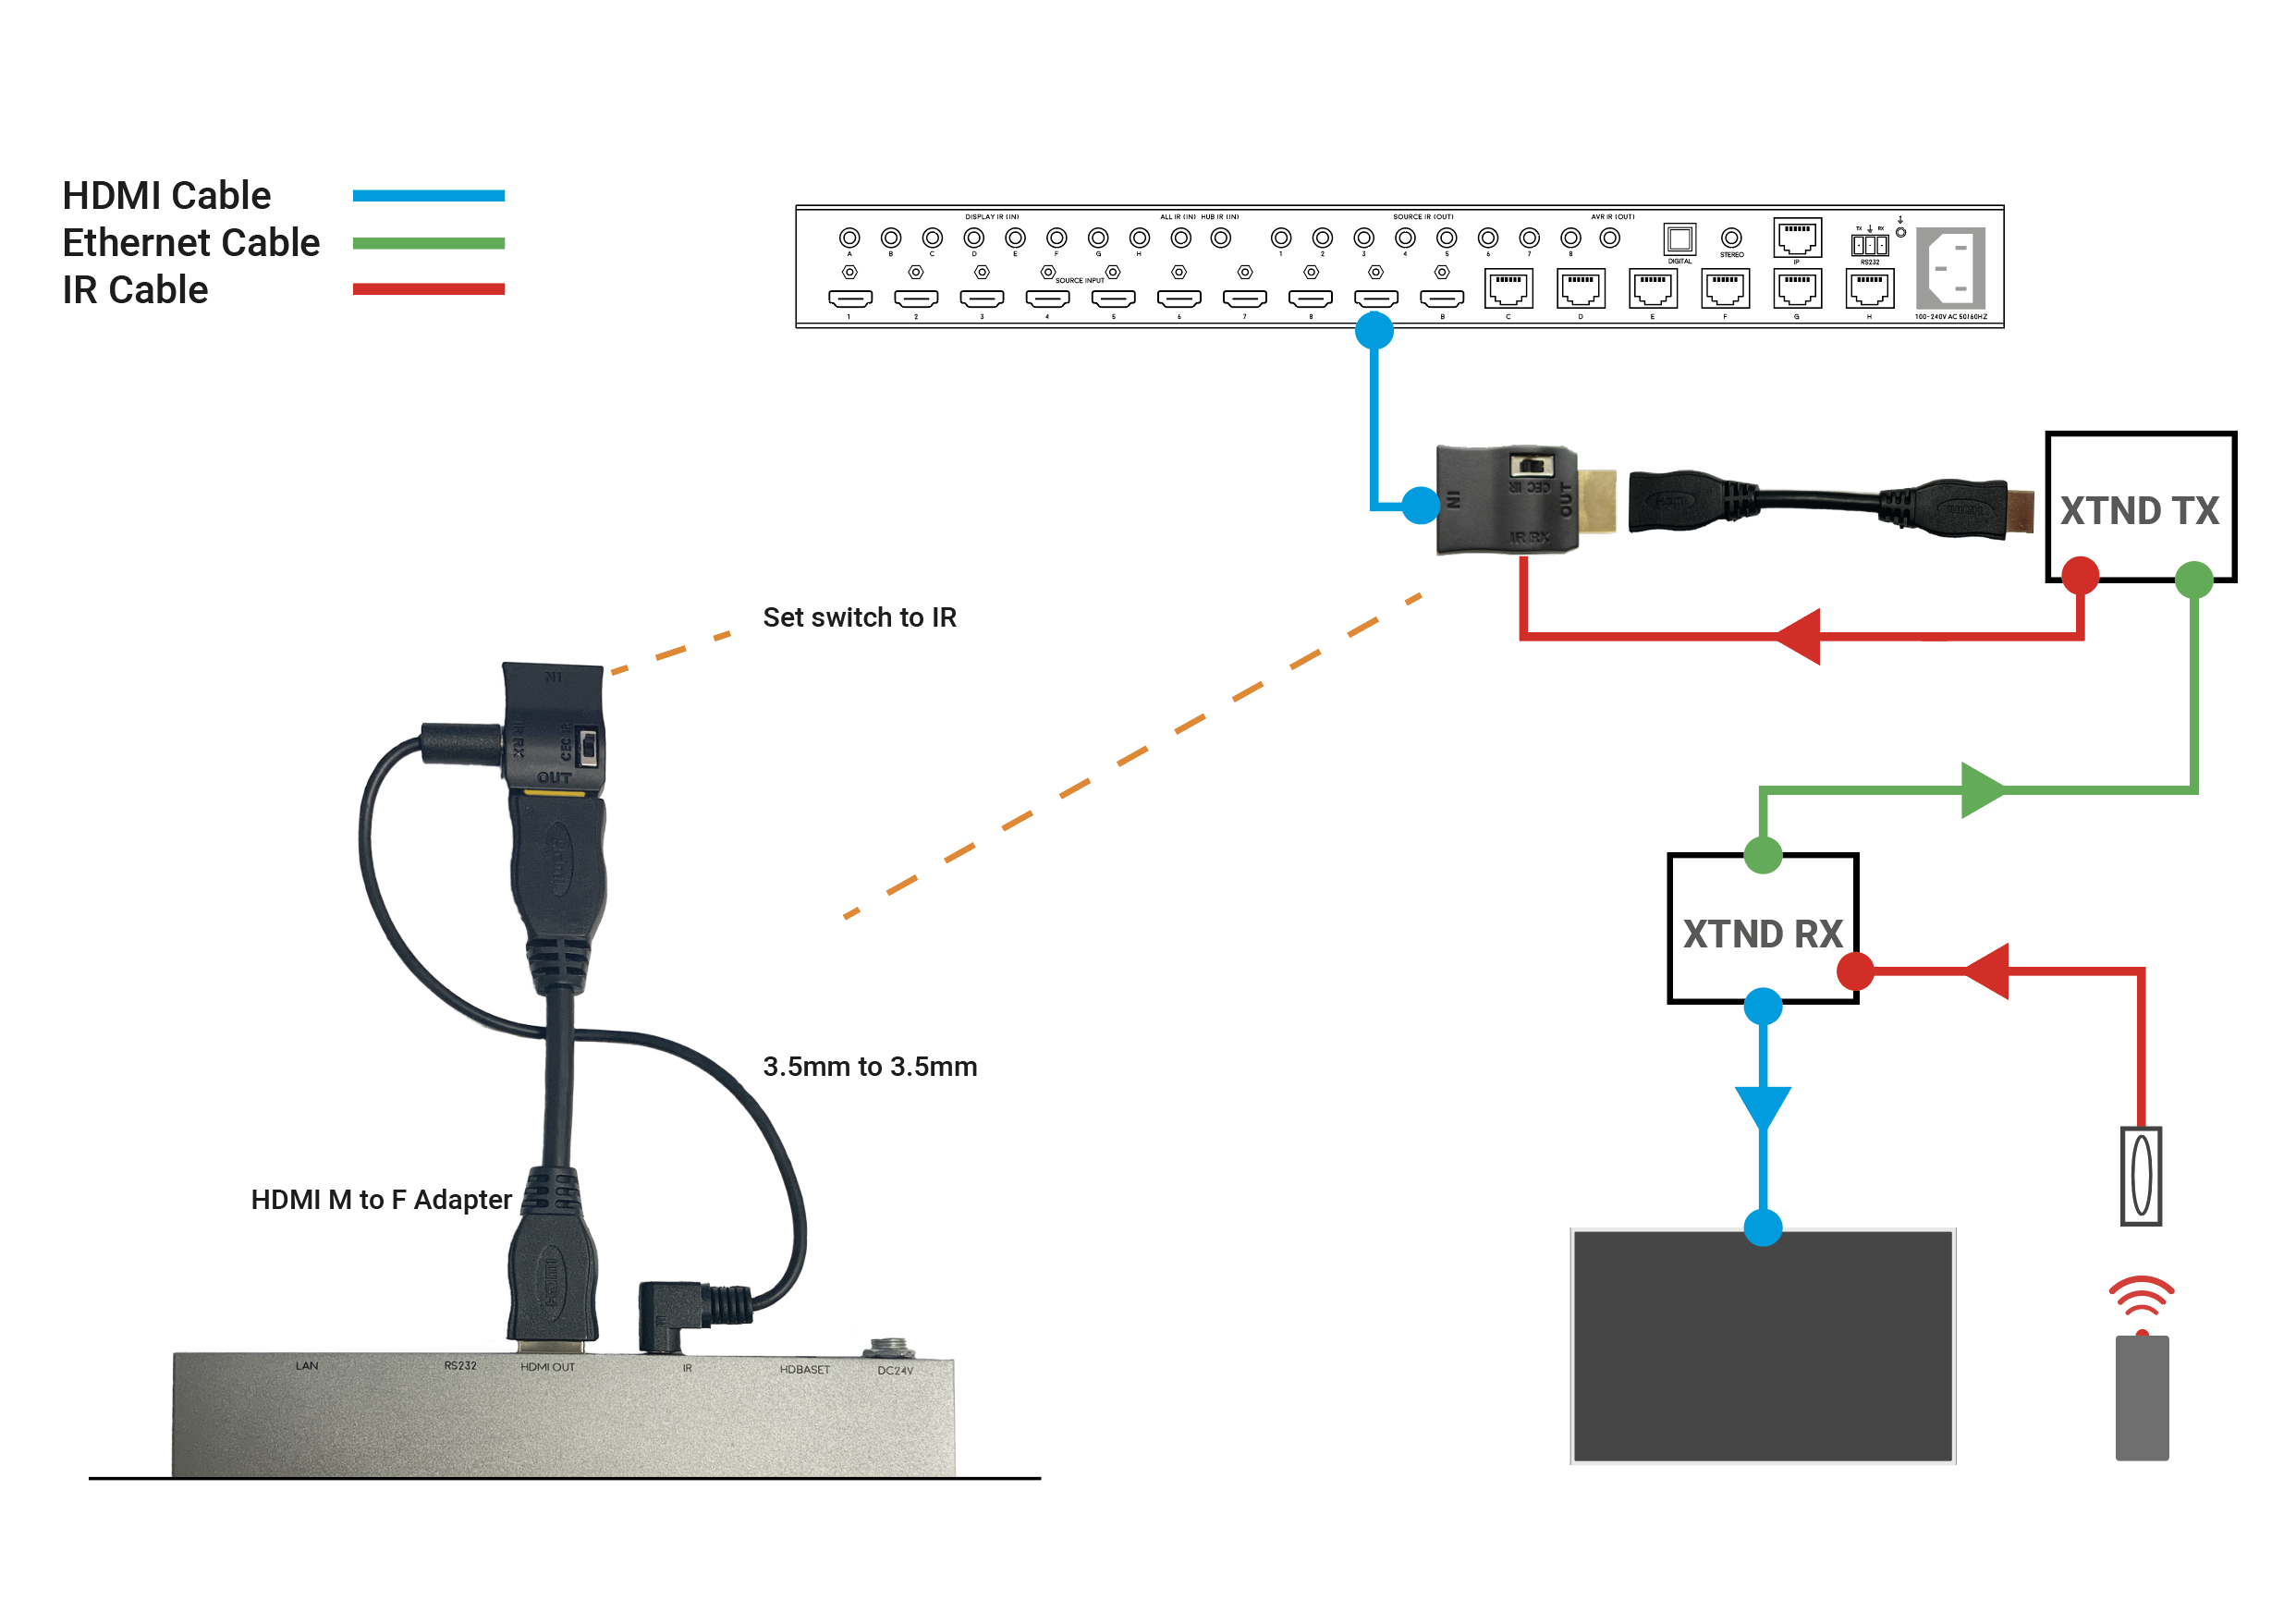
a) The diagram below shows how you can link two HDA devices, such as an MHUBU86240 and an XTND4K40TPC using a MHUB + XTND Integration Kit
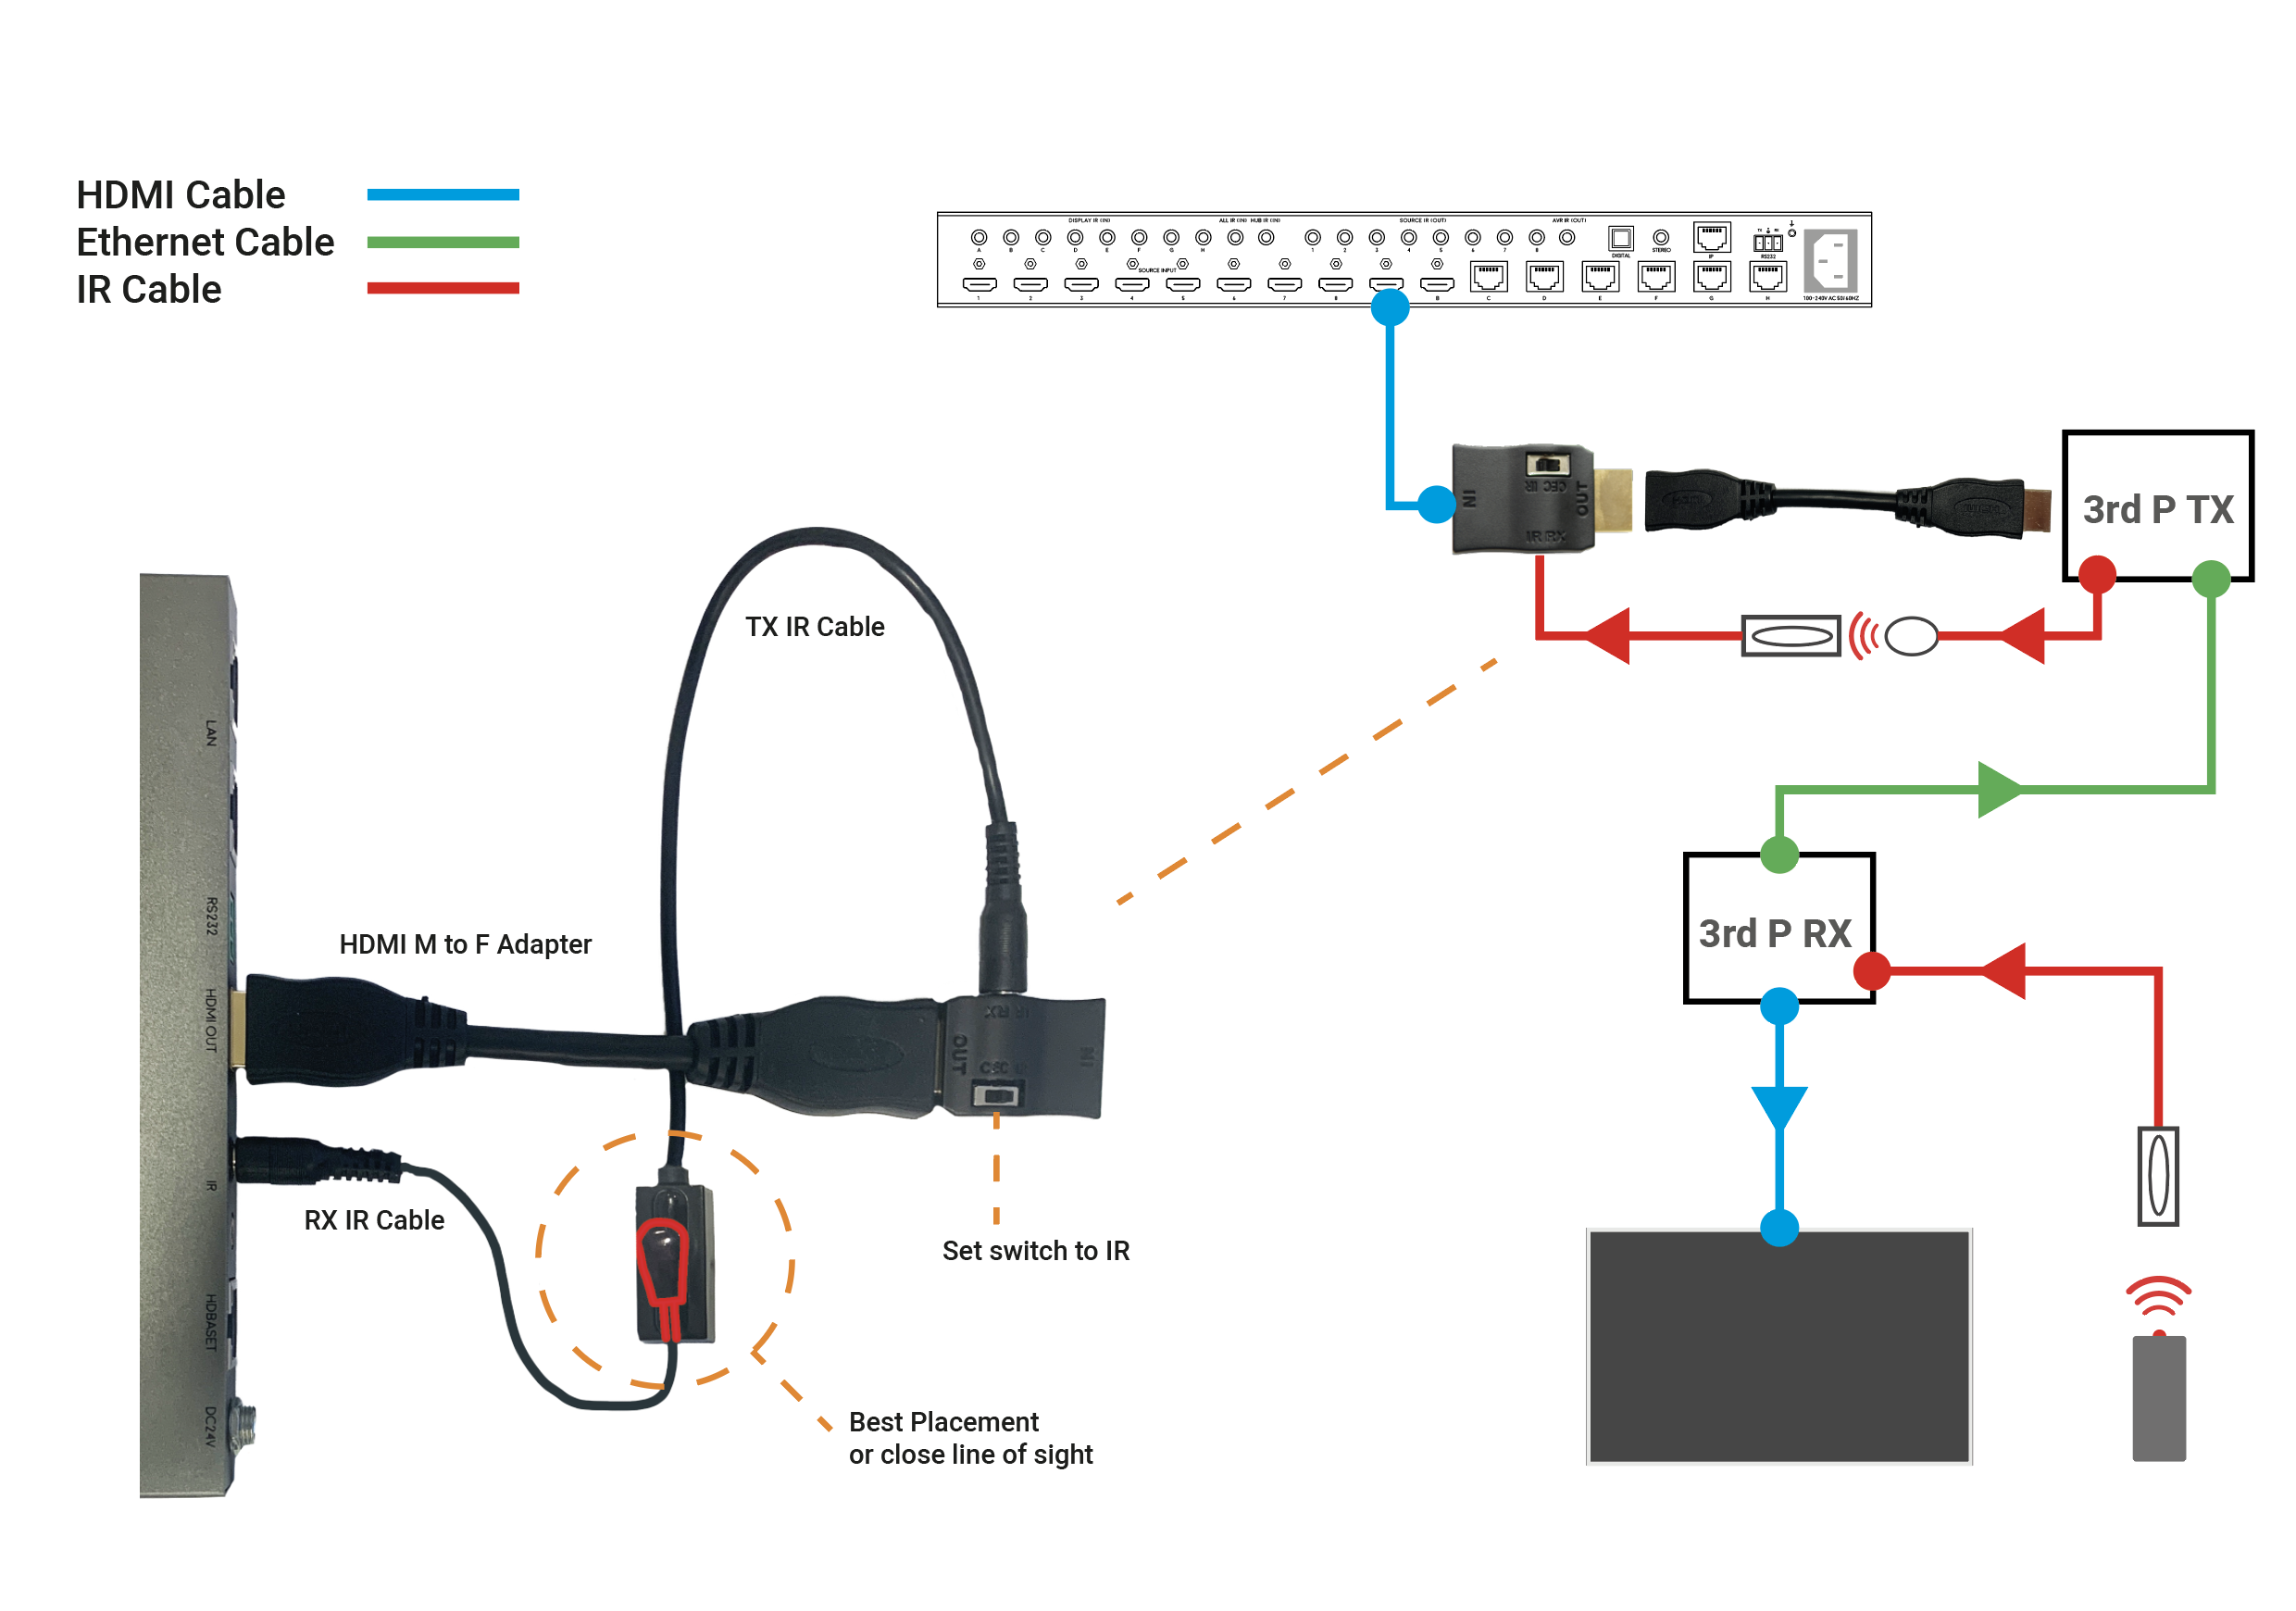
b) This second diagram shows how you would connect a HDA system to a 3RD PARTY extender or device such as a Harmony Remote by Daisy-chaining the IR transmitter from the 3RD party device and the IR receiver included with the MHUB system.
c) T

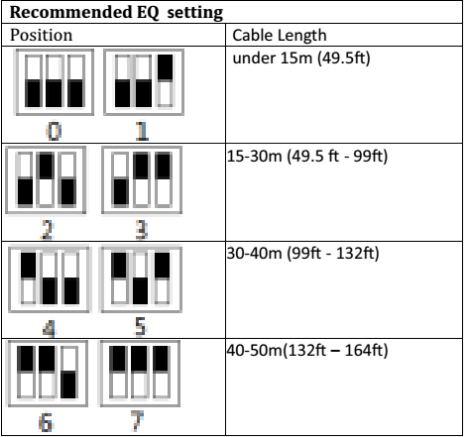
If you find that you have no picture or poor picture quality, you may need to adjust the EQ settings on your XTND 2K30 based on the approximate distance of your cable run. If you have any patch points add an additional 10% onto your effective distance. The below diagram shows the correct switch settings for various lengths of cable run. We suggest working from the maximum distance and working down if you are unsure of the length of your cable run.
Description
When I try to install the software, I receive this warning:
“The application has failed to start because its side-by-side configuration is incorrect. Please see the application event log for more detail.”
This issue is typically caused by a conflict between the program and one or more of the files in the C++ runtime libraries. These libraries are part of the Windows operating system and are used, and potentially updated, by installing or updating several Microsoft or other third party products.
If you are experiencing this error when launching or installing the program, and if the program repair option does not resolve the issue, the most effective method to correct this error is to uninstall and reinstall any Microsoft Visual C++ installations currently available on your computer before proceeding with the installation.
To uninstall all current Microsoft Visual C++ installations
Open the Control Panel and locate the list of programs.
Windows 8/10
From within the Start screen, type “Control Panel” and click on the Control Panel search result when it appears.
Select Programs and Features.
Windows 7/Vista
Click Start> Control Panel
If viewing categories, click Programs> Uninstall a Program
If viewing icons, click Programs and Features
Windows XP
Select Start> Control Panel> Add or Remove Programs
Scroll down to locate the Microsoft Visual C++ entries.
Select each one, starting from the top entry, and choose Uninstall.
Do this for each entry, until there are no more Microsoft Visual C++ entries listed.
To reinstall new Microsoft Visual C++ packages follow the instructions on this page –
Once every package has been downloaded and installed, restart Windows.
Finally, launch the program. If the error message persists after following all of these instructions, then please contact HDanywhere technical support on 01684 576348